Introduction
In Part 1 of this series, we looked at the Observable classes designed to wrap aribitrary Object values, and in Part II we looked at the typed Observable classes. In this article we are going to look at the Observables designed to hold ObservableLists.
This is a subject that always confused me. Aren’t ObserableLists already Observable? And doesn’t ObseravbleList already implement the Obseravble interface? So why wrap an ObservableList inside an Observable wrapper?
The whole thing, at first glance, seems very circular. We have an Observable that wraps an ObservableList and supports these same methods as ObservableList. What’s the point?
The point is that this turns out to be awesomely cool! And not just cool, but super useful, too. In this article we’ll first look at how ListProperty behaves, then we’ll look at how the various interfaces and classes go together, and then we’ll take a look at some practical examples.
And, by the way, everything about ListProperty is also true for MapProperty and SetProperty too.
ObservableList Observables in Action
The reality is, you’ve already used a Property that wraps an ObseravbleList if you have ever used TableView. That’s because the items field in TableView is an ObjectProperty<ObservableList<S>>. But it’s highly unlikely that you’ve ever used this as a Property, meaning that you’ve probably never put a Listener on it or bound it to or from anything. And even then, ObjectProperty<ObservableListe<S>> is still not ListProperty<S>, which is where the real coolness lies.
We should have a closer look at what this does.
The best way to figure out the value of List Obseravbles is to see one in action…
The Basic Scenario
Here’s a small program that can test how ObjectProperty<ObservableList<String>> works:
class Example1 : Application() {
    @Throws(Exception::class)
    override fun start(primaryStage: Stage) {

        val mainScene = Scene(createContent(), 840.0, 700.0)
        primaryStage.scene = mainScene
        primaryStage.show()
    }

    private fun createContent(): Region = VBox(20.0).apply {
        val list1 = FXCollections.observableArrayList("abc", "def", "ghi")
        val list2 = FXCollections.observableArrayList("jkl", "mno")
        val messages = SimpleStringProperty("")
        val listProperty = SimpleListProperty(list1)
        listProperty.subscribe { oldVal, newVal ->
            messages.value += "Change -> Old: $oldVal  New: $newVal\n"
        }
        list1.subscribe { messages.value += "List1 Invalidated\n" }
        children += Label().apply {
            textProperty().bind(listProperty.sizeProperty().map { "List Size: $it" })
        }
        children += TextArea().apply {
            textProperty().bind(messages)
            prefHeight = 300.0
        }
        children += Button("Add Element to List1").apply {
            setOnAction {
                messages.value += "Add Element to List1 clicked\n"
                list1.add("xyz")
            }
        }
        children += Button("Swap to List2").apply {
            setOnAction {
                messages.value += "Swap List clicked\n"
                listProperty.set(list2)
            }
        }
        padding = Insets(30.0)
    }
}


fun main() = Application.launch(Example1::class.java)
Data-wise, we have two ObservableArrayLists<String> called list1 and list2, and a SimpleListProperty called listProperty. We start off with list1 loaded into listProperty.
On the screen, we have a Label() with its textProperty bound to listProperty.sizeProperty(). Then we have a TextArea with its textProperty bound to a StringProperty called messages.
We’ve added a Subscription to the listProperty to add a line to messages whenever its value changes. Then we’ve added a Subscription to list1 to tell us whenever it becomes invalidated.
Finally, we have two Buttons. The first adds a line to messages and adds a new element to list1. The second swaps list2 into listProperty after adding a line to messages so that we can tell when it was clicked.
Let’s see what happens. First we’ll click the first Button a couple of times:
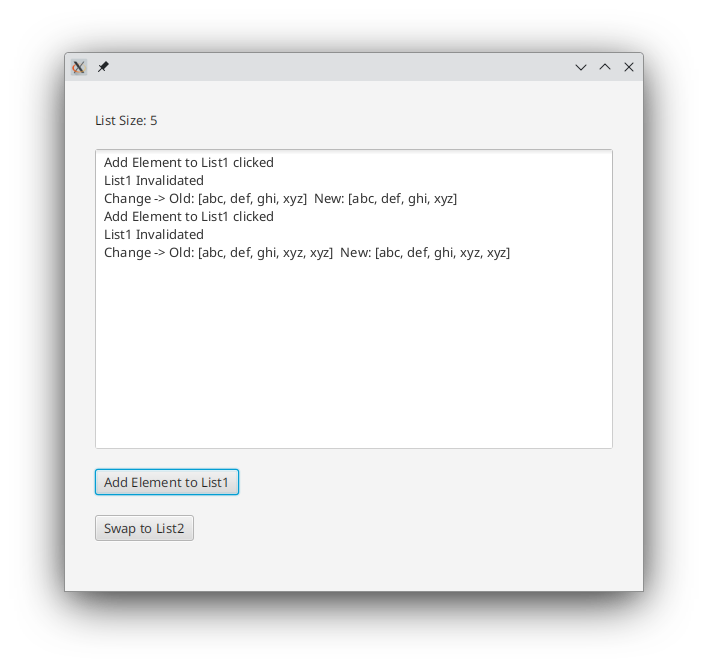
You can see that the list size of 5 matches the size of list1 which is still loaded into listProperty. You can see the two messages from clicking the first Button twice, and you can see the two “Invalidation” messages from the Listener on list1.
The really interesting part is that you can see the messages from the Subscription on listProperty. But we didn’t change the value of listProperty!
This tells us the changes to the ObseravbleList in a ListProperty trigger a change in the ListProperty itself! But you can see that both oldVal and newVal are still the same thing. So it’s not like we get a snapshot of what the ObservableList looked like before and after the change.
Then we’ll click on the second Button and then the first Button a few more times:
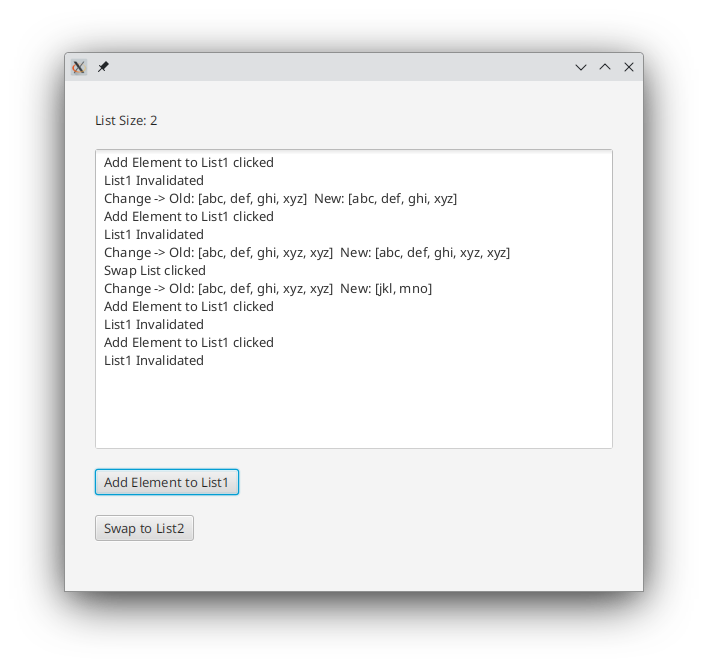
You can see the message where the second Button was clicked, and then the Subscription message. Now we have different values for oldVal and newVal. You can also see that the listProperty.sizeProperty() has changed from the Label at the top.
Next the first Button was clicked twice more, and you can see the messages from the Invalidation Subscription on list1. Interestingly, even though we haven’t done any getValue() operations on list1 it seems to be revalidating itself, because the second click also triggered the Subscription.
Adding a ListChangeListener
There’s another thing we can try. ListProperty supports ObseravbleList.addListener(ListChangeListener) which will show us actual changes.
Let’s see if we swap out the Subscription on listProperty with one of those:
listProperty.addListener(ListChangeListener { change ->
    messages.value += "listProperty change: $change \n"
})
And we’ll add another Button to add an element to list2:
children += Button("Add Element to List2").apply {
    setOnAction {
        messages.value += "Add Element to List2 clicked\n"
        list2.add("xyz")
    }
}
And this is what happens:
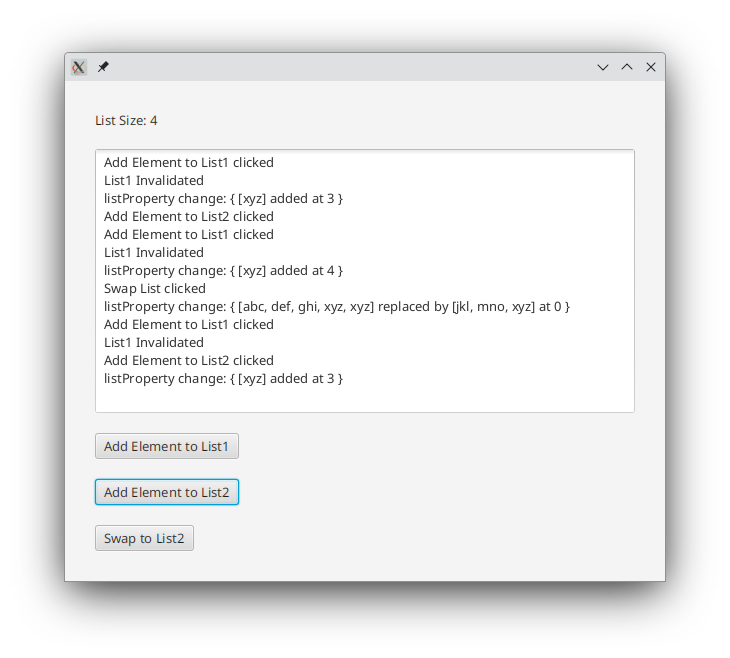
We start off by clicking on the first Button and we see list1 invalidated and the ListChangeListener on listProperty fires and adds its message. Then we click on the Button to add an element to list2, which generates no new messages other than the Button click message. We click the first Button again, and see all the messages that we expect to see.
Then we click the “Swap” Button and we see the ListChangeListener on listProperty fire again! It tells us that the entire ObseravbleList has been changed by showing us the elements (all of them) being replaced. Notice that this is fundamentally different from the way that the old Subscription worked by showing us the change in the wrapper value.
Next, the first Button was clicked again. This generated the click message, and the list1 invalidation message, but no messages from the ListChangeListener. So we can see that the ListChangeListener didn’t just get passed on down to list1 through listProperty.
Finally, the Button to add an element to list2 was clicked. We see the click message, and then a message from the ListChangeListener on listProperty, telling us that a new element was added to listProperty.
Adding Elements to the Wrapper Observable
ListProperty also supports the List.add() method. What happens if we try that.
We’ll change the “Add to List1” Button to add to listProperty instead. Then we’ll take away “Add to List2” and put an Invalidation Subscription on list2:
children += Button("Add Element to listProperty").apply {
    setOnAction {
        messages.value += "Add Element to listProperty clicked\n"
        listProperty.add("xyz")
    }
}
Let’s see what happens:
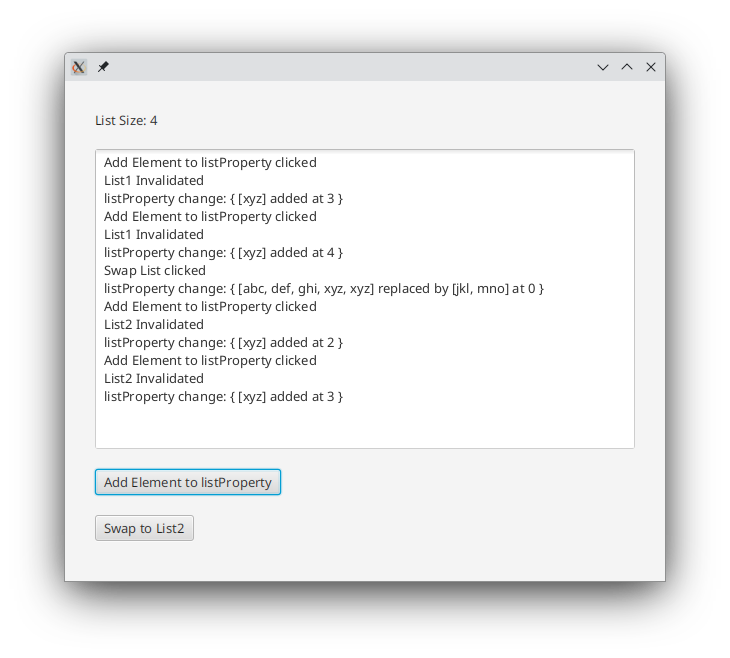
You can see the “Add” Button is clicked twice, and we get the messages that we would expect; list1 is invalidated and the change on listProperty is shown both times.
Then the “Swap” Button is clicked and we see the click message and the change of all of the elements in listProperty displays. No InvalidationListeners fire.
Finally the “Add” Button is clicked twice more and we see that list2 is invalidated and the change on listProperty displays twice.
What This Means
In our examples, we see how a ListProperty acts exactly like a Property<ObseravbleList> but also exactly like the ObservableList that is currently in its value.
Now let’s take a look at how all of the classes and elements hook up together…
The List Classes and Interfaces
We’ll start off with the chart, which looks quite a bit like the charts from the first two parts of this series:
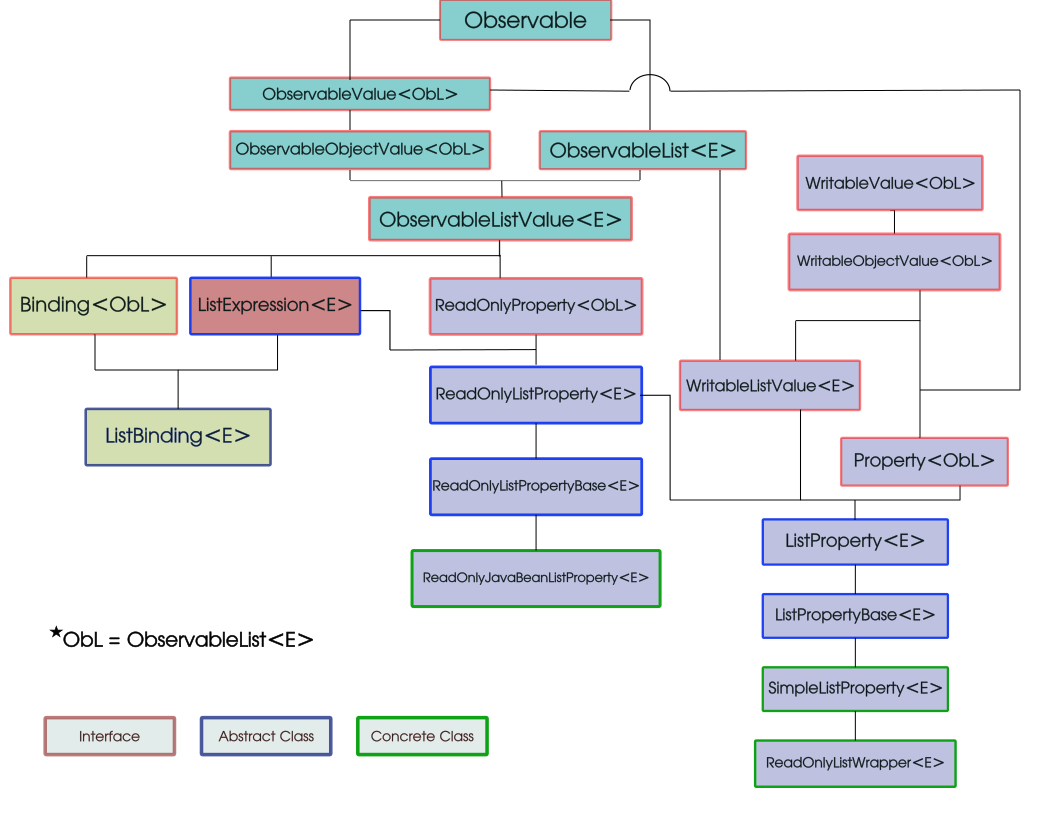
Here you can see that all of the generic <T>’s have been replaced with <ObservableList<E>> and the typed entries are of <E>. I’ve used ObL as a shorthand for ObservableList<E> to avoid having to use a tiny, tiny font.
Understand, though, that there is no interface called ObservableValue<ObservableList<E>>, it’s just ObservableValue<T> with the <T> resolved as a <ObservableList<E>>. The same holds true for all of the other entries on the chart defined with <ObL>.
This chart is a little bit more complicated in its relationships because of the dual base interfaces; ObservableValue and ObservableList. However, you can see that every entry with “List” in its name implements ObservableList, while those without it do not. For instance, WritebleListValue implements ObservableList, while Property does not.
The Interfaces
We’ll start with the interfaces. Some of the descriptions are a little bit stripped down from what you’ll see in Part 1. I want this article to be complete within itself, but I don’t want to repeat a lot of information that you can find in Part 1.
Observable & ObservableValue<ObservableList<E>>
At the top of the chart, you’ll find the interface, Observable. You’ll notice that it is not typed at all, it’s not even a generic. That’s because all of its methods do not deal with data.
This is the root for all of the other classes and interfaces, but it’s really quite simple and only defines three methods: addListener(), removeListener() and subscribe(). These are all related to the process called “Invalidation”.
The next interface down is ObservableValue<ObservableList<E>>, which extends Observable. The key method in this interface is ObservableValue.getValue(), which allows us to actually read the value and will re-validate the Observable.
Now that we can read the value we can have the methods related to ChangeListeners, including those related to Subscriptions. The other methods it adds are the map() and flatMap() methods used for transforming an ObservableValue into a different ObservableValue.
There is also the ObservableObjectValue<ObservableList<E>> interface, which introduces the get() method, which at this point is effectively identical to getValue().
ObservableListValue<E>
ObservableListValue is where the List Observables start to get very different from the other typed Observables. This interface extends ObservableObjectValue<ObservableList<E>>, as expected, but it also implements ObservableList<E>. Unlike, for instance, ObservableStringValue, it’s not just a placeholder entry that you can treat the same as ObservableObjectValue<ObservableList<E>>.
This is the place on the chart where ObservableValue takes on the characteristics of ObservableList. In addition to the getValue and the two types of Listener methods we also ListChangeListener methods along with all of the methods in List, Collection, and Iterable. There are some extra methods for manipulating lists as well; setAll(), addAll(), and removeAll().
Finally, we get filtered() and sorted() which generate FilteredList and SortedList.
ReadOnlyProperty<ObservableList<E>> & WritableValue<ObservableList<E>>
These are the two parent interfaces for all of the Property classes.
ReadOnlyProperty<ObservableList<E>> simply introduces the getBean() and getName() methods. These are presumably meaningful methods if you are serializing your Properties.
The interface WritableValue<ObservableList<E>> gives us the setValue() method. Now we can actually put something into an Observable!
WritableObjectValue<ObservableList<E>> and WritableListValue<E>
WritableObjectValue<ObservableList<E>> adds the set() method, which, for String types is identical to setValue().
WritabaleListValue<E> is an extension of WritableObjectValue<ObservableList<E>> that adds no methods but does also implement ObseravbleList<E> (even though it has no actual implementations of its methods). So an object passed as WritebleListValue<E> can be treated as if it was an ObseravbleList<E>.
Property<ObservableList<E>>
The Property<ObseravbleList<E>> interface extends WritableObjectValue<ObseravbleList<E>> and adds the ability to bind to other observables. We get bind() and bindBidirectional(), and their corresponding unbinding methods. Also there is the isBound() method that will tell us if the Property has been bound to something.
Notice, though, that it does NOT implement or extend WritebleListValue<E> so it cannot be treated like an ObseravbleList<E>.
Binding<ObservableList<E>>
Binding<ObservableList<E>> is the last interface on the chart. It extendsObservableValue<ObservableList<E>> adding a method to force the Binding to invalidate, a method to check if the Binding is valid and a method to get the dependencies of the Binding.
The Classes
Everything else on the chart is a class, let’s take a look at them.
ListExpression<E>
This is the root class for all of the Property<ObservableList<E>> classes, even though the diagram goes diagonally down to ObjectProperty<ObservableList<E>>. Note that ListExpression<E> is a drop-in replacement for ObjectExpression and does not extend or implement ObjectExpression
This is the only class in the chart that introduces new concrete methods that don’t implement methods already defined by any of the interfaces in the chart.

ListExpression is where the implementation of the methods for ObservableList happens.
This class provides the core functionality for the “Fluent API” for creating List bindings. In truth, this isn’t much. There’s the expected isNull() and isNotNull(), along with isEqualTo() and isNotEqualTo(). There are also two versions of valueAt() which returns an ObjectBinding<E>, one of these takes as static index value, the other an ObservableIntegerValue.
Beyond that there are emptyProperty() and sizeProperty(). We saw sizeProperty() used in our test example above. This alone could be a reason to use a ListProperty.
But more importantly, ListExpression<E> is an abstract class that implements all of the List and ObservableList methods, essentially turning ListExpression into an implementation of ObservableList.
ReadOnlyListProperty<E>
This class extends ListExpression and implements ReadOnlyProperty. This class can also be thought of as very much like ReadOnlyProperty but with the ability to use the Fluent API with it to create bindings.
ListProperty<E>
The best way to think about ListProperty<E> is an implementation of Property<ObservableList<E>> but, since it inherits from ListExpression<E> through ReadOnlyListProperty<E>, it also has the methods for creating bindings via the Fluent API, and the methods to implement ObservableList<E>. However, it only has implementations for bidirectional binding and setting the value.
This is, however, a great class to declare your instantiated Properties as. Like this:
val someProperty : ListProperty<String>= SimpleListProperty(FXCollections.observableArrayList("abc", "def"))
ListPropertyBase<E>
This class adds almost all the remaining methods defined in the various interfaces up hierarchy. We get methods to bind and unbind, add and remove Listeners and a get() method.
The methods that are missing are the two silly Java Bean related methods. This is the class that you probably want to extend from if you want to create your own Property classes, especially if you want to ignore Java Bean stuff as much you can.
SimpleListProperty<E>
This is the only class in the chart that you can directly instantiate, so everybody is familiar with it. It adds the getBean() and getName() methods and the infrastructure and constructors to set their values.
ReadOnlyListPropertyBase<E> and ReadOnlyListWrapper<E>
ReadOnlyListPropertyBase<E> is very similar to ListPropertyBase<E> in that it is an abstract class that has almost all of the interface methods implemented except for the “Bean” methods. It’s also missing the get() method.
The only “only out of the box” implementation of ReadOnlyListPropertyBase<E> is contained in ReadOnlyListWrapper<E>. This is a fairly involved topic that was covered in depth here in Part I.
ListBinding<E>
This is the sole class on the Binding side of the chart, and it’s abstract and it extends ListExpression<E> and implements Binding<ObservableList<E>>. Any utility (including the Fluent API) that creates List Bindings will do so by extending from this class.
It doesn’t add any new public methods but there are a few protected methods that are the framework for custom Binding classes. We get bind() and unbind() to start with. We also get allowValidation(), onInvalidating() and isObserved(). There is one abstract method, and that’s computeValue() which is also protected.
The intention is clear about the standard use case for custom classes extended from ListBinding<E>. It’s that the Observables to be bound are defined when the class is instantiated and that you’ll also define a computeValue() method that will use those bound values to determine the return value of any calls to get() or getValue().

Note that computeValue() is only called when a call is made to get() or getValue() when the Binding has been invalidated.
Since ListBinding extends from ListExpression you can use the Fluent API with it, and you can treat it just as though it was an ObservableList.
Using this Information
At some point during this article, you should have had an, “Oh! Wow!” moment. I know I did when I was writing it.
If you didn’t, then consider this: ListProperty<E> can be used any place that you can use ObservableList<E>.
Any place.
Let’s look at the ramifications of this…
In your Presentation Model
For years I’ve been saying that if you are using the “set” methods for Nodes than have values, then you’re doing it wrong. You shouldn’t be calling setText() or setValue() or setSelected(). Use should be using textProperty().bind(), valueProperty().bind() and selectedProperty().bind().
Yet, I’ll still call ListView.setItems() or TableView.setItems(). It never even occurred to me that there was another way. But if I declare my ObservableLists as Properties in my Model, then I can do the same binding operation:
class Model {
   val someStuff : ListProperty<String> = SimpleListProperty<String>(FXCollections.observableArrayList("abc", "def"))
}
and then I can do this:
listView.itemsProperty().bind(model.someStuff)
But here’s the cool part, I can ignore the Property nature of model.someStuff if I want. Like this:
model.someStuff.add("hjk")
listView.setItems(model.someStuff)
And it will still work.
But what’s the big deal? What’s the difference?
If I declare model.someStuff as an ObservableList<String>, then I have to use listView.setItems(model.someStuff). And then, if I want to change the list in the business logic, I have to clear out model.someStuff and replace its contents with new items. But, if I declare it as a ListProperty<String>, I not only have the ObservableList methods, but I also have Property methods. So now I can do this:
model.someStuff.set(someOtherObseravbleList)
and the ListView will automatically change.
But wait!! There’s more!
This will still work, even if I used listView.setItems(model.someStuff)! Wrap your brain around that.
As a Binding
Let’s look at this some more. But now we’ll use a ListBinding. Here’s something close to the examples we started out with:
class Example1 : Application() {
    @Throws(Exception::class)
    override fun start(primaryStage: Stage) {
        val mainScene = Scene(createContent(), 600.0, 500.0)
        primaryStage.scene = mainScene
        primaryStage.show()
    }

    private fun createContent(): Region = VBox(20.0).apply {
        val list1 = FXCollections.observableArrayList("abc", "def", "ghi", "123")
        val list2 = FXCollections.observableArrayList("jkl", "mno")
        val listProperty1 = SimpleListProperty(list1)
        val listProperty2 = SimpleListProperty(list2)
        val listBinding = object : ListBinding<String>() {
            init {
                super.bind(listProperty1, listProperty2)
            }

            override fun computeValue(): ObservableList<String> =
                if (listProperty1.size >= listProperty2.size) listProperty1 else listProperty2
        }
        children += ListView<String>().apply {
            itemsProperty().bind(listBinding)
        }
        children += Button("Add Element to list2").apply {
            setOnAction {
                listProperty2.add("xyz")
            }
        }
        padding = Insets(30.0)
    }
}


fun main() = Application.launch(Example1::class.java)
Now, we’ve added a ListView with its itemsProperty() bound to a ListBinding. The Binding is dependent on two ListProperties and will return whichever one is the biggest. At the beginning, list1 has 4 elements and list2 has 2 elements. The Button now adds an element to list2 with each click. Here’s how it starts out:
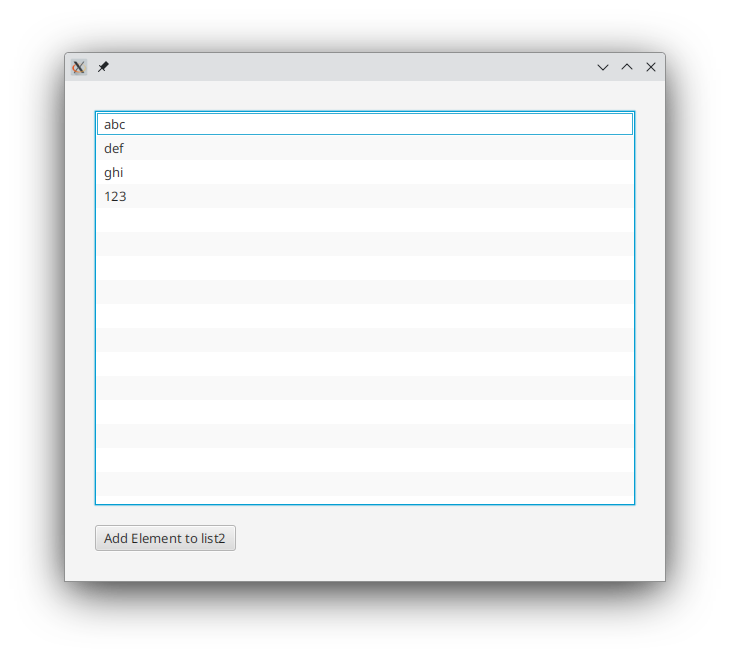
And here’s what it looks like after 3 clicks:
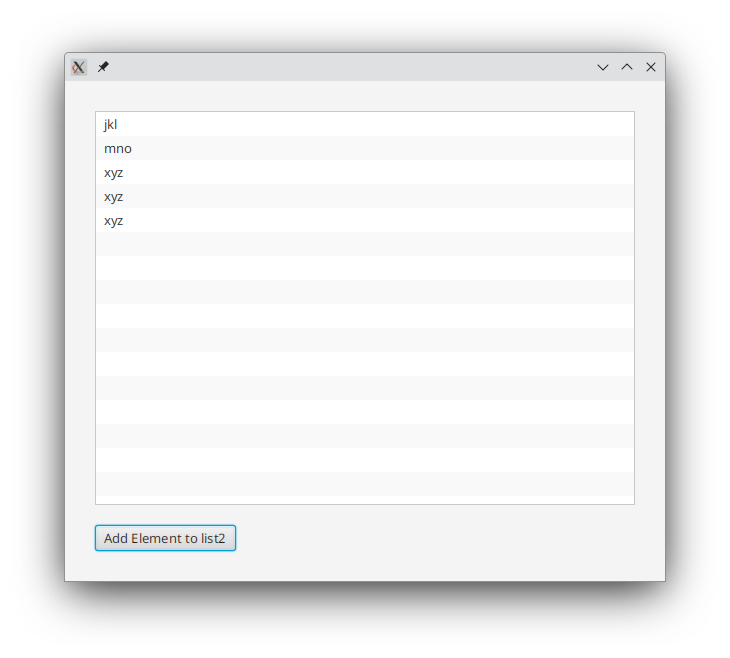
And it works exactly the same if we use setItems(listBinding) instead of itemsProperty().bind(listBinding).
But Wait!!! There’s more!
Remember that ObservableList implements Observable. And what does Observable define? Invalidation!! And, of course, invalidation is the core element of binding. Which means that we can do this:
class Example1 : Application() {
    @Throws(Exception::class)
    override fun start(primaryStage: Stage) {
        val mainScene = Scene(createContent(), 600.0, 500.0)
        primaryStage.scene = mainScene
        primaryStage.show()
    }

    private fun createContent(): Region = VBox(20.0).apply {
        val list1 = FXCollections.observableArrayList("abc", "def", "ghi", "123")
        val list2 = FXCollections.observableArrayList("jkl", "mno")
        val listBinding = object : ListBinding<String>() {
            init {
                super.bind(list1, list2)
            }

            override fun computeValue(): ObservableList<String> =
                if (list1.size >= list2.size) list1 else list2
        }
        children += ListView<String>().apply {
            itemsProperty().bind(listBinding)
        }
        children += Button("Add Element to list2").apply {
            setOnAction {
                list2.add("xyz")
            }
        }
        padding = Insets(30.0)
    }
}


fun main() = Application.launch(Example1::class.java)
Which will work exactly the same as the previous example. What happens is that each time we add an element to list2 it invalidates. This causes listBinding to invalidate, and then computeValue() will eventually get called, revalidating both listBinding and list2.
Linked ComboBoxes
One last example of this, because it does come up quite often…
What if you have two ComboBoxes and the selection list in the second one depends on the selection in the first? Here’s how I’d do this now…
class Example2 : Application() {
    @Throws(Exception::class)
    override fun start(primaryStage: Stage) {
        val mainScene = Scene(createContent(), 320.0, 300.0)
        primaryStage.scene = mainScene
        primaryStage.show()
    }

    private fun createContent(): Region = HBox(20.0).apply {
        val birds = FXCollections.observableArrayList("Robin", "Starling", "Woodpecker", "Blue Jay")
        val fish = FXCollections.observableArrayList("Goldfish", "Carp", "Bass", "Perch")
        val rodents = FXCollections.observableArrayList("Rat", "Mouse", "Capybara", "Chipmunk")
        val selectionList = FXCollections.observableArrayList("Birds", "Fish", "Rodents")
        val selectedType = SimpleStringProperty("")
        val listBinding = object : ListBinding<String>() {
            init {
                super.bind(selectedType)
            }

            override fun computeValue(): ObservableList<String>? = when (selectedType.value) {
                "Birds" -> birds
                "Fish" -> fish
                "Rodents" -> rodents
                else -> null
            }
        }

        children += ComboBox<String>().apply {
            items = selectionList
            selectedType.bindBidirectional(valueProperty())
        }
        children += ComboBox<String>().apply {
            itemsProperty().bind(listBinding)
        }
        padding = Insets(30.0)
    }
}


fun main() = Application.launch(Example2::class.java)
We have three lists; birds, fish and rodents which might be loaded into the items of the second ComboBox. The first ComboBox basically has a list of the lists, and its valueProperty() is bound to selectedType. There is a ListBinding which is dependent only on selectedType and its computeValue() method will return one of the three other lists based on the value in selectedType. The Kotlin when() statement is equivalent to a variant of the Java switch statement.
Unfortunately, I can’t get screenshots with ComboBoxes open, but the screen starts looking like this:
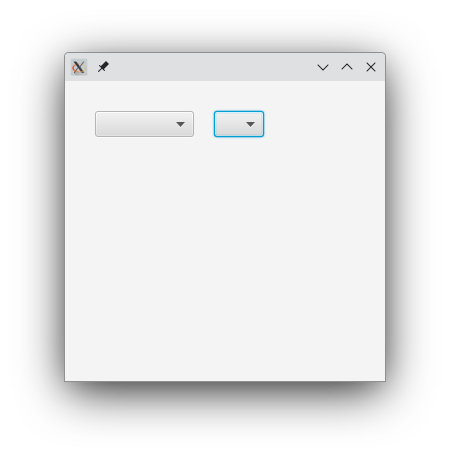
Where you can see that the second ComboBox is very small, as it has an empty list of items. And then after picking “Rodents”:
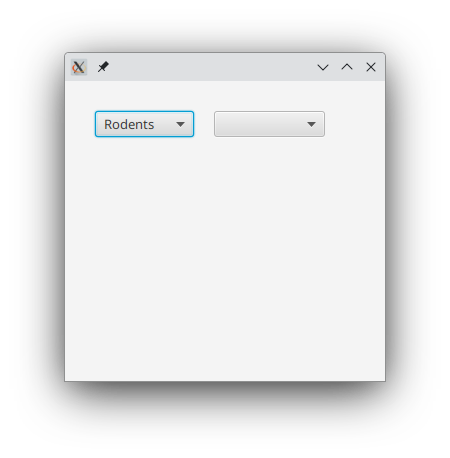
Where it’s now bigger because it has items in its list.
Here’s the thing. You can search the Web and StackOverflow.com and you’ll find variations on this situation over and over. But I don’t think you’re going to find anything like this approach, no matter how hard you look. Because nobody seems to know about it.
Why not?
I had a look through the JavaDocs for the Bindings class. There are exactly zero methods in that class that return a ListBinding. The only way to do this is to write a custom ListBinding as I did.
Now, you could change listBinding so that it was ObjectBinding<ObservableList<String>> and the rest of the code in this example will work perfectly. That would let you use Bindings or the Fluent API and might be something that someone would stumble across. However, if you did that, it will NOT work with ComboBox.setItems(listBinding).
The fact that ComboBox.items is an ObjectProperty<ObservableList<E>>, isn’t particularly hidden, but the idea of ObservableLists wrapped in Properties pushes it into a different level of functionality.
Conclusion
I think that there are two really important take-aways from this article:
-
ListPropertycan be used anywhereObservableListcan be used.
There’s problably some very minor memory and performance hit to using ListProperty, as you need storage for things likesizeProperty()and all of the methods are delegated to the enclosedObseravbleList. But I doubt that any ordinary application is going to have any noticable impact. On the upside, you do get a lot of versatility that you didn’t have before.
As you can see from theComboBoxexample, usingListBindingorListPropertyallows you to do cool stuff while at the same time not creating dependencies in your client code. WithListBindingtheComboBoxexample worked whether the clientComboBoxwas aware it was getting an observable wrapper and usingitemProperty().bind(), or if it wasn’t and just usedsetItems(). This is a strong case for just implementing all of yourObseravbleListsasListPropertiesas a standard practice. -
ObservableListcan be treated just likeObservable.
This is something that seems to get missed all the time. When you think about using anObseravbleListyou immediately think aboutListChangeListenersand then dealing with the resultingListChangeListener.Changeobjects that it passes. But if you treat it asObseravblethen you can create aBindingwith it as a dependancy. If nothing else, this makes it trivial to createBindingsthat return the maximum, minimum or average value of anObservableListof numbers - something that appears incredibly hard otherwise.
When I started this series, I figured this Part III would be something I wrote just for the sake of completeness. But when I dug into the subject I discovered that this is one of those “hidden features” of JavaFX that everyone should know about and understand, but few people seem to - like TextFormatter.
Is it better/cooler/more useful that TextFormatter???
I think it just might be.