What is an Event?
An Event is a data object propagated by JavaFX in response to a trigger in the UI. It’s a signal that something of significance has happened, and gives the application a chance to react to that event.
Events are useful because they offer an opportunity to create imperative code that responds to something in the UI. As a Reactive framework, the functionality provided by Bindings and ChangeListeners provide the primary tools for connecting the View to the State in an application. However, there are times when imperative code is appropriate, such as when connecting to an external API, and Events provide that mechanism in JavaFX.
How Events Fit in the JavaFX Hierarchy
Event classes inherit methods and properties from these important classes:
- EventObject
- All
Eventsextend fromEventObjectwhich supplies theSourceproperty. - Event
- All
Eventsextend fromEventwhich provides thefire()andconsume()methods. - InputEvent
- This is the base class for input type
Events, likeMouseEvent
The version 16 JavaDocs for Event can be found here
Fields
Source & Target
Source is the Node that generated the EventHandler that’s running. Target is the Node that triggered the Event. In virtually all real use cases, these will be the same Node since the EventHandler is usually attached to the Node that triggered the Event.
EventType
This is a little more complicated.
While Events have Java types (such as ActionEvent and InputEvent), there is also a field called EventType and a getter, getEventType() that you should use to make decisions about handling different kinds of Events. This holds true even if the Java type of the Event has only one possible EventType - it will make your code cleaner.
EventType, however, is a generic class, parameterized over the Java type of the Event. This means that the actual class of the EventType will be something like EventType\<ActionEvent\>, or EventType\<MouseEvent\>. That can get a little ugly when you are passing the EventType to a method which accepts EventType from a variety of different Event classes. You’ll get warnings about using raw classes if you just define the method parameter as EventType.
Finally, the actual possible values of EventType are stored as static fields in the Event classes themselves. To check for a type of mouse Event you’ll need:
if (event.getEventType().equals(MouseEvent.MOUSE_CLICKED)) {}
Event Handlers
So, what do you do with an Event?
An Event indicates, as its name suggests, that something - some kind of event - has occurred, and it’s passed around as an object. In order to deal with an Event, you need to create an EventHandler.
An EventHandler is just a snippet of code which is designed to consume an Event of a specific type. It’s a functional interface that works very much like Consumer, it accepts a value and doesn’t return anything. Instead of having an accept() method, it has a handle() method, where it is passed the Event.
Submitted to the FXAT
The other really important aspect to remember is that all of the code inside, or called from an EventHandler is going to be executed on the FXAT. Furthermore, it’s going to be executed by submitting it to an “Event Queue”, meaning that its execution may be delayed. There is only one FXAT and the jobs are all executed in the order of submission, so there may be some delay before your EventHandler is executed, and significant code may run on the FXAT between the moment that the Event is fired, and the time that the EventHandler is executed. If multiple EventHandlers are defined to respond to the same event, there are specific rules which govern which will be executed first.
So how do you implement an EventHandler? There are a few ways:
Create a Custom class
EventHandler is just an Interface, so any class which implements it and has a handle() method can be used as an EventHandler. Probably the most useful case for this would be if you had some kind of data that was persistent between invocations of handle() or that needed to be initialized via a constructor when the EventHandler was defined.
Here’s an example that uses a custom class to track a counter as part of the EventHandler class. At instantiation, the EventHandler is passed an IntegerProperty as the counter value, and an int as the increment value. Each time that handle() is invoked it adds the increment to the property, which is bound to the Text property of the Button.
public class EventClassExample extends Application {

    public static void main(String[] args) {
        launch(args);
    }

    private final IntegerProperty count1 = new SimpleIntegerProperty(10);
    private final IntegerProperty count2 = new SimpleIntegerProperty(20);

    @Override
    public void start(Stage primaryStage) {
        HBox hbox = new HBox(10, createCounterButton(count1, 1), createCounterButton(count2, 2));
        hbox.setPadding(new Insets(30));
        primaryStage.setScene(new Scene(hbox));
        primaryStage.show();
    }

    private Node createCounterButton(IntegerProperty count, int increment) {
        Button button = new Button("Fetch");
        Counter counter = new Counter(count, increment);
        button.textProperty().bind(Bindings.createStringBinding(() -> Integer.toString(count.get()), count));
        button.setOnAction(counter);
        return button;
    }
}

class Counter implements EventHandler<ActionEvent> {

    private final IntegerProperty count;
    private final int increment;

    public Counter(IntegerProperty count, int increment) {
        this.count = count;
        this.increment = increment;
    }

    @Override
    public void handle(ActionEvent event) {
        count.set(count.get() + increment);
    }

    public ReadOnlyIntegerProperty counterProperty() {
        return count;
    }
}
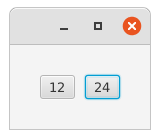
And when it runs, it looks like this:
Create an Anonymous Inner class
Prior to the introduction of Lambdas, this was the “normal” way to create an EventHandler. It can get a bit bulky if you in-line the class definition inside the method assigning it to the Node.
Here’s the same example as before, but using an anonymous inner class:
public class InnerClassExample extends Application {

    public static void main(String[] args) {
        launch(args);
    }

    private final IntegerProperty count1 = new SimpleIntegerProperty(10);
    private final IntegerProperty count2 = new SimpleIntegerProperty(20);

    @Override
    public void start(Stage primaryStage) {
        HBox hbox = new HBox(10, createCounterButton(count1, 1), createCounterButton(count2, 2));
        hbox.setPadding(new Insets(30));
        primaryStage.setScene(new Scene(hbox));
        primaryStage.show();
    }

    private Node createCounterButton(IntegerProperty count, int increment) {
        Button button = new Button("Fetch");
        button.textProperty().bind(Bindings.createStringBinding(() -> Integer.toString(count.get()), count));
        EventHandler<ActionEvent> counter = new EventHandler<>() {
            @Override
            public void handle(ActionEvent event) {
                count.set(count.get() + increment);
            }
        };
        button.setOnAction(counter);
        return button;
    }
}
Of course, you can define the inner class in-line when the ActionHandler is set:
private Node createCounterButton(IntegerProperty count, int increment) {
    Button button = new Button("Fetch");
    button.textProperty().bind(Bindings.createStringBinding(() -> Integer.toString(count.get()), count));
    button.setOnAction(new EventHandler<ActionEvent>() {
        @Override
        public void handle(ActionEvent event) {
            count.set(count.get() + increment);
        }
    });
    return button;
}
Use a Lambda Expression
Since EventHandler is a Functional Interface, you can define it with a Lambda expression. This can provide a really compact way to declare a handler, especially if you stick to the in-line form of lambda and just use it as a way to invoke code in a separate method.
Here’s the same example from the Anonymous Inner Class section, but turned into a Lambda
public class LambdaExample1 extends Application {

    public static void main(String[] args) {
        launch(args);
    }

    private final IntegerProperty count1 = new SimpleIntegerProperty(10);
    private final IntegerProperty count2 = new SimpleIntegerProperty(20);

    @Override
    public void start(Stage primaryStage) {
        HBox hbox = new HBox(10, createCounterButton(count1, 1), createCounterButton(count2, 2));
        hbox.setPadding(new Insets(30));
        primaryStage.setScene(new Scene(hbox));
        primaryStage.show();
    }

    private Node createCounterButton(IntegerProperty count, int increment) {
        Button button = new Button("Fetch");
        button.textProperty().bind(Bindings.createStringBinding(() -> Integer.toString(count.get()), count));
        button.setOnAction(event -> count.set(count.get() + increment));
        return button;
    }
}
Slightly better, IMHO, is to put the actual work into a method and simply invoke it from the EventHandler:
public class LambdaExample1 extends Application {

    public static void main(String[] args) {
        launch(args);
    }

    private final IntegerProperty count1 = new SimpleIntegerProperty(10);
    private final IntegerProperty count2 = new SimpleIntegerProperty(20);

    @Override
    public void start(Stage primaryStage) {
        HBox hbox = new HBox(10, createCounterButton(count1, 1), createCounterButton(count2, 2));
        hbox.setPadding(new Insets(30));
        primaryStage.setScene(new Scene(hbox));
        primaryStage.show();
    }

    private Node createCounterButton(IntegerProperty count, int increment) {
        Button button = new Button("Fetch");
        button.textProperty().bind(Bindings.createStringBinding(() -> Integer.toString(count.get()), count));
        button.setOnAction(event -> incrementCounter(count, increment));
        return button;
    }

    private void incrementCounter(IntegerProperty counter, int increment) {
        counter.set(counter.get() + increment);
    }

}
Types of Events
In addition to the types listed below, there are a handful of very specific Event types, like TreeTableView.EditEvent, which are best examined in the context of an article about specific JavaFX Node classes. The following are the common Event types that you might need to deal with:
The ActionEvent
The ActionEvent is probably the mostly commonly encountered event, as it’s the one that’s triggered by Buttons and CheckBoxes and their ilk. It’s also the simplest kind of event, as it doesn’t have any data beyond its Source property. ActionEvents are installed on Nodes by calling their setOnAction() method.
Look at the samples from the EventHandlers section above. These all show how an ActionEvent triggers a handler that does work without any specific reference to the Event that triggered it.
The MouseEvent
For MouseEvent and KeyEvent handlers, you are probably going to need to look at the Event itself since there is information in the Event which is going to be required in order to handle the Event. There are a number of different types of MouseEvent, and you can see the complete list in the JavaDocs.
“Drag and Drop” is a more complicated topic which requires its own article, so we’ll leave it for now.
Mouse Enter and Leave Events
These are the Events that are generated when the cursor enters or leaves a Node on the screen. There are two EventTypes, each with two flavours. They are MOUSE_ENTERED or MOUSE_ENTERED_TARGET and MOUSE_EXITED or MOUSE_EXITED_TARGET. The differences between the two flavours is only meaningful if you read and apply, “The Complicated Stuff”, below. Otherwise, you can use either flavour without seeing any differences in functionality.
Like most mouse based Events, there’s probably a better way in JavaFX to do whatever you are trying to do with MOUSE_ENTERED and MOUSE_EXITED. The “hover” pseudo-class in CSS might do what you need, or maybe a ToolTip.
Mouse Click and Button Events
There are three types of Events in this category, MouseClicked, MousePressed and MouseReleased. MouseClick is the Event generated by a complete press-release cycle on a mouse button. The source is whatever Node the cursor was over when the Event happened.
The most common use for these MouseEvents is when a Node doesn’t have an OnAction() method, or where you need to check for alternate mouse button usage. To that end, there are two important methods in the MouseEvent
- getButton()
- This will tell you which button was clicked/pressed/released. It is of type MouseButton, with the most important values being
PRIMARY,SECONDARYandMIDDLE. - getClickCount()
- This will tell you how many times the button was clicked to generate the
Event.
There are also methods to tell if <Ctrl>, <Alt>, <Shift> and a few other modifying keys were pressed when the Event was generated.
The KeyEvent
KeyEvents are used to capture keystrokes that occur in a Node. Just like the mouse based Events, there are three kinds of events one for key pressed, one for key released and one for key typed - which is a press/release cycle on a key.
And also just like with mouse based Events there are methods that will tell you if <Ctrl>, <Alt>, <Shift> and a few other modifying keys were pressed when the Event was generated.
The main piece of information is the KeyCode, from the getCode() method in the KeyEvent. It will return you a value that can be found in this JavaDocs page.
The WorkerStateEvent
WorkerStateEvents are not called by Nodes but by Tasks and Services which are generally used to run code on a background thread. For the most part, these Events are used to get your code running back on the FXAT once the Task has been completed.
How to deal with Tasks and WorkerStateEvents will be covered in its own article.
The WindowEvent
WindowEvents are triggered by Window subclasses, the most important of which is Stage. There are three basic classes of WindowEvent types: Showing, Hiding and Closing. “Showing” and “Hiding” each have a before and after Event, while “Closing” has a single type WINDOW_CLOSE_REQUEST.
WIDOW_CLOSE_REQUEST is arguably the most useful as it is triggered whenever an external element (including the user) attempts to close the window. If not consumed by an EventHandler, this event will cause the window to close. The most common use of an EventHandler here is to perform operations like checking for unsaved data, showing an “Are you sure?” alert and possibly interrupting the window close.
Tips
View EventHandler as a Trigger
The presence of an EventHandler in your code seems to automatically make it more complex. Get your code out of the handle() method as soon as possible. If possible, treat the EventHandler as nothing more than a trigger to call some “regular” Java code outside of the EventHandler.
There’s rarely a reason for an ActionEvent handler to be anything other than an Expression Lambda. If you need to do something more complicated, then call a method and pass it any parameters it might need. Other types of Events may require a few lines of code to extract supplementary information from the Event, but any involved processing should happen in some other method.
Don’t Write “Dispatch” Event Handlers
I don’t know if there is something about FXML that makes this necessary, or if it’s just copypasta from some early (bad) tutorial that’s become ubiquitous. There are also lots of articles and tutorials answering the question, “How do I know which button was clicked?”.
In this pattern (anti-pattern, actually), the idea is to treat the triggering Node as data, extract it from the Event and then use if or switch statements to determine what to do.
Now, take a look at this horrible code:
public class DispatchHandlerExample extends Application {

    public static void main(String[] args) {
        launch(args);
    }

    private final IntegerProperty count = new SimpleIntegerProperty(10);
    private final EventHandler<ActionEvent> counter = new EventHandler<>() {
        @Override
        public void handle(ActionEvent event) {
            Button button = ((Button) (event.getTarget()));
            switch (button.getText()) {
                case "Ten" -> count.set(count.get() + 10);
                case "Twenty" -> count.set(count.get() + 20);
            }
        }
    };

    @Override
    public void start(Stage primaryStage) {
        primaryStage.setScene(new Scene(createContent()));
        primaryStage.show();
    }

    private Region createContent() {
        VBox results = new VBox(20);
        Label countLabel = new Label();
        countLabel.textProperty().bind(Bindings.createStringBinding(() -> Integer.toString(count.get()), count));
        results.setPadding(new Insets(30));
        Button buttonTen = new Button("Ten");
        Button buttonTwenty = new Button("Twenty");
        buttonTen.setOnAction(counter);
        buttonTwenty.setOnAction(counter);
        results.getChildren().addAll(countLabel, new HBox(10, buttonTen, buttonTwenty));
        return results;
    }
}
In this code there is just one EventHandler for the screen and all of the triggered Events are going to be funnelled through this single handler. The handler then figures out which Button triggered it and it will then update the counter accordingly.
In this case, the Text property of the Buttons is being used to determine which button was clicked. The cast to Button is problematic, also. It would also be possible to use Labeled instead, but this still excludes any Control that fires ActionEvent but doesn’t implement Labeled.
Shockingly, this is offered as a “good” method to achieve this in many tutorials, even though it creates a huge amounts of problems. It’s also possible to use the UserData field of Node to store a unique identifier which you can access from the EventHandler. This still ties the EventType to ActionEvent, so if you wanted to trigger the increment some other way, like by detecting each time the mouse moved into a Node, you’d need to create a new EventHandler.
No matter how it’s done, this is the most complicated approach to implementing the button clicks.
Consider this instead:
public class NotDispatchHandlerExample extends Application {

    public static void main(String[] args) {
        launch(args);
    }

    private final IntegerProperty count = new SimpleIntegerProperty(10);

    @Override
    public void start(Stage primaryStage) {
        primaryStage.setScene(new Scene(createContent()));
        primaryStage.show();
    }

    private Region createContent() {
        VBox results = new VBox(20);
        Label countLabel = new Label();
        countLabel.textProperty().bind(Bindings.createStringBinding(() -> Integer.toString(count.get()), count));
        results.setPadding(new Insets(30));
        Button buttonTen = new Button("Ten");
        buttonTen.setOnAction(evt -> incrementCount(10));
        Button buttonTwenty = new Button("Twenty");
        buttonTwenty.setOnAction(evt -> incrementCount(20));
        results.getChildren().addAll(countLabel, new HBox(10, buttonTen, buttonTwenty));
        return results;
    }

    private void incrementCount(int increment) {
        count.set(count.get() + increment);
    }
}
So the correct answer to, “How do I know which button triggered an EventHandler?”, is “Because each button has its own, unique, EventHandler”
Don’t Pass EventHandlers Between Classes
This is an easy trap to fall into, especially if you’re trying to add structure to your application and implement MVC or some other framework that separates processing from the UI.
An EventHandler is “processing”, right? So shouldn’t it be defined in the Controller and passed to the View?
Well, not so much.
An EventHandler is a UI element which provides an interface to facilitate processing. It belongs in the View.
The Complicated Stuff
This part is at the bottom because you shouldn’t even read it if any of the information above confused you. 99% of the time you don’t need to know anything below this line, and you can happily build JavaFX applications without even being aware of it.
Generally speaking, the source of an Event is usually the Node at which the EventHandler is defined. In other words, if you have, say, a Button and you want to capture its ActionEvent, you’ll call the setOnAction() method of that Button to install the EventHandler.
But it doesn’t have to be done that way!
The Event Chain
In virtually any case where you are going to encounter Events, the source of each Event is going to be contained inside of something else. And that something else might be contained in another Node, and so on, with everything eventually contained inside of a Scene which is in turn, contained inside a Stage.
Now, any number of those containing objects can have an EventHandler installed to respond to any Event generated by any of the Nodes contained inside them.
It’s even possible that one of those Nodes can swallow up the Event so that it never triggers the source Node's EventHandler!
The documentation makes a big deal about “Target Selection Phase”, but you can probably just assume that the “target” is going to be the source Node. It’s a fair bet.
Event Capturing Phase
The Event is actually passed to the containing Stage first, then to the Scene and then to the root Node of the Scene. After that it is passed to through the levels of containers until it reaches the target Node. Each one of those Nodes might have an EventHandler that would respond to the Event.
For the “Event Capturing Phase”, the EventHandlers are installed on the Nodes using the addEventFilter() method. A Node can have multiple EventFilters defined, and each EventFilter specifies the type of Event to which it will respond.
To make matters more complicated, the handlers for EventFilters use the same interface, EventHandler. You’ll see how this is confusing in the next section…
Event Bubbling Phase
If you image the “Event Capturing Phase” as travelling down the containing Nodes from the top, the “Event Bubbling Phase” is the reverse (I guess it “bubbles up”, back to the Stage). Starting with the target Node, it’s EventHandler will be executed (if there is one), and then the Event is passed to the Node containing the target, and so on, right back up to the Stage.
For the “Event Bubbling Phase”, EventHandlers are installed on Nodes using the addEventHandler() and setEventHandler(), as well methods like setOnAction(). If the target Node has both an EventFilter and an EventHandler, the EventFilter will be executed first.
An Example
public class ChainedEvents extends Application {

    public static void main(String[] args) {
        launch(args);
    }

    private final StringProperty text = new SimpleStringProperty("");

    @Override
    public void start(Stage primaryStage) {
        Scene scene = new Scene(createScene());
        primaryStage.setScene(scene);
        scene.addEventFilter(Event.ANY, evt -> logHandler("Filter", "Scene", evt));
        scene.addEventHandler(Event.ANY, evt -> logHandler("Handler", "Scene", evt));
        primaryStage.addEventFilter(Event.ANY, evt -> logHandler("Filter", "Stage", evt));
        primaryStage.addEventHandler(Event.ANY, evt -> logHandler("Handler", "Stage", evt));
        primaryStage.show();
    }

    private Region createScene() {
        BorderPane results = new BorderPane();
        addHandlers(results, "BorderPane");
        TextArea textArea = new TextArea();
        textArea.setStyle("-fx-font-family: 'monospaced';");
        textArea.textProperty().bind(text);
        textArea.setMinWidth(700);
        results.setRight(textArea);
        Button button = new Button("Click Me!");
        addHandlers(button, "Button");
        StackPane stackPane = new StackPane(button);
        addHandlers(stackPane, "StackPane");
        results.setCenter(stackPane);
        results.setMinHeight(800);
        return results;
    }

    private void addHandlers(Node node, String name) {
        node.addEventFilter(Event.ANY, evt -> logHandler("Filter", name, evt));
        node.addEventHandler(Event.ANY, evt -> logHandler("Handler", name, evt));
    }

    private void logHandler(String handlerType, String name, Event event) {
        if (event.getEventType().equals(MouseEvent.MOUSE_MOVED))
            return;
        if (event.getEventType().equals(MouseEvent.MOUSE_ENTERED_TARGET))
            return;
        if (event.getEventType().equals(MouseEvent.MOUSE_EXITED_TARGET))
            return;
        String time = LocalTime.now().format(DateTimeFormatter.ofPattern("hh:mm:ss:SSS"));
        String className = event.getTarget().getClass().getSimpleName();
        String formatted = String.format("%-13s %-15s %-20s %-10s %-15s", time, name, event.getEventType(), handlerType, className);
        System.out.println(formatted);
        text.set(formatted + "\n" + text.get());
    }

}
Which looks like this, when it runs and button is clicked:
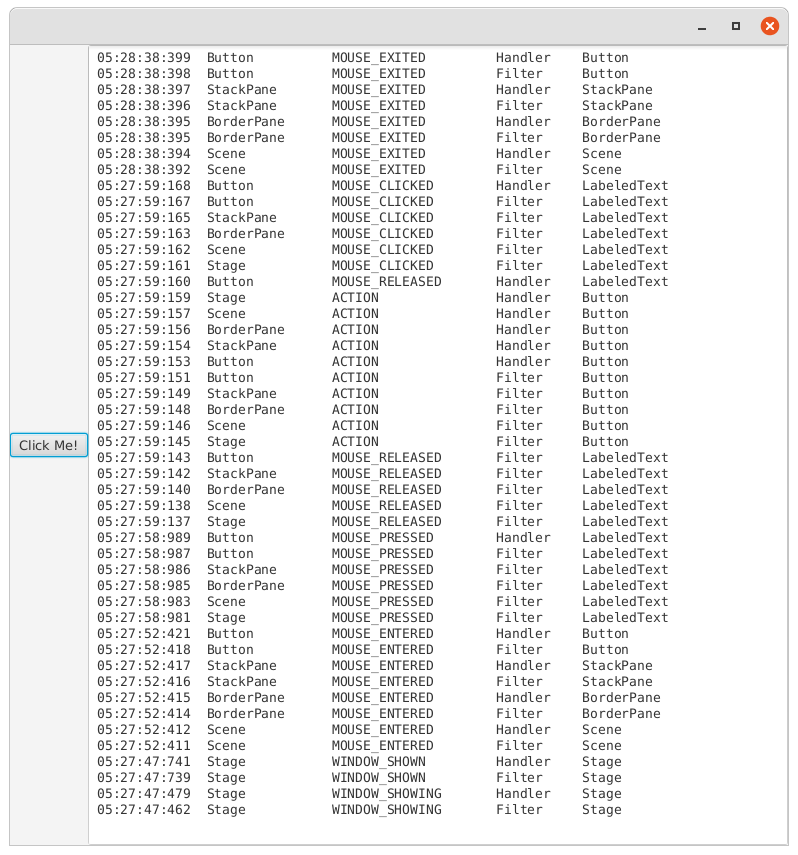
This is what’s going on here:
We have a Stage which holds a Scene which holds a BorderPane which holds a StackPane which holds a Button. That’s the chain of containers from the top down to the ActionEvent source. There are EventFilters and EventHandlers on every one of those objects, so that we can see how the Events are propagated and handled. The output in the TextArea is in reverse chronological order.
You should notice:
- There’s a lot of
Events, not just theButton ActionEvent. - The code to remove the mouse movement
Eventswas necessary to prevent there being just too much output. - At 5:27:58 the chain for the click on the
Buttonstarts, withMOUSE_PRESSEDcaught by theStagefilter. - The
Button ActionEventstarts when the mouse button is released. - The
MOUSE_RELEASEDhandler on theButtonseems to happen after theActionEventhas been handled by all of the objects. - There are three mouse based
Events:MOUSE_PRESSED,MOUSE_RELEASEDandMOUSE_CLICKED. They appear to be independent from theButton'sActionEvent. - All of mouse based
Eventsappear to be consumed by theEventHandleron theButton, since they don’t bubble up any further. - The mouse based
Eventsall have a target ofLabeledText. This is because I clicked right on the middle of theButton, on the words “Click Me!”.Buttonis just aRegionand it containsNodesinside it to hold the contents. The mouse clicks targeted these innerNodesofButton. - Look at the
MOUSE_ENTERED Events. The mouse enters all of the Nodes fromScenetoButtonin one movement, and it seems to handle each of those separately, without passing through a successively longer chain for each source, which makes sense.
Event Consumption
The last twist is that any one of those EventFilters or EventHandlers on any of those Nodes can invoke the consume() method on the Event and swallow it up. This prevents any other Nodes further along the “Capture” and “Bubbling” phases from seeing the Event.
I took the code above and changed this line:
scene.addEventFilter(Event.ANY, evt -> logHandler("Filter", "Scene", evt));
to:
scene.addEventFilter(Event.ANY, evt -> {
            logHandler("Filter", "Scene", evt);
            if (evt.getEventType().equals(ActionEvent.ACTION)) {
                evt.consume();
            }
        });
This will cause the Scene to consume the ActionEvent in the “Event Capturing Phase”, so that the Event never gets to the Button (or anything contained in the Stage).
The output now looks like this:
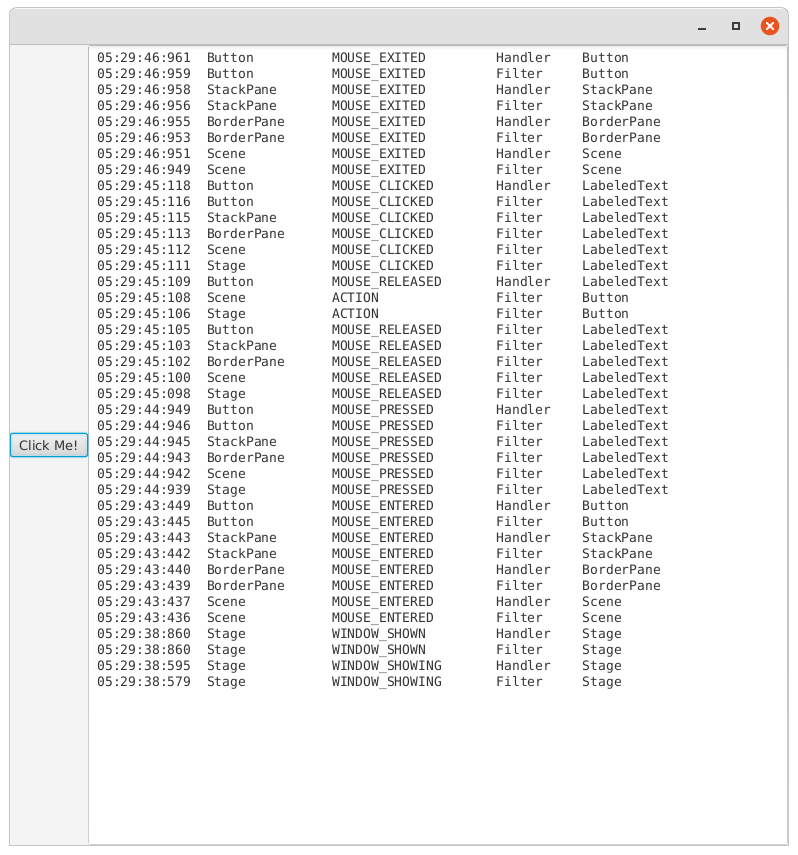
Which is what you would expect. All of the Events propagate through all of the Nodes except the ActionEvent from the Button which is seen by just the Stage, and then the Scene, which consumes it.
Conclusion
There are some practical applications of this technique. But if you are building a standard desktop business application and your design depends on deep understanding of “Event Capturing and Bubbling Up” you’re probably deep in the weeds and heading in the wrong direction. Chances are you don’t know about some feature of JavaFX that you should be using instead. You should look for alternatives.