Introduction
Since the JavaFX GUI elements are not thread-safe, virtually all of the JavaFX methods are intended to run on a single thread called the “FX Application Thread” or “FXAT”. This includes any code that you write that runs under an EventHandler or a Listener, as well as the internal routines that control how JavaFX works.
What this means is that if you write any code that runs on the FXAT that takes a long time to execute or blocks, then you’ll end up “hanging” your GUI. JavaFX provides a mechanism to run long or blocking code on a background thread, including a way to get back onto the FXAT when the job completes and you want to update your GUI.
That mechanism is called Task. In this article, we are going to look at how Task provides a facility to monitor the progress of a job from the FXAT and how to expand that facility to provide custom data updates.
About Task
Task is a special JavaFX class for background jobs that implements Runnable. This means that it can be loaded into a Thread via new Thread(task), which allows it to be run on a background thread. You can read the basics about using Task here.
Additionally, Task implements the Worker interface, which allows the status of a running Task to be fully observable. This is useful because you can now bind these Properties of Task to elements of your GUI to keep your users informed of the progress of the Task.
In the usual course of using Task you would instantiate it as an anonymous inner class, override the Task.call() method, supply an EventHandler for when it completes, and pass it to a Thread through its constructor. Then you call Thread.start() and it rolls along from there. Whatever you put in the Task.call() method is the code that you want to run it the background thread, and whatever you put in the completion EventHandler will execute on the FXAT.
As expected, the introduction in JavaDocs for Task is jumbled, confusing mess. Everything you need to know is there, but meaningless unless you already know what you need to know. Once again, you should read my article about the FXAT and Task if you need help getting started with Task.
Monitoring Progress
The standard use case for progress monitoring of a Task is presented as a fraction of the total work. Task provides for this with a read-only Property called progress. You can update progress through two version of a method called updateProgress(). In both of these, you provide the amount of work completed and the total amount of work to be done and Task converts this into a single Double between 0.0 and 1.0 which it stores in progress. These methods also update two other properties, totalWork and workDone which store the amounts given as Double.
I’m just going to give a slightly modified version of the example from the JavaDocs here:
Task<Integer> task = new Task<Integer>() {
    @Override protected Integer call() throws Exception {
        int iterations;
        for (iterations = 0; iterations < 10000000; iterations++) {
            updateProgress(iterations, 10000000);
        }
        return iterations;
    }
};
In a similar manner, there is also a read-only StringProperty called message. You can update it via updateMessage(). These 4 Properties (progress, message, totalWork and workDone) can be bound to elements of your GUI to keep the user informed of how the Task is progressing. Let’s look at the simplest implementation of something like that, using a ProgressIndicator:
class TaskProgress0App : Application() {
    override fun start(stage: Stage) {
        stage.scene = Scene(createContent(), 300.0, 300.0)
        stage.title = "Task Progress Example 0"
        stage.show()
    }

    private fun createContent(): Region = BorderPane().apply {
        val task = object : Task<Unit>() {
            init {
                updateMessage("Not Started")
            }

            override fun call() {
                updateProgress(0,100)
                updateMessage("Initializing")
                Thread.sleep(Duration.ofMillis(3000))
                updateProgress(30, 100)
                updateMessage("Processing")
                for (x in 31..90) {
                    updateProgress(x.toLong(), 100)
                    Thread.sleep(52.toLong())
                }
                updateMessage("Verifying")
                Thread.sleep(2000.toLong())
                updateProgress(100, 100)
                updateMessage("Completed")
            }
        }
        center = VBox(10.0).apply {
            children += Label().apply {
                textProperty().bind(task.messageProperty())
            }
            children += ProgressBar().apply {
                progressProperty().bind(task.progressProperty())
                minWidth = 200.0
            }
            alignment = Pos.CENTER
        }
        bottom = HBox(Button("Run Task").apply {
            setOnAction { Thread(task).start() }
        }).apply {
            alignment = Pos.CENTER
            padding = Insets(20.0)
        }
    }
}

fun main() {
    Application.launch(TaskProgress0App::class.java)
}
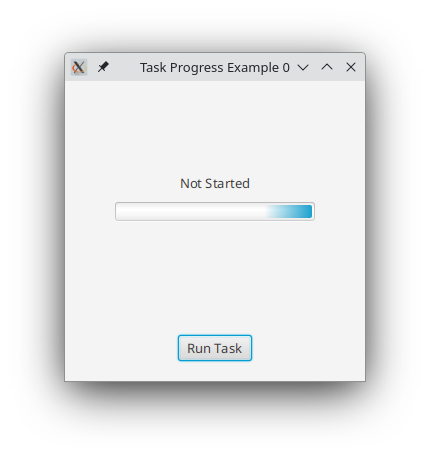
It looks like this at first:
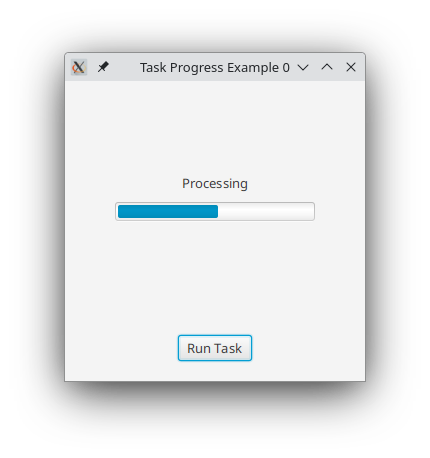
And then, when it’s in the “Processing” loop:
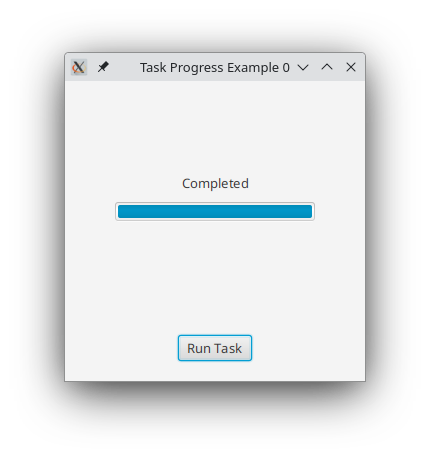
And, finally, like this:
These Update Methods Have “Protected” Scope
What if you don’t want to have all of the processing happen inside Task.call()? For instance, if you are using a framework like MVCI and you want to put the business logic where it belongs, in the Interactor?
Well, then you’re going to have a problem because Task.updateProgress(), and Task.updateMessage() have protected scope, meaning that they can only be called from inside your Task object. To get around this, you’ll need to provide some functional elements to do the updates, like this:
class TaskProgress2App : Application() {
    override fun start(stage: Stage) {
        stage.scene = Scene(createContent(), 300.0, 300.0)
        stage.title = "Task Progress Example 2"
        stage.show()
    }

    private fun createContent(): Region = BorderPane().apply {
        val task = object : Task<Unit>() {
            init {
                updateMessage("Not Started")
            }

            override fun call() {
                handleProcessing({ done, total -> updateProgress(done, total) }, { updateMessage(it) })
            }
        }
        center = VBox(10.0).apply {
            children += Label().apply {
                textProperty().bind(task.messageProperty())
            }
            children += ProgressBar().apply {
                progressProperty().bind(task.progressProperty())
                minWidth = 200.0
            }
            alignment = Pos.CENTER
        }
        bottom = HBox(Button("Run Task").apply {
            setOnAction { Thread(task).start() }
        }).apply {
            alignment = Pos.CENTER
            padding = Insets(20.0)
        }
    }
}

fun handleProcessing(progressUpdater: (Long, Long) -> Unit, messageUpdater: (String) -> Unit) {
    progressUpdater(0, 100)
    messageUpdater("Initializing")
    Thread.sleep(Duration.ofMillis(3000))
    progressUpdater(30, 100)
    messageUpdater("Processing")
    for (x in 31..90) {
        progressUpdater(x.toLong(), 100)
        Thread.sleep(52.toLong())
    }
    messageUpdater("Verifying")
    Thread.sleep(2000.toLong())
    progressUpdater(100, 100)
    messageUpdater("Completed")
}

fun main() {
    Application.launch(TaskProgress2App::class.java)
}
Updates from Background Threads
One thing that you might have noticed is that these calls to Task.updateProgress() and Task.updateMessage are happening from background threads. And yet these values are bound to elements on the SceneGraph! How does that work?
The JavaDocs clearly state that these methods are safe to be called from any thread. We’ll look at how this works in just a little bit, but it’s important to note that you do NOT need to put these calls in Platform.runLater(). As a matter of fact, as we’ll see, you shouldn’t put them in Platform.runLater(), as it could impact performance in cases where you are doing a lot of updates.
Custom Updates
This basic use case seems like it’s what you need, but in practice maybe not so much. My experience has been that you often just don’t know how much processing is going to happen, or that you cannot measure it terms of “x number of total items” processed. You often end up with something that performs like the Microsoft updates progress bar, that gets to 95% in the first few seconds, and then sits there for 10 minutes.
More often than not, you just set the ProgressBar progress to “Indeterminent” and hope that the user doesn’t get bored and turn off the computer before it ends.
As you’ve seen, you can use message to convey progress and a sense that things aren’t hung to the user. But String is a poor substitute for some kind of custom object that holds status when you are using the values for actual processing. Imagine that you want certain areas of your GUI to be disabled only when certain stages of the process are actually running, or you want to trigger Events when the status changes to particular values. Using String in these cases would be a “code smell” if not an actual anti-pattern.
Happily, we can build our own “thread-safe” methods that can hold a status, state or progress value of our own design that will work just as well as the built-in progress and message facilities.
But, before we can do that, we need to take a look at how Task handles those updates-from-background-threads, because that will show us how to build our own…
Under the Hood With Task Updates
There’s something very important in the JavaDocs that’s easy to miss:
protected void updateMessage(String message)
Updates the message property. Calls to updateMessage are coalesced and run later on the FX application thread, so calls to updateMessage, even from the FX Application thread, may not necessarily result in immediate updates to this property, and intermediate message values may be coalesced to save on event notifications.
This method is safe to be called from any thread.
What we want to understand here is this part:
…intermediate message values may be coalesced to save on event notifications.
What does this mean?
Let’s say that you have a background thread that’s generationg gazillions of calls to Task.updateMessage() from a background thread - way faster than the FXAT can process them given all the other stuff it’s doing. Well, in that case, it seems that this means that not all of our calls to Task.updateMessage() are going to result in screen updates.
Let’s take a look at the source code for Task.updateMessage() to see how it does this, and what it really means:
private AtomicReference<String> messageUpdate;
   .
   .
   .
protected void updateMessage(String var1) {
    if (this.isFxApplicationThread()) {
        this.message.set(var1);
    } else if (this.messageUpdate.getAndSet(var1) == null) {
        this.runLater(new Runnable() {
            public void run() {
                String var1 = (String)Task.this.messageUpdate.getAndSet((Object)null);
                Task.this.message.set(var1);
            }
        });
    }
}
First, we have a variable messageUpdate, which is an AtomicReference<String>. Atomic variables are designed to be concurrently accessed by multiple threads, which primarily means that get and set functions can be combined into a single, indivisible, atomic, operation. In this way, it’s guaranteed that some other thread won’t get in and change the value in between your thread checking the value and then changing it.
This concept is key to how this method works. First, let’s look at the flow when the call to Task.updateMessage() comes from a background thread…
To understand this, you need to keep track of what code is running on what thread. The function is entirely composed of a single if statement. So if we come in on a background thread, then the if and the else if are going to run on that background thread. Most importantly, it means that:
if (this.messageUpdate.getAndSet(var1) == null)
including the call to messageUpdate.getAndSet(var1) will run on the background thread. AtomiceReference.getAndSet() will instantly update it’s stored value with var1, and then it returns whatever was previously stored in it.
Only in the case where the previous value in messageUpdate was null will it invoke Platform.runlater() to update the message Property.
Why? To understand that we need to look at what happens inside Platform.runLater(). There are two lines of code:
String var1 = (String)Task.this.messageUpdate.getAndSet((Object)null);
Task.this.message.set(var1);
The first line gets the value from messageUpdate and instanly sets it value to null. The second line will update the Property with that value.
From this, you can see that the FXAT is the only thread that puts null into messageUpdate (well, var1 could be null, but let’s not worry about that). So if our background thread checks messageUpdate and finds that it’s not null, then that must mean that there is a pending operation in the FXAT’s queue to update the message Property from messageUpdate. In that case, it’s not necessary to invoke a new FXAT job, but we can update the value in messageUpdate (actually, we already did that) and this new value is the one that the FXAT will pick up.
Let’s imagine that we have a message that we want to walk through the values, “Starting”, “First”, “Second”, “Third”, and “Fourth”. These values to be supplied from our background thread. We’ll assume that message has just been updated to “Starting” and it’s put messageUpdate to null. The background thread is running really fast, and it will call Task.updateMessage() a few times before the FXAT can get around to copying the value into message.
Here’s what our values look like:
| Thread | New Value | Old Value | message | Queue FXAT Job? |
|---|---|---|---|---|
| Background | First | Null | Starting | Yes |
| Background | Second | First | Starting | No |
| Background | Third | Second | Starting | No |
| FXAT | Null | Third | Third | Is the FXAT Job |
From this, you can see that only one job is launched for the FXAT, and at that time, the value of messageUpdate was “First”. However, by the time that that initial job on the FXAT was executed, the background thread had called Task.updateMessage() two more times, and the value in messageUpdate was now “Third”. The values “First” and “Second” never made it to message. Once again, messageUpdate has the value null, and any call to Task.updateMessage() from the background thread will queue up a new FXAT job.
But what if a call to Task.updateMessage() comes from the FXAT? Then it just updates message and doesn’t touch messageUpdate. But what if messageUpdate isn’t null when this happens?
If messageUpdate has a non-null value in it, then there is a job on the FXAT to copy the current value of messageUpdate into message. The FXAT always processes jobs in sequential order. This means that if this code is running from the FXAT, then it was queued before the call from the background thread called Platform.runLater(). It may be running after that background code ran, but the job on the FXAT generated by that background code is still pending processing.
This is why you don’t want to put your calls to Task.updateMessage() inside Platform.runlater(). Because if you do that, then you’ll be creating a job on the FXAT for every single update to message, and if you are generating a huge number of updates in a short span of time, you might swamp the FXAT and cause performance issues with your GUI. If you issue your calls from the background thread, then you only get as many jobs on the FXAT as the FXAT can handle.
Understanding this means that it’s pretty easy to implement our own status updates that work the same way..
Creating Custom Data Updates
Let’s imagine that we have process that can be broken down into stages, each of which takes some time to process on a single background thread. We want the user to be updated as each stage progresses. We’ll all assume that we’re using a framework, so the actual work is going to be done from our Interactor.
First let’s look at the data stuff:
enum class ProcessingStage { STAGE1, STAGE2, STAGE3, STAGE4, DONE }

class Model {
    val currentStage = SimpleObjectProperty(ProcessingStage.STAGE1)
}
This is pretty straight-forward. We have an Enum to hold our progress values, and a Model with just a single field - a Property to hold our progress Enum.
Now let’s look at the Controller code:
class Controller {
    private val model = Model()
    private val interactor = Interactor(model)
    private val viewBuilder = ViewBuilder(model) { launchTask() }

    fun getView() = viewBuilder.build()

    private fun launchTask() {
        val task = object : Task<Unit>() {
            val stageUpdate = AtomicReference<ProcessingStage?>()
            val stage = SimpleObjectProperty(ProcessingStage.STAGE1)
            override fun call() {
                interactor.doProcessing { updateStage(it) }
            }

            fun updateStage(newStage: ProcessingStage) {
                if (Platform.isFxApplicationThread()) {
                    stage.set(newStage)
                } else if (stageUpdate.getAndSet(newStage) == null) {
                    Platform.runLater {
                        stage.set(stageUpdate.getAndSet(null))
                    }
                }
            }
        }
        task.setOnSucceeded { model.currentStage.unbind() }
        model.currentStage.bind(task.stage)
        Thread(task).start()
    }
}
As usual, we intstantiate the other MVCI components and supply a getView() method for the Application.
In the Task we create a field to hold the AtomicReference for the processing stage Enum, then we create a Property to hold the processing stage. This is just like the way that standard Task handles message. Looking at the updateStage method you’ll see that it also follows exactly the same structure as Task.updateMessage(), updating the AtomicReference, launching a job on the FXAT to update the Property and manipulating the null value of the AtomicReference as a control.
The Task.call() implementation is simple, it just calls the Interactor method doProcessing() passing it a consumer that will invoke updateStage().
The launchTask() method instatiates our custom Task, binds the Model’s currentStage Property to the stage Property of the Task, loads the Task into a Thread and launches it. The only other thing it does it to create an onEventSucceeded handler that unbinds the currentStage Property of the Model.
The Interactor looks like this:
class Interactor(private val model: Model) {

    fun doProcessing(updater: (ProcessingStage) -> Unit) {
        doStep1()
        updater(ProcessingStage.STAGE2)
        doStep2()
        updater(ProcessingStage.STAGE3)
        doStep3()
        updater(ProcessingStage.STAGE4)
        doStep4()
        updater(ProcessingStage.DONE)
    }

    private fun doStep1() {
        Thread.sleep(5000)
    }

    private fun doStep2() {
        Thread.sleep(5000)
    }

    private fun doStep3() {
        Thread.sleep(5000)
    }

    private fun doStep4() {
        Thread.sleep(5000)
    }
}
Not much to say here. doProcessing() simply calls the various update sub-methods and invokes the updater Consumer between each method call.
Next, the ViewBuilder:
class ViewBuilder(private val model: Model, private val taskRunner: () -> Unit) : Builder<Region> {
    override fun build(): Region = BorderPane().apply {
        center = Label().apply {
            textProperty().bind(model.currentStage.asString())
        }
        bottom = Button("Click Me").apply {
            setOnAction { taskRunner.invoke() }
        }
    }
}
And, finally, the Application:
class TaskProgress1App : Application() {
    override fun start(stage: Stage) {
        stage.scene = Scene(Controller().getView(), 300.0, 300.0)
        stage.show()
    }
}
Treating it as Data
Okay, but our Enum is hardly better than String in this example. So let’s put it together with another concept so that we treat it more like “data”.
interface PseudoClassSupplier {
    fun getPseudoClass(): PseudoClass
}

enum class ProgressPseudoClass : PseudoClassSupplier {
    STAGE1, STAGE2, STAGE3, STAGE4, DONE;

    companion object PseudoClasses {
        val stage1PseudoClass: PseudoClass = PseudoClass.getPseudoClass("stage1")
        val stage2PseudoClass: PseudoClass = PseudoClass.getPseudoClass("stage2")
        val stage3PseudoClass: PseudoClass = PseudoClass.getPseudoClass("stage3")
        val stage4PseudoClass: PseudoClass = PseudoClass.getPseudoClass("stage4")
        val donePseudoClass: PseudoClass = PseudoClass.getPseudoClass("done")
    }

    override fun getPseudoClass() = when (this) {
        STAGE1 -> stage1PseudoClass
        STAGE2 -> stage2PseudoClass
        STAGE3 -> stage3PseudoClass
        STAGE4 -> stage4PseudoClass
        DONE -> donePseudoClass
    }
}
This is a structure lifted from my article Non-Binary PseudoClasses. It’s an Enum with a PseudoClass references built in, and implementing the method getPseudoClass().
We can use this new class as a drop-in replacement for the Enum class ProcessingStage in our example. None of that code will change, except the class reference. In the ViewBuilder, we just need to add a Subscription to the Property and invoke Node.pseudoClassStateChange() on our Label which now has the StyleClass of progress-label added to it:
class ViewBuilder3(private val model: Model3, private val taskRunner: () -> Unit) : Builder<Region> {
    override fun build(): Region = BorderPane().apply {
        center = Label().apply {
            textProperty().bind(model.currentStage.asString())
            styleClass += "progress-label"
            model.currentStage.subscribe { oldVal, newVal ->
                oldVal?.let { pseudoClassStateChanged(it.getPseudoClass(), false) }
                newVal?.let { pseudoClassStateChanged(it.getPseudoClass(), true) }
            }
        }
        bottom = Button("Click Me").apply {
            setOnAction { taskRunner.invoke() }
        }
    }
}
We need to add this style sheet:
.root {}

.progress-label {
  -fx-font-size: 14px;
  -fx-font-weight: bold;
  -fx-text-fill: blue;
}

.progress-label: stage1 {
   -fx-text-fill: black;
}

.progress-label: stage2 {
   -fx-text-fill: orange;
}

.progress-label: stage3 {
   -fx-text-fill: pink;
}

.progress-label: stage4 {
   -fx-text-fill: green;
}

.progress-label: done {
   -fx-text-fill: red;
}
To our Application:
class TaskProgress3App : Application() {
    override fun start(stage: Stage) {
        println("Running Example3")
        stage.scene = Scene(Controller3().getView(), 300.0, 300.0).apply {
            TaskProgress3App::class.java.getResource("tasks.css")?.toString()?.let {
                println("adding stylesheet")
                stylesheets += it
            }
        }
        stage.show()
    }
}
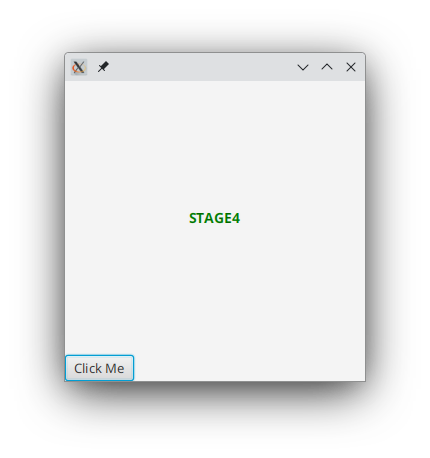
And we get something like this:
Creating a Library Version
If you think that this is, perhaps, the key missing element from the standard JavaFX Task class, then you can easily turn this into a generic template of your own:
abstract class StagedTask<T,S> : Task<T>() {
    private val stageUpdate = AtomicReference<S?>()
    val stage = SimpleObjectProperty<S?>()

    fun updateStage(newStage: S) {
        if (Platform.isFxApplicationThread()) {
            stage.set(newStage)
        } else if (stageUpdate.getAndSet(newStage) == null) {
            Platform.runLater {
                stage.set(stageUpdate.getAndSet(null))
            }
        }
    }
}
This is still an abstract class, so you’ll need to provide the implementation of the call() method when you instantiate it. However, the “stage” element is now also a generic type, so you can provide updates via any class that you like. In our example, the implementation in the Controller would look like this:
val task = object : StagedTask<Unit, ProgressPseudoClass>() {
    override fun call() {
        interactor.doProcessing { updateStage(it) }
    }
}
You could even provide an optional constructor parameter to set the initial value of stage:
abstract class StagedTask<T, S>(initialStage: S? = null) : Task<T>() {
    private val stageUpdate = AtomicReference<S?>()
    val stage = SimpleObjectProperty<S?>(initialStage)

    fun updateStage(newStage: S) {
        if (Platform.isFxApplicationThread()) {
            stage.set(newStage)
        } else if (stageUpdate.getAndSet(newStage) == null) {
            Platform.runLater {
                stage.set(stageUpdate.getAndSet(null))
            }
        }
    }
}
Conclusion
I think that the most interesting thing about this technique is that it’s literally lifted right out of the source code for Task and modified just enough for a new use case. It shows us two things:
- You should take the time to look at the JavaFX source code, because there’s lots of nifty ideas and techniques that you can appropriate as your own.
- There’s nothing magical about the JavaFX source code.
99% of the code that you see inside the various classes is just plain old Java. It’s not full of hand-compiled machine code, or mystery libraries that you can’t see. There are some annoying non-public API’s that are used in some cases that can make it difficult to copy an entire class to make a small change to the way it works, but you’ll usually only run into this when you are doing really advanced stuff.
From time to time I hear people complaining that some specific feature is missing from JavaFX, or lamenting that no new layout classes or significant new features have been added to JavaFX in years. Yet, most of the time JavaFX gives you all of the tools you need to create those features yourself, just as we created StagedTask here. Often, it doesn’t even take much code to create those features. StagedTask is 13 lines long, including all the lines with nothing but } on them.
One of the more recent new features, Subscription is only about 50 lines of code all told. There is the Subscription interface itself, which is less than 20 lines long, and the three different subscribe methods, each of which is 9 lines long. You could have coded those yourself, creating the Subscription interface and then implementing the subscribe methods as extension functions on ObservableValue and Observable and it would have been just as good.
And that’s the point. There’s nothing inherently inferior to creating your own features for JavaFX because there’s nothing inherently superior to those contained inside the standard JavaFX library. As long as your code is good and you understand what you are doing, your own features will run just as well, and just as safely and as efficiently as the ones inside the standard JavaFX library.