In this tutorial we’re going to look at one of the parts of JavaFX that causes the most headaches for beginners - background threads and the FXAT.
In my experience, every JavaFX programmer “knows” you cannot do long operations on the FXAT. Yet every newbie programmer breaks this rule at every opportunity. Over and over again.
Sometimes, it looks like you can get away with it. Maybe your development environment has a local development database with only a couple of programmers using it. The response time is a few milliseconds for just about any request. Your screens work fine, even when you load your data on the FXAT.
Then you move it into production. Now the database is running somewhere in the cloud with thousands of active users. The network latency alone adds a guaranteed 50ms overhead to every request. Your application makes 100 back-to-back API calls to load your data. It took 600ms in development, now it’s 5500ms. That’s 5.5 seconds! Your GUI just hangs for 5.5 seconds. What went wrong? The phone starts to ring as the support tickets come in…
You need to understand how to use the FXAT properly.
What is the FXAT, Anyway?
All of the various elements that make up the JavaFX screens are not thread-safe. This means that they have no programming baked into them to handle concurrency issues that might arise from having separate threads accessing the same data elements at the same time, possibly changing values, while another thread is relying on the previous value. Undoubtedly, this has greatly simplified the design of all of these classes, and the authors of JavaFX have had to ensure that the screens don’t become slow and unresponsive when being serviced by only a single thread.
The FXAT is the “JavaFX Application Thread”, and it’s the mechanism by which JavaFX can be a single threaded library. It’s a single process which is started up automatically when you execute the launch() method in your Application class. From that point on, everything that has to do with the GUI needs to run on that single thread.
From the JavaDocs for Application
JavaFX creates an application thread for running the application start method, processing input events, and running animation timelines. Creation of JavaFX Scene and Stage objects as well as modification of scene graph operations to live objects (those objects already attached to a scene) must be done on the JavaFX application thread.
How the FXAT Works
Basically, it’s an infinite loop that checks a queue for jobs and executes them in order. Each “job” is a snippet of code (ie: a Runnable), that’s been triggered by some kind of Event or manually submitted to the queue.
One of the big things to remember about this system is that there’s no connection in time between when a job is submitted to the FXAT and when it will run. It might run very quickly, or the queue may already have hundreds of jobs in it. You don’t know. You cannot know.
The impact of this is that while you can count on code which is contained within a single job on the FXAT being executed sequentially, you cannot assume that two jobs submitted back-to-back will be executed back-to-back. So each job should be complete within itself.
Jobs submitted to the FXAT will be run in order, but there’s no guarantee that other jobs won’t be slipped in between two jobs. This means that the GUI environment could change, and could change a lot, between the time that a job is triggered and the time that it executes. This can become a critical design consideration.
How to Submit Jobs to the FXAT
There’s two ways to get your code into the FXAT queue:
- Attach an EventHandler to a Node or Object.
- Pretty much any place that you see a method in a JavaFX object called
setOn...()you are going to be defining anEventHandler. And thatEventHandlerwill be submitted to the FXAT queue each time thatEventis triggered on that object. - Call Platform.runLater()
- This is how you manually submit a job to the FXAT. It’s called “runLater” because that’s exactly what it does, it put’s your job onto the back end of the FXAT queue where it will be run when it hits the front of the queue.
Things You Shouldn’t Do on the FXAT
There are two basic classifications of operations that should never be done on the FXAT.
- Operations that take more than a few milliseconds to complete.
- I’d set the limit at about 10 milliseconds, but that might be a bit conservative. There’s a lot that can be done in that much time, and in truth you probably wouldn’t even be looking to see how long something took unless you were experiencing issues with your GUI.
- Blocking (or Potentially Blocking) Operations.
- A blocking operation is anything that potentially executes a
wait()operation or its equivalent. This includes virtually every file operation, every database operation, and any calls to API’s that mightwait(). Blocking operations are particularly brutal on the FXAT because they can last for seconds at a time, during which the GUI is completely frozen. Also, blocking operations can be highly variable, and might be fast in your test environment but subject to delays at times in production.

While the FXAT is running your code it's not doing anything else.
This means that it’s not responding to mouse events, clicks, keystrokes, or anything else. New jobs submitted via Platform.runlater() or as EventHandlers are going to sit at the bottom of the queue until your code completes. Your GUI is effectively frozen until your code is finished.
Starting Background Threads with Task
OK, so you’ve decided that some piece of code needs to be run off the FXAT. How do you do this?
JavaFX has a tool designed just for this: Task.
Task is an abstract generic class that has methods for communicating between a background thread and the FXAT and a single abstract method name call().
In the JavaDocs for Task there’s a fairly long description section. It’s accurate, but also pretty much rubbish unless you already understand how to use Task. There’s only a passing mention of the most useful use-case for Task, which is to run a job to completion, at which point some code is executed on the FXAT - possibly using the results from call().
Generally speaking, you’ll use Task as an anonymous inner class, so you’ll have access to all of the data available in the scope in which the Task is defined.
You need to be careful if your Task accesses data updated by the FXAT as it may have changed between the time that the Task was invoked and the time that the code in call() runs.
This tutorial is really about the FXAT and how to deal with it. So we’re not going to go into all of the cool features of Task (or Service) and updating progress and all that. We’re going to concentrate on the mechanics of getting off the FXAT and then back onto it through Task.
A Simple Example
The most straight-forward use for Task is to run some process that produces data as a result, and then use that data to update your GUI.
The Simulated API
The JavaDocs for Task have a lot of examples with loops and sleep(), but in order to keep it clear how this fits with something more real-life, with the blocking code at arms-length from layout code, I’ve created a simulated API class. This allows us to call it and just assume that it’s doing something external which is going to take some time to complete or may possibly block.
public class FxatApi {

    public String remoteCall(String theAnswer) {
        try {
            Thread.sleep(3000);
        } catch (InterruptedException e) {
            e.printStackTrace();
        }
        return theAnswer;
    }
}
It’s very simple, and it just echoes back whatever is passed to it after a 3 second delay. We’re going to use this same simulated API for all of the examples.
The Layout
Here’s the actual screen. It’s just a Label and a Button in a VBox. The application has a Presentation Model, and that’s a single StringProperty. This is just enough skeleton to demonstrate how Task works.
public class FxatDemo1 extends Application {

    private final StringProperty stringProperty = new SimpleStringProperty("Starting Value");

    public static void main(String[] args) {
        launch();
    }

    @Override
    public void start(Stage primaryStage) throws Exception {
        primaryStage.setScene(new Scene(createContent()));
        primaryStage.show();
    }

    private Region createContent() {
        Label label = new Label();
        label.textProperty().bind(stringProperty);
        Button button = new Button("Click Me");
        button.setOnAction(evt -> callApi());
        VBox results = new VBox(20, label, button);
        results.setPadding(new Insets(20));
        return results;
    }
}
The Task
This method is actually part the FxatDemo1 class, but I’ve split it out here so that it’s clear how it’s operating:
private void callApi() {
    Task<String> apiTask = new Task<String>() {
        @Override
        protected String call() throws Exception {
            return new FxatApi().remoteCall("The Answer");
        }
    };
    apiTask.setOnSucceeded(evt -> stringProperty.set(apiTask.getValue()));
    Thread apiThread = new Thread(apiTask);
    stringProperty.set("Running API...");
    apiThread.start();
}
Here we create a Task which returns a String, and then set its call() method to instantiate our dummy API and call its remoteCall() method. The Task has an EventHandler added to it, triggered on its OnSucceeded event. That event handler grabs the value calculated by call() and sets it in the Presentation Model.
Task's call() method runs on the background thread and produces results that can be retrieved later via the Task's getValue() method.
Finally, a new Thread is created for the Task and it is started on it. Just before it is launched, the value in the StringProperty is changed to “Running API…”. This way we can see when the Task starts, and when it ends.
All of the code in this method except for that single line inside of the Task's call() method executes on the FXAT at time that the Button's click action runs.
Understanding what-code-runs-when-and-where is a key element in using the FXAT properly.
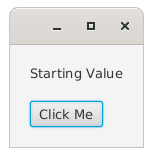
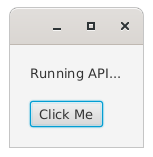
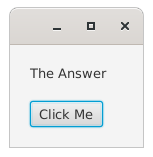
The Output
Initially, the screen looks like this:
Then, as soon as the Button is clicked, it changes to this:
And then it ends like this 3 seconds later:
And that’s just about the most simple and common use for Task in JavaFX.
onSucceeded, onFailed, and onCancelled
The example above uses setOnSucceeded() to fire an EventHandler that runs when the Task completes. This gets you back on the FXAT and runs when the value calculated by call() on the background thread is available.
Now, if you look at the JavaDocs, you’ll see that there’s a couple other events that might be fired when call() ends. These are OnFailed, and OnCancelled. If your Task can end with OnSucceeded, can’t it end with these other events, too?
There was a time when I felt I was obliged, for the sake of tying up all the loose ends, to deal with these other two events. But I’ve come to realize that this isn’t necessary.
First, from what I’ve been able to determine, OnFailed will only be triggered when the code in call() throws an uncaught exception. Generally speaking, an exception in a background task is either a nothing, or it’s a something that you really should deal with in some explicit way and may involve updating the GUI to let the user know what’s happened. If you do need to update the GUI after an exception, then OnFailed is probably the way to go, as it will execute on the FXAT and allows you to access the exception, too.
Cancelling a running Task is a pretty specific and potentially complicated operation. It can’t happen unless you deliberately program it in. And if you don’t do this, you don’t need to worry about OnCancelled.
The Juggler
A lot of programmers have a great deal of difficulty envisioning how the background tasks work and the impact to their application logic.
The One Thing That you Cannot Do…
You can’t write anything that looks like a Function. What I mean by this is some construct that accepts input data and then returns a value derived from it. Once you spawn a background thread, this linear approach is off the table. There’s no way that you can implement it without executing wait() on the FXAT somehow, and that’s an absolute “no-no”.
All new JavaFX programmers try to do this.
It can't be done but, go on...try now.
Continue reading when you give up.
Now, About Juggling
The analogy that helped me cope with this was to think about it like a juggler. So, picture a juggler…
At any given time, he’s got some number of balls in the air, and one of them is on it’s way down and needs to be caught and tossed back into air very soon. He might have special rules about how to handle the balls. Like, say… “the blue ball needs to be bounced off his knee every time”, and, “the green ball needs to be thrown twice as high as the other balls”.
Whatever the instructions, he can’t take very long with any particular ball or he’s going to miss handling the next ball coming down, and the whole performance will come to an end. An instruction like, “grab a pen and write your name on the ball before you toss it”, is out of the question.
Obviously, the juggler is the FXAT and the balls are the Runnables that are being dumped into the queue all of the time. It’s not a perfect analogy, but it’s close enough to give some pretty solid guidelines about how to program around the FXAT.
Now, imagine that the juggler has an assistant or another juggler with him.
From time to he’ll toss one of his balls off to that assistant, and then some time later the assistant will toss a ball back to him. When that happens, he has to be able to handle it and integrate it into the balls that he’s currently juggling without dropping any of them.
But here’s the important part: He doesn’t know when, or even if, the assistant is going to toss a ball back. So he cannot wait for it. He has to keep juggling his other balls, and when the new ball comes to him, whenever that happens, he has to deal with it.

This is How You Need to Think About Background Tasks
Running a background task is just like tossing a ball off to an assistant. You package up your code to run and hand it off to the background task. At the same time, you need to write the code that will be executed to handle the event that’s triggered when the background task completes (or fails).
You can’t wait for it. You cannot make any assumptions about when it’s going to happen. You cannot make any assumptions about the state of your GUI when it happens. You cannot make any assumptions about which background task will complete first.
This is what you are doing when you write an EventHandler for OnSucceeded. You’re writing the instructions for how to handle whatever information has been updated by your Task. You don’t know when, or even if, that will happen. But this is what you want to have happen on the FXAT when it does.
Another Approach to Task
Personally, I prefer to have all of the business logic off in its own class, something I have been calling an Interactor. With this structure the Interactor has access to the Model, and can update it. But, since it still needs the thread handling of Task there are two public methods, one to call the API and another to update the Model:
public class FxatInteractor {

    private final StringProperty model;
    private String domainData;

    public FxatInteractor(StringProperty model) {
        this.model = model;
    }

    public void fetchApiData() {
        domainData = new FxatApi().remoteCall("The Answer");
    }

    public void loadModel() {
        model.set(domainData);
    }
}
The method fetchApiData() is intended to be called on a background thread, and it simply calls the API and stores the result in the field, domainData. The method loadModel() is called on the FXAT and updates the Model with the data previously fetched from the API on the background thread.
Note that the Interactor is aware of the FXAT, but only at arms length. The code is divided up into things that shouldn’t happen on the FXAT and things that should happen on the FXAT. But there’s no code that actually deals with the FXAT.
Here’s callApi() from the main class:
private void callApi() {
    Task<Void> apiTask = new Task<>() {
        @Override
        protected Void call() {
            interactor.fetchApiData();
            return null;
        }
    };
    apiTask.setOnSucceeded(evt -> interactor.loadModel());
    Thread apiThread = new Thread(apiTask);
    stringProperty.set("Running API...");
    apiThread.start();
}
Additionally, interactor is instantiated as a field in the main class, and it’s given a reference to the Model:
private final FxatInteractor interactor = new FxatInteractor(stringProperty);
The Task now has a type of Void, as the method call() no longer needs to return anything. The Interactor will update the Model directly.
Dealing With Concurrency Issues
As soon as you start launching threads you absolutely have to start worrying about concurrency issues. There’s no way around this. For this example, there are two basic ways to cope with concurrency…
Method 1: Prevent Multiple Background Threads
The domain data is at risk here because it could be updated by multiple threads simultaneously. One way to guard against this it to structure the application in such a way that only one background thread can be run at a time. Since the background thread in this example is only launched when the Button is clicked, we can ensure that Button cannot be clicked again until the background thread has completed:
private Region createContent() {
   Label label = new Label();
   label.textProperty().bind(stringProperty);
   Button button = new Button("Click Me");
   button.setOnAction(evt -> {
       button.setDisable(true);
       callApi(() -> button.setDisable(false));
   });
   VBox results = new VBox(20, label, button);
   results.setPadding(new Insets(20));
   return results;
}
We disable the Button as soon as it has been clicked, then create a Runnable that will re-enable it. We pass that Runnable to the callApi() method.
private void callApi(Runnable postFetchAction) {
   Task<Void> apiTask = new Task<Void>() {
       @Override
       protected Void call() {
           interactor.fetchApiData();
           return null;
       }
   };
   apiTask.setOnSucceeded(evt -> {
       interactor.loadModel();
       postFetchAction.run();
   });
   Thread apiThread = new Thread(apiTask);
   stringProperty.set("Running API...");
   apiThread.start();
}
The only change here is that we now take a Runnable as a parameter, and call its run() method in the OnSucceeded event handler. This will do the trick and it’s really not a bad approach. In most cases, you probably won’t want to keep open the possibility that the user will re-run whatever process is kicked off by the the Button until it’s finished anyways.
Perhaps even more important, though, is how this example demonstrates a clean way to handle this very, very common pattern around Button handling - especially if the Button is doing a “Load” or a “Save” type function. Note how the actions which are internal to the View are all contained inside the View, and the callApi() method has no knowledge of the inner structure of the View.
Method 2: Isolate the Data for Each Thread
private void callApi() {
    Task<FxatInteractor> apiTask = new Task<>() {
        @Override
        protected FxatInteractor call() {
            final FxatInteractor interactor = new FxatInteractor(stringProperty);
            interactor.fetchApiData();
            return interactor;
        }
    };
    apiTask.setOnSucceeded(evt -> apiTask.getValue().loadModel());
    Thread apiThread = new Thread(apiTask);
    stringProperty.set("Running API...");
    apiThread.start();
}
Here the Interactor is treated as a single-purpose business logic class. It’s instantiated inside of the Task’s call() method and returned as the value so that setOnSuccedded() can retrieve it on the FXAT. This means that every time our Task is started, it will create a brand new Interactor and there’s no possible concurrency issues with the updating of domainData.
This method is really valuable when you have a background task that can be triggered frequently and concurrently. For instance, you may have a ListView and trigger your Task whenever a new row becomes selected. A user scrolling down through the ListView by holding down an arrow key could trigger many, many Tasks in a very short period of time. In a case like that, though, you probably want to look into using Service instead of Task since it uses a ThreadPool to limit the number of active background threads.
Avoiding Platform.runLater()
If you look out there on the Internet you’ll find tons and tons of examples with Platform.runLater() scattered willy-nilly all over the code. Heck, even the JavaDocs for Task has them. Yuck!
There’s really nothing wrong with Platform.runLater() per se, and you’ll see it used in examples all over the web. It works, and it works well.
My observation, however, is that Platform.runLater() can be a bit of a code smell and often indicates some deeper issue with the design of a system. So I personally leave Platform.runLater() as the last alternative to get code back on the FXAT, and only use it when I can’t find a better way. I think the result is a more coherent, well thought out, JavaFX design.
Platform.runLater() is best used when you really need to return partial results. Not progress tracking, but actually returning results and incorporating them into the GUI as they are generated.
If you’re using Task, and you’re not returning partial results, there’s really no valid reason to use Platform.runLater(). If you are just manually launching a Thread to execute some Runnable, you probably should be using Task instead. There’s very little extra work involved in defining a Task, and the structure clearly declares what you’re doing for anybody who comes along looking at your code.
Another Use for Platform.runLater()
Sometimes you just need to make sure that some aspect of what you’re doing to your GUI needs to happen at the end of everything. It’s entirely possible that something in your code is going to trigger an Event, or the internal handling of some GUI element is going to have some side-effect you have to ensure is completed before some part of your code.
Maybe there’s some background process that’s generating partial results, or which might complete while your code is running, and you want to make sure that some piece of your code runs after these results have been handled.
In these cases, you’re already writing code that’s running on the FXAT, and Platform.runLater() can be the answer. It’s right there in the name runLater(), “run later”!
There’s a reason it’s called this. Any Runnable that you submit to Platform.runLater() is added to the end of the FXAT job queue. Meaning that it will get run after any Events that your code has already triggered. It will run after any other jobs that have already been submitted via Platform.runLater(), perhaps from a background Task.
In practice, you’ll need this technique only rarely. Sometimes you’ll come across a case where sticking part of your code inside a Platform.runLater() seems to fix a problem. But it will often turn out not the best solution to the problem, and if you come back and look at the code later, after you’ve learned more about how JavaFX works, you might see what’s really going on.