Introduction
There are three ways to create a Binding; the Fluent API, using the Bindings class builder methods and extending one of the abstract Binding classes to create a custom binding. We’re going to look at this last method in this article.
You should understand how to create your own custom Binding class just so that you understand how Bindings work internally. This makes it much easier to understand how to use the builder method in the Bindings class - which you will probably use a lot.
How This Fits in the JavaFX Hierarchy
The Binding Interfaces
In JavaFX, Binding is an interface which extends Observable, and ObservableValue. These two super-interfaces are important because they supply the addListenter(), and removeListener() methods for both InvalidationListeners and ChangeListeners.
Bindings themselves rely on InvalidationListeners to control their updates. We’ll see how this works. In fact, the two main methods that the Binding interface adds are the invalidate() and isValid methods. In practice, you’ll rarely need to directly deal with either of those methods.
The Abstract Classes
In practice, virtually all custom Binding classes are created by extending one of the abstract Binding classes contained in the JavaFX library. These are all designed to handle bindings on different types of data. There is BooleanBinding, DoubleBinding, IntegerBinding, ListBinding, LongBinding, MapBinding, ObjectBinding, SetBinding, and StringBinding.
In general, all of these abstract classes are similar, differing only in the data types that they are concerned with. The Binding classes for collections have some additional methods that relate to aspects of collections, such as size or “empty”. Also, all of these classes implement observable interfaces for their data types. So, an IntegerBinding implements ObservableIntegerValue.
Since they implement Binding, they will implement methods for addListener() (for both InvalidationListeners, and ChangeListeners). The bind() method for all of these classes is protected, so you cannot call it from your layout code - meaning that your bound dependencies need to be defined at the time that you instantiate the Binding.
The computeValue() Method
The vast majority of the time, all of the code that you write for a custom Binding class will be it’s constructor and the computeValue() method. The computeValue() method is abstract in all of these classes, so it’s mandatory when you define your own class. You’ll need to call the protected bind() method from the parent abstract class, and the only place to do that is generally the constructor.
The computeValue() method is also protected. It’s called from the public get() method, and it returns the data type encapsulated by the Binding class. So a class extending IntegerBinding will return int from both its get() and computeValue() methods.
This is very important to understand:

The Binding itself is all about linking `Observable` values and `Properties`, but the `computeValue()` method is concerned about the underlying data type of the binding. It can calculate its return value from anywhere, and it generally deals with normal Java data types and classes.
An Example
Now, let’s look at an example:
public class CustomBindingDemo extends Application {

    public static void main(String[] args) {
        launch();
    }

    @Override
    public void start(Stage stage) throws IOException {
        Scene scene = new Scene(createContent(), 620, 340);
        stage.setScene(scene);
        stage.show();
    }

    private Region createContent() {
        ObjectProperty<Integer> number1 = new SimpleObjectProperty<>(100);
        ObjectProperty<Integer> number2 = new SimpleObjectProperty<>(30);
        BooleanProperty evensOnly = new SimpleBooleanProperty(false);
        Label label1 = new Label();
        label1.textProperty().bind(number1.asString());
        Label label2 = new Label();
        label2.textProperty().bind(number2.asString());posts
        Label results = new Label();
        results.textProperty().bind(new CustomIntegerBinding(number1, number2, evensOnly).asString());
        HBox labelBox = new HBox(10,
                new Label("Number 1:"), label1,
                new Label("Number2: "), label2,
                new Label("Results: "), results);
        Button button1 = new Button("Increase Value 1");
        button1.setOnAction(evt -> number1.set(number1.get() + 1));
        Button button2 = new Button("Increase Value 2");
        button2.setOnAction(evt -> number2.set(number2.get() + 1));
        CheckBox checkBox = new CheckBox("Evens Only");
        evensOnly.bind(checkBox.selectedProperty());
        HBox controlBox = new HBox(5, button1, button2, checkBox);
        VBox vBox = new VBox(40, labelBox, controlBox);
        vBox.setPadding(new Insets(30));
        return vBox;
    }
}

class CustomIntegerBinding extends IntegerBinding {

    private final ObservableObjectValue<Integer> property1;
    private final ObservableObjectValue<Integer> property2;
    private final ObservableBooleanValue evenOnly;
    private int divisor = 1;

    public CustomIntegerBinding(ObservableObjectValue<Integer> property1, ObservableObjectValue<Integer> property2, ObservableBooleanValue evenOnly) {
        super.bind(property1, property2, evenOnly);
        this.property1 = property1;
        this.property2 = property2;
        this.evenOnly = evenOnly;
    }

    @Override
    protected int computeValue() {
        int result = (property1.get() + property2.get()) / divisor;
        System.out.println("computing " + property1.get() + " " + property2.get() + " divisor: " + divisor + " result: " + result);
        divisor++;
        if (evenOnly.get()) {
            return ((result % 2) == 0) ? result : 0;
        }
        return result;
    }
}
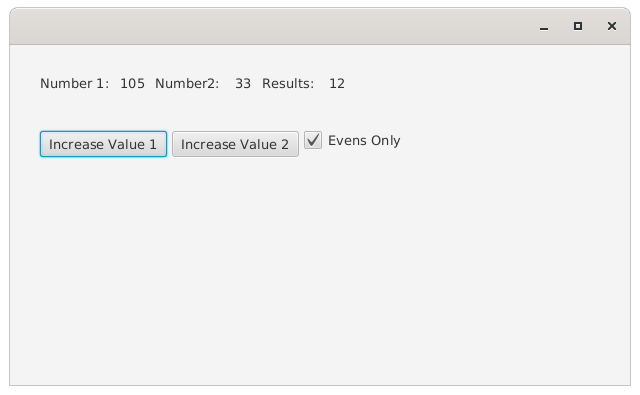
This is a bit goofy, and it certainly doesn’t do anything too useful, but it does demonstrate all the key points you need to understand about custom bindings. When it runs, it looks like this:
and the console output looks like this:
computing 100 30 divisor: 1 result: 130
computing 100 30 divisor: 2 result: 65
computing 101 30 divisor: 3 result: 43
computing 102 30 divisor: 4 result: 33
computing 102 31 divisor: 5 result: 26
computing 102 32 divisor: 6 result: 22
computing 102 33 divisor: 7 result: 19
computing 102 33 divisor: 8 result: 16
computing 103 33 divisor: 9 result: 15
computing 104 33 divisor: 10 result: 13
computing 105 33 divisor: 11 result: 12
The Layout Code
Here we have three Property variables instantiated, which together are the Model for this application. Two are Integer properties used as counters, and the third is a Boolean property. So that we can see the results, we have a set of Labels in a row, the first two of which are bound to our counter properties, and the last is bound to our custom binding.
There are two Buttons and a CheckBox in a second row. Each Button increments one of the counter properties, and the CheckBox is bound to the Boolean property.
The Custom Binding
This custom Binding extends IntegerBinding, so its get() and computeValue() are going to return int. Since this is an externally declared class, we need to create fields for all of the dependency properties, and they need to be passed in the constructor. That’s pretty much all that the constructor does; initialize the fields and call super.bind().
The call to super.bind() is going to register each of these properties with IntegerBinding so that they are monitored and will invalidate the Binding when one of them changes. This invalidation will trigger whatever Properties that this Binding is bound to to call the get() method, which will in turn call the computeValue() method.
There’s also a private int field in the Binding called divisor. This is there to show that this is just an ordinary class, and computeValue() is just an ordinary method like any other.
What does computeValue() do? Basically, it adds the current values of both Integer properties together, and then divides them by the divisor, which it then increments by one. If the Boolean property is true then it checks to see if the result is even or odd, and if it’s odd, it returns zero instead.
About Invalidation
At this point we need to talk about Invalidation and how it relates to Bindings.
What is it?
Every Observable has two data elements: The observed value and a Valid boolean. The Valid boolean signals whether or not the observed value has changed since the last time it was accessed, with true meaning that the last value accessed is still valid. When you set a listener on an Observable, what you’re really doing is asking to be notified whenever the Valid value changes to “false”. In other words, we’re listening for when the value becomes “invalid” or, if you like, has been “invalidated”.
Resetting Validation
This is super important: The only way to re-validate an Observable is to call the *get()* method of the Observable.
Think about those Labels in the sample code. They are bound to the IntegerProperties. There’s a lot of functionality that we don’t see (or really care about), behind Label. It needs to take the data from its Text property and turn it into pixels on the screen. Somewhere in there, there’s going to be an InvalidationListener on that Text property, and that listener is going to call the property’s get() method.
In turn, the property is going to call the binding’s get() method, which in turn is going to call the get() method of the IntegerProperty. And all three elements are going to have their Valid field set to true.
Invalidating an Observable
A property can become invalidated in two ways: The set() method can be called on it or the Observable that it’s been bound to has become invalidated. Since a bound Property cannot be set(), only one of these two reasons can ever apply to a Property at any given time.
Bindings can only become invalidated when one of their bound dependencies becomes invalidated. In turn, any Observables that are bound to this Binding will also become invalidated.
What you’re seeing is that calling super.bind() in your custom Binding simply creates an InvalidationListener on each bound dependency which does nothing except invalidate your custom Binding. Any InvalidationListener on your Binding will be notified of the change.
This is super, super important: A Binding that's already invalidated cannot be invalidated again until it's reset.
The Big “Gotcha” With Custom Bindings
While it’s true that the computeValue() method of a Binding can perform its calculation any way it wants and doesn’t have to use any value from its bound dependencies, you really need to make sure that you call the get() method of every bound dependency inside computeValue().
Why?
Because you need to re-validate all of those bound dependencies. The InvalidationListeners are only going to trigger once when the Observable is invalidated. If it’s not re-validated before its value is changed again, it’s already invalidated and won’t trigger the InvalidationListeners a second time.
Everyone who’s created enough custom Bindings has fallen into this trap at least once. It usually happens when you have Bindings dependent on other Bindings so that it obscures where the problem is. Then, Poof! Three hours of your life are gone trying to figure out why the Binding updates sometimes but not others.
An Example of Not Re-validating
Here’s the first example modified to remove all of the get() calls on the number2 property:
public class CustomBindingDemo2 extends Application {

    public static void main(String[] args) {
        launch();
    }

    @Override
    public void start(Stage stage) throws IOException {
        Scene scene = new Scene(createContent(), 620, 340);
        stage.setScene(scene);
        stage.show();
    }

    private Region createContent() {
        AtomicInteger number2Value = new AtomicInteger(30);
        ObjectProperty<Integer> number1 = new SimpleObjectProperty<>(100);
        ObjectProperty<Integer> number2 = new SimpleObjectProperty<>(number2Value.get());
        Label label1 = new Label();
        label1.textProperty().bind(number1.asString());
        Label results = new Label();
        results.textProperty().bind(new CustomIntegerBinding2(number1, number2).asString());
        HBox labelBox = new HBox(10,
                new Label("Number 1:"), label1,
                new Label("Results: "), results);
        Button button1 = new Button("Increase Value 1");
        button1.setOnAction(evt -> number1.set(number1.get() + 1));
        Button button2 = new Button("Increase Value 2");
        button2.setOnAction(evt -> number2.set(number2Value.incrementAndGet()));
        HBox controlBox = new HBox(5, button1, button2);
        VBox vBox = new VBox(40, labelBox, controlBox);
        vBox.setPadding(new Insets(30));
        return vBox;
    }
}

class CustomIntegerBinding2 extends IntegerBinding {

    private final ObservableObjectValue<Integer> property1;
    private int divisor = 1;

    public CustomIntegerBinding2(ObservableObjectValue<Integer> property1, ObservableObjectValue<Integer> property2) {
        super.bind(property1, property2);
        this.property1 = property1;
    }

    @Override
    protected int computeValue() {
        System.out.println("computing " + property1.get() + "divisor: " + divisor);
        return property1.get() / divisor++;
    }
}
The computeValue() method has been changed so that it only uses number1 and divisor, while the Binding itself still has a dependency on number2.
The Label showing the value of number2 has been removed because it was automatically calling get() on number2, and re-validating the Property. Finally, the action in button2 has been changed because it was calling number2.get() in order to change it. So a separate counter, number2Value was introduced so it’s no longer necessary to call number2.get() in order to increment it.
Finally, the BooleanProperty has been removed since we’re done with it.
Now, when you click on button1 the computeValue() method will be called every time. But after the first click of button2, which invalidates number2, it won’t have any impact on the screen any more. The value in the Property will change, but it won’t cause the custom binding to invalidate, because number2 has already been invalidated and there’s no code in the program to re-validate it.
Binding Lists
Creating Bindings that calculate totals and averages, or which find the minimum or maximum of an ObservableList appears to be very difficult to do at first. It’s nearly impossible if you’re just using the Fluent API for binding, but actually quite easy with a custom Binding class.
Here we’re going to calculate the total of an ObservableList<Integer> which is loaded into a ListView:
public class CustomBindingDemo3 extends Application {

    public static void main(String[] args) {
        launch();
    }

    @Override
    public void start(Stage stage) {
        Scene scene = new Scene(createContent(), 620, 340);
        stage.setScene(scene);
        stage.show();
    }

    private Region createContent() {
        Random numberGenerator = new Random();
        ObservableList<Integer> theList = FXCollections.observableArrayList();
        for (int x = 0; x < 5; x++) {
            theList.add(numberGenerator.nextInt(101));
        }
        ListView<Integer> listView = new ListView<>();
        listView.setItems(theList);
        Label results = new Label("");
        results.textProperty().bind(new CustomIntegerBinding3(theList).asString());
        HBox labelBox = new HBox(10, new Label("Total: "), results);
        Button button1 = new Button("Add Value");
        button1.setOnAction(evt -> theList.add(numberGenerator.nextInt(101)));
        VBox vBox = new VBox(10, listView, labelBox, button1);
        vBox.setPadding(new Insets(30));
        return vBox;
    }
}

class CustomIntegerBinding3 extends IntegerBinding {

    ObservableList<Integer> theList;

    public CustomIntegerBinding3(ObservableList<Integer> theList) {
        super.bind(theList);
        this.theList = theList;
    }

    @Override
    protected int computeValue() {
        System.out.println("computing " + theList.size());
        return theList.stream().reduce(0, Integer::sum);
    }
}
It looks something like this:
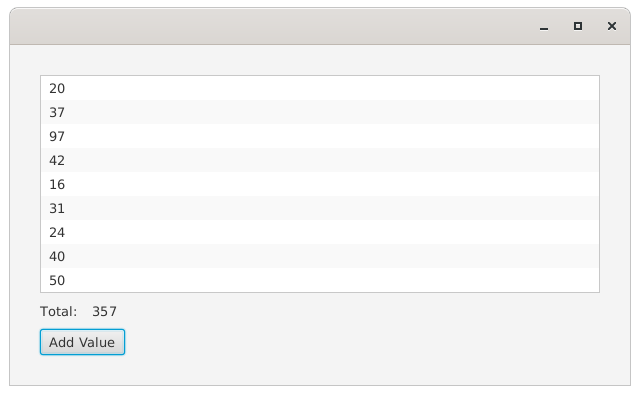
On the screen we have a ListView, a couple of Labels and a Button. The Button generates a new random number and adds it to the ObservableList. One of the Labels is bound to a custom Binding that calculates the total of values in the ObservableList. So when the Button is clicked, the ObservableList becomes invalidated, which invalidates the custom Binding and triggers the Label to call CustomIntegerBinding3.get(), which invokes its computeValue() method.
The calculation inside computeValue() is trivial; stream through the List and add up all the values.
Custom Bindings as Anonymous Inner Classes
This is probably the most common way that you’ll use custom Bindings.
Anonymous Inner Classes have the advantage that you can access any variable or field which is available in the scope in which they are created, but the limitation that you can’t use a constructor with parameters. For custom Bindings, you still need to implement the default constructor because you have to call super.bind().
Here’s the previous List binding example, but rewritten as an anonymous inner class:
public class CustomBindingDemo4 extends Application {

    public static void main(String[] args) {
        launch();
    }

    @Override
    public void start(Stage stage) {
        Scene scene = new Scene(createContent(), 620, 340);
        stage.setScene(scene);
        stage.show();
    }

    private Region createContent() {
        Random numberGenerator = new Random();
        ObservableList<Integer> theList = FXCollections.observableArrayList();
        for (int x = 0; x < 5; x++) {
            theList.add(numberGenerator.nextInt(101));
        }
        IntegerBinding customListBinding = new IntegerBinding() {
            {
                super.bind(theList);
            }

            @Override
            protected int computeValue() {
                System.out.println("computing " + theList.size());
                return theList.stream().reduce(0, Integer::sum);
            }
        };
        ListView<Integer> listView = new ListView<>();
        listView.setItems(theList);
        Label results = new Label("");
        results.textProperty().bind(customListBinding.asString());
        HBox labelBox = new HBox(10, new Label("Total: "), results);
        Button button1 = new Button("Add Value");
        button1.setOnAction(evt -> theList.add(numberGenerator.nextInt(101)));
        VBox vBox = new VBox(10, listView, labelBox, button1);
        vBox.setPadding(new Insets(30));
        return vBox;
    }
}
Once again, it’s fairly trivial and looks almost the same as the external custom Binding. There’s no need to create a field for ObservableList, since it’s available in the scope in which the Binding is created, so it can be directly referenced.
There is the slightly strange looking hanging {}, which is the Java way of defining default constructors for anonymous inner classes, and it does nothing other than call super.bind() to set theList as a bound dependency for the Binding.
Something to Watch Out For
Since anonymous inner classes have access to all the fields and local variables in their scope, it can be very tempting to just access any of these in computeValue(). However, if any of those fields or variables are mutable and they are NOT set as bound dependencies for the Binding, then changes in them will NOT trigger invalidation of your Binding.
Changes to those variables will be reflected in the value returned by computeValue() the next time that it is called, but that will only happen when one of the bound dependencies becomes invalidated.