Using Sprites
Sprites are an old concept. I remember that Commodore 64's and the Atari 800's in the early 1980's had the concept of Sprites included in their operating systems. A Sprite is just stand-alone graphic element that can be independently manipulated within a larger image environment.
In the context of this tutorial, we're going to concentrate on the idea of a Sprite as an image container with a set of related images which are displayed within that container. By rapidly changing the image displayed in the container, we can give the illusion of motion.
Single Image Sprites
Nowadays, and especially where CSS and web pages are concerned, a Sprite is usually a single image which contains a number of related images. For web design, this is a good technique as it avoids loading multiple images and improves page performance.
For JavaFX, it can also handy. As an example, let’s look at a single image file containing a number of images for a running troll:
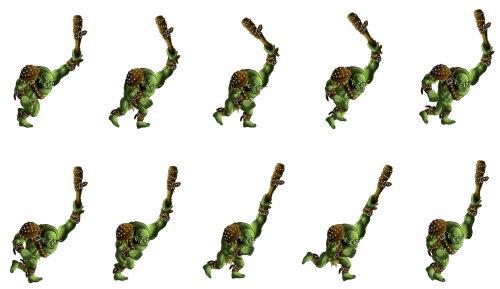
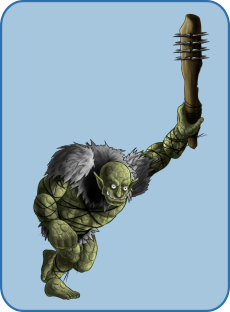
This is one of the trolls from the CraftPix.net free troll series. I think they’re pretty cool, and the images are actually huge, with lots of details. The guy at the top of the page is another one of them.
It’s important to note that your individual images all have to be the same size, and are positioned identically relative to each other, and regularly spaced out.
To start with, let’s just get the Image on the screen in an ImageView, then we can move on from there:
public class SpriteDemo1 extends Application {
    @Override
    public void start(Stage primaryStage) throws Exception {
        primaryStage.setScene(new Scene(createContent()));
        primaryStage.show();
    }

    private Region createContent() {
        BorderPane results = new BorderPane();
        ImageView sprite = new ImageView(this.getClass().getResource("Troll.png").toExternalForm());
        results.setCenter(sprite);
        return results;
    }
}
Which yields this:
![]()
Okay, now we have the image loaded properly. It’s always a good idea to start off super simple, that way you know you don’t have problems locating the resources or anything else. Now, let’s use it as a Sprite.
public class SpriteDemo2 extends Application {
    @Override
    public void start(Stage primaryStage) throws Exception {
        primaryStage.setScene(new Scene(createContent()));
        primaryStage.show();
    }

    private Region createContent() {
        ObjectProperty<Integer> indexProperty = new SimpleObjectProperty<>(1);
        BorderPane results = new BorderPane();
        results.setMinWidth(500);
        results.setMinHeight(400);
        ImageView sprite = new ImageView(this.getClass().getResource("Troll.png").toExternalForm());
        Button button = new Button("Click Me!");
        results.setCenter(sprite);
        results.setBottom(button);
        button.setOnAction(evt -> {
            int currentValue = indexProperty.get();
            indexProperty.set((currentValue < 9) ? currentValue + 1 : 1);
        });
        Rectangle2D viewPort = new Rectangle2D(0, 0, 100, 140);
        sprite.setViewport(viewPort);
        indexProperty.addListener(observable -> {
            int column = indexProperty.get() % 5;
            if (column == 0) {
                column = 5;
            }
            int xOffset = (column - 1) * 100;
            int yOffset = (indexProperty.get() / 5) * 150;
            sprite.setViewport(new Rectangle2D(xOffset, yOffset, 100, 140));
        });
        return results;
    }
}
The individual troll images occupy a 100 x 140 pixel space, so that’s the size of or ViewPort rectangle.
Here we’ve added on ObjectProperty<Integer> to hold the index of the current troll image. The Button “click” action just increments the value from 1 to 10 and then back around to start over.
There’s an InvalidationListener on the Property, which handles the display swapping inside the Sprite. Since there are two rows of trolls, there’s a little bit of calculation to turn a single index number into a row and column. There’s also a 10 pixel gap between the rows, so the vertical offset needs to be a bit bigger than the image height.
Which gives this:
How This Works
Now the ImageView has a ViewPort set on it. Essentially, this is rectangular area of the Image in the ImageView which will be displayed on the screen.
![]()
And then we move the origin of the ViewPort rectangle over 1 troll to the right, like this:
![]()
Since the ViewPort is locked onto the screen in a single position, it looks to the user like the Image behind it is snapping around to put a new troll under the window.
Animating the Sprite
Animating the Sprite is just a matter of automating the changing of the index value in the Property. The InvalidationListener doesn’t need to be changed at all, although it has been split off into its own method to keep the layout code looking clean.
Instead of using Button clicks to trigger the change to the index value, we’re going to use an Animation, which is the JavaFX tool for automating things like this.
The Animation that we’re using is a Transition. What Transition is going to do is to increment a Double counter from 0.0 to 1.0 over the time span of a cycle. In this case the cycle is going to be 1,200 ms, or 1.2 s. Periodically, it’s going to fire the interpolate() method, passing the current value of the counter to it. We don’t know how often it’s going to fire, but we can be fairly sure that it’s going to be many, many times during the cycle.
We need our Transition to turn these calls to interpolate() into a set of discrete changes to the ViewPort of our Sprite, evenly spaced out over the cycle. To do this, we multiple the Double counter by the number of trolls inside the Sprite, and then take the integer value (which rounds down). Since we have 10 trolls in the Sprite, this will yield an integer between 0 and 9, which we shift over to 1 -10 by adding 1.
Even if the interpolate() method is called 100 times before the index moves from 1 to 2, this won’t trigger the InvalidationListener until it actually changes to 2. And so on. This turns the interpolate() calls into discrete events.
public class SpriteDemo3 extends Application {
    @Override
    public void start(Stage primaryStage) throws Exception {
        primaryStage.setScene(new Scene(createContent()));
        primaryStage.show();
    }

    private Region createContent() {
        ObjectProperty<Integer> indexProperty = new SimpleObjectProperty<>(1);
        BorderPane results = new BorderPane();
        results.setMinWidth(500);
        results.setMinHeight(400);
        ImageView sprite = new ImageView(this.getClass().getResource("Troll.png").toExternalForm());
        results.setCenter(sprite);
        setViewPort(sprite, 1);
        indexProperty.addListener(observable -> setViewPort(sprite, indexProperty.get()));
        createAnimation(indexProperty).play();
        return results;
    }

    private void setViewPort(ImageView sprite, int value) {
        int column = value % 5;
        if (column == 0) {
            column = 5;
        }
        int xOffset = (column - 1) * 100;
        int yOffset = (value <= 5) ? 0 : 155;
        sprite.setViewport(new Rectangle2D(xOffset, yOffset, 100, 140));
    }

    private Animation createAnimation(ObjectProperty<Integer> indexProperty) {
        Animation animation = new Transition() {

            private int oldValue = 99;

            {
                setCycleDuration(Duration.millis(1200));
                setInterpolator(Interpolator.LINEAR);
            }

            protected void interpolate(double frac) {
                int value = ((int) (frac * 10)) + 1;
                indexProperty.set(value);
            }
        };
        animation.setCycleCount(Animation.INDEFINITE);
        return animation;
    }
}
A key thing to notice here is that you need to use Linear interpolation, not the default interpolation. Otherwise, he speeds up and slows down as it cycles, which is annoying (and took me a while to figure out).
Scrolling Background
Now we’re going to add a scrolling background to the application. The background will be this image:
![]()
The important thing about this image is that the extreme right edge of the image is identical to the left edge, which means that we can paste a copy of it at either side and it will look like a continuous scene. Even more importantly, the second half will be identical to the first half (obviously).
Now the technique is very similar to the one with the Sprites. We’ll create a rectangular ViewPort, and then move it across the image, a few pixels at a time. Just like with the Sprites, since the ViewPort is fixed on the screen, it will look like the image is moving through the ViewPort, not the other way around.
Infinite Scrolling
In order to handle the infinite scrolling aspect, we need to reset the offset every time the ViewPort is fully into the second half of the image:
![]()
Here there’s a big line showing the join between the images, and you can see how the part of image inside the blue ViewPort is identical to the content shown in the pink ViewPort. So you can flip between the two of them and the user wouldn’t see any difference. This means that we can vary the X offset between 0 and the width of one of the images, resetting it back to zero each time, and it will look like a continuous scroll.
In reality, it would never get that far over to the right, you’ll see…
Here’s the code:
public class SpriteDemo4 extends Application {
    @Override
    public void start(Stage primaryStage) throws Exception {
        primaryStage.setScene(new Scene(createContent()));
        primaryStage.show();
    }

    private Region createContent() {
        ObjectProperty<Integer> indexProperty = new SimpleObjectProperty<>(1);
        ObjectProperty<Integer> backgroundOffsetProperty = new SimpleObjectProperty<>(0);

        ImageView sprite = new ImageView(this.getClass().getResource("Troll.png").toExternalForm());
        ImageView background = new ImageView(this.getClass().getResource("Background.png").toExternalForm());
        background.setViewport(new Rectangle2D(0, 0, 400, 238));
        setViewPort(sprite, 1);
        sprite.setTranslateY(50);
        indexProperty.addListener(observable -> setViewPort(sprite, indexProperty.get()));
        backgroundOffsetProperty.addListener(observable -> {
            background.setViewport(new Rectangle2D(backgroundOffsetProperty.get(), 0, 400, 238));
        });
        createSpriteAnimation(indexProperty).play();
        createBackgroundAnimation(backgroundOffsetProperty).play();
        StackPane results = new StackPane(background, sprite);
        results.setMinWidth(500);
        results.setMinHeight(400);
        return results;
    }

    private void setViewPort(ImageView sprite, int value) {
        int column = value % 5;
        if (column == 0) {
            column = 5;
        }
        int xOffset = (column - 1) * 100;
        int yOffset = (value <= 5) ? 0 : 155;
        sprite.setViewport(new Rectangle2D(xOffset, yOffset, 100, 140));
    }

    private Animation createSpriteAnimation(ObjectProperty<Integer> indexProperty) {
        Animation animation = new Transition() {

            private int oldValue = 99;

            {
                setCycleDuration(Duration.millis(900));
                setInterpolator(Interpolator.LINEAR);
            }

            protected void interpolate(double frac) {
                int value = ((int) (frac * 10)) + 1;
                if (value != oldValue) {
                    if (value == 11) {
                        value = 1;
                    }
                    oldValue = value;
                    indexProperty.set(value);
                }
            }
        };
        animation.setCycleCount(Animation.INDEFINITE);
        return animation;
    }

    private Animation createBackgroundAnimation(ObjectProperty<Integer> backgroundOffsetProperty) {
        Animation animation = new Transition() {
            {
                setCycleDuration(Duration.millis(36000));
                setInterpolator(Interpolator.LINEAR);
            }

            protected void interpolate(double frac) {
                int backgroundOffset = (int) ((frac * 6350)) % 635;
                backgroundOffsetProperty.set(backgroundOffset);
            }
        };
        animation.setCycleCount(Animation.INDEFINITE);
        return animation;
    }
}
This is very similar to the previous example, but we’ve swapped out the BorderPane for a StackPane since we want our running troll to be on top of the scrolling background. We also had to apply a vertical translation to the troll so that his feet lined up with the grass at the bottom, so he didn’t look like he was running in the air.
All of the scrolling is done be manipulating the offset Property in the Animation. The 0.0 -> 1.0 frac is multiplied by an even multiple of the single image width (635 pixels), and then the modulo when divided by the single image width is taken as the new offset. In this case, the multiplier is 6350, which means that each complete cycle of the Transition will go across the image 10 times. In needs to be an even multiplier of the width so that the cycle ends at the right edge of the single image and the next cycle - starting at the left edge - will be a smooth transition.
The only trick here is getting the cycle times right for both Animations, so that the troll looks like he’s running at the same speed as the background is moving. Otherwise he looks like he’s sliding.
Now it looks like this:
Now let’s look at Sprites again…
Multiple Image Sprites
When I started out writing this tutorial, I was under the impression that most Sprites were packaged up into single image files the way I’ve shown above. But when I started looking for good example Sprites to use, I found that many of them are packaged up as individual images.
In fact, this is the way that the trolls were packaged up - a Zip file with individual images. I wasn’t going to use them at first, but they are just too awesome not to use. So I ended up creating a composite image Sprite file myself to show how that works.
But now, let’s look at how to use individual files. There were three different trolls in the Zip file, so let’s use a different troll, but we’ll stick to the “running” Sprites.
The Technique
In many ways, this is simpler than the single image file Sprite. There are ten images, all named “Run_00{x}.png”, where the “x” is an index. So we load them into a Queue. At this point we aren’t even really interested in the numbering of the images at all. They are just a sequence that we’ll rotate through. To keep the Queue going, we add each Image that we remove from the ImageView to the end of the Queue, then load the one from the front into the ImageView.
I’ve kept the index Property, in part just to keep the separation between the layout and the animation control. But the Listener doesn’t even look at the value of the Property. There is a call to get(), but it’s just there to revalidate the Property. However, the mechanics of the index Property still convert the continuum of values for frac into 10 discrete, fairly evenly spaced out, events.
public class SpriteDemo5 extends Application {
    @Override
    public void start(Stage primaryStage) throws Exception {
        primaryStage.setScene(new Scene(createContent()));
        primaryStage.show();
    }

    private Region createContent() {
        ObjectProperty<Integer> indexProperty = new SimpleObjectProperty<>(1);
        ObjectProperty<Integer> backgroundOffsetProperty = new SimpleObjectProperty<>(0);
        Queue<Image> imageQueue = getImages();
        ImageView sprite = new ImageView(imageQueue.remove());
        ImageView background = new ImageView(this.getClass().getResource("Background.png").toExternalForm());
        background.setViewport(new Rectangle2D(0, 0, 400, 238));
        sprite.setTranslateY(18);
        indexProperty.addListener(observable -> {
            indexProperty.get();
            changeTrollImage(sprite, imageQueue);
        });
        backgroundOffsetProperty.addListener(observable -> {
            background.setViewport(new Rectangle2D(backgroundOffsetProperty.get(), 0, 400, 238));
        });
        createSpriteAnimation(indexProperty).play();
        createBackgroundAnimation(backgroundOffsetProperty).play();
        StackPane results = new StackPane(background, sprite);
        results.setMinWidth(500);
        results.setMinHeight(400);
        return results;
    }

    private Queue<Image> getImages() {
        Queue<Image> imageQueue = new ArrayDeque<>();
        for (int x = 0; x < 10; x++) {
            URL url = this.getClass().getResource("Run_00" + x + ".png");
            imageQueue.add(new Image(url.toExternalForm(), 160.0, 0.0, true, true));
        }
        return imageQueue;
    }

    private void changeTrollImage(ImageView sprite, Queue<Image> imageQueue) {
        imageQueue.add(sprite.getImage());
        sprite.setImage(imageQueue.remove());
    }

    private Animation createSpriteAnimation(ObjectProperty<Integer> indexProperty) {
        Animation animation = new Transition() {
            {
                setCycleDuration(Duration.millis(900));
                setInterpolator(Interpolator.LINEAR);
            }

            protected void interpolate(double frac) {
                int value = ((int) (frac * 10));
                indexProperty.set(value);
            }
        };
        animation.setCycleCount(Animation.INDEFINITE);
        return animation;
    }

    private Animation createBackgroundAnimation(ObjectProperty<Integer> backgroundOffsetProperty) {
        Animation animation = new Transition() {
            {
                setCycleDuration(Duration.millis(36000));
                setInterpolator(Interpolator.LINEAR);
            }

            protected void interpolate(double frac) {
                int backgroundOffset = (int) ((frac * 6350)) % 635;
                backgroundOffsetProperty.set(backgroundOffset);
            }
        };
        animation.setCycleCount(Animation.INDEFINITE);
        return animation;
    }
}
One thing I did was to scale the Images to the correct size, rather than have the ImageView scale them for display. This might make some difference in performance, but it’s hard to tell with such a simple example. In a busy screen with many Sprites, it could become important.
I also scaled this troll a bit bigger than the last one. So his vertical positioning needed adjustment.
It looks like this:
Conclusion
I hope that you can see that both animated Sprites and scrolling backgrounds are fairly easy to implement in JavaFX.
Most Sprites are bundled up with a variety of different action sequences. The trolls have walking, jumping, dying, running, attacking and idle. Some others might have “firing”, or “exploding”. I can see a strong case for packaging everything up into a single class that extends ImageView, and having methods to start up different animations. So you could have a class called Troll, and then call troll.run(), or troll.attack() to trigger the appropriate animation. That would allow you to have different kinds of trolls on the screen and your layout code wouldn’t contain any of the mechanics about the animation - which would be very clean.