Introduction
This is the second article in a series that started with Understanding ListView. If you’re new to ListView you might want to take a look at that article first, as it explains some important concepts about how ListView works, and we’ll be building on that information in this article.
ListCell as a Layout
ListView really starts to shine when you look at it as an alternative to TableView to display complex data models. ListView is especially good when you have sparsely populated fields in your data, where TableView would gobble up valuable screen real estate on largely empty columns. It can also compress the display of information into a much tighter space and improve the visibility of certain data. Even more, ListView is extremely powerful when you look at it as a container for layouts that using the power of VirtualFlow to handle large amounts of data.
For the example of this, I found a really nifty resource on the web - a JSON file filled with thousands and thousands of clues and answers from the game show, “Jeopardy!”. The data for this is highly structured, with information about the show that each question appeared on, what round it came from, the question value and so on. It also has good potential to be interactive, which further shows how ListView can be much, much more than just a “List”.
Before we look at any code, let’s take a look at what the final product should look like:
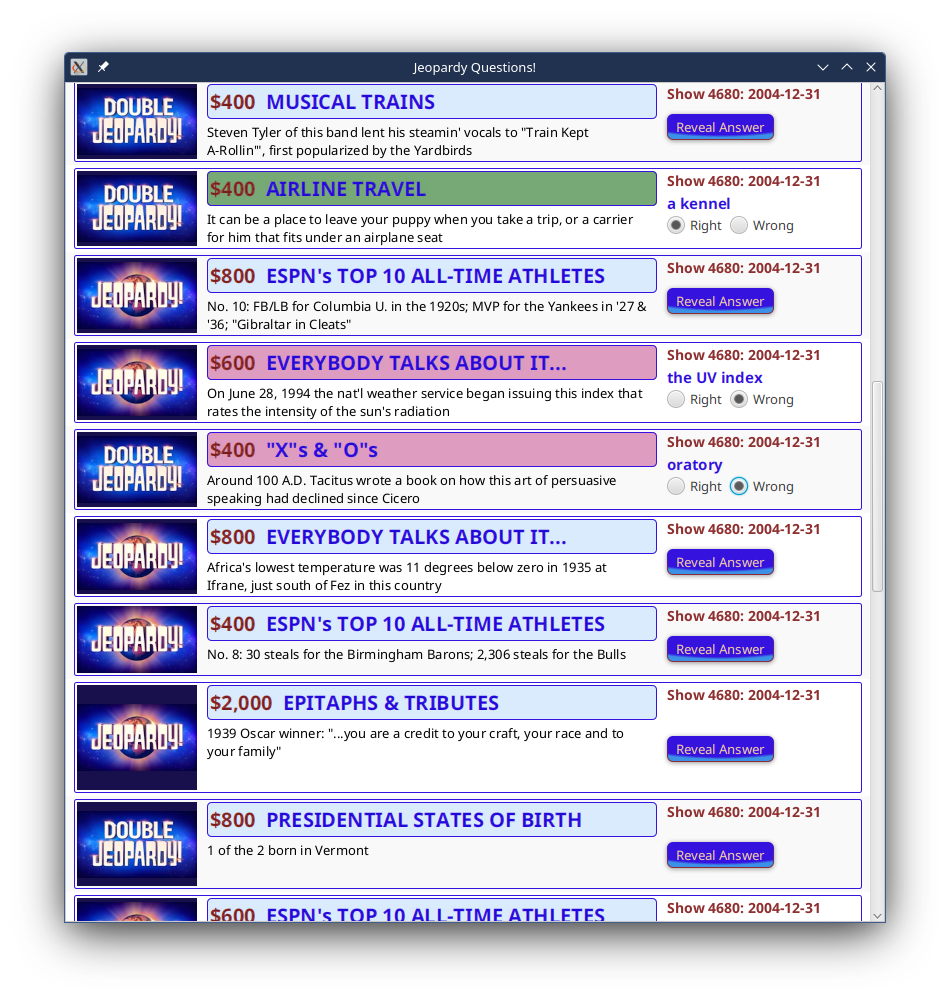
Yeah, it looks a little busy, but that’s the point (as a matter of fact, it looks like a bad 1990’s website). Each row on the ListView here has an image to show what round the question came from, and then a section that shows the question itself, with a heading that’s holds the value of the question and its category. On the right side there’s some information about the show number and the date and a Button that says, “Reveal Answer”. When the user clicks the Button, it disappears and is replaced with the answer and a pair of RadioButtons that say, “Right” and “Wrong”. When you click one of the RadioButtons it changes the background colour of the question heading to either red or green.
The whole thing starts to look like the visualization of an interface for a practice application for Jeopardy! contestants. There’s no database functionality behind it to allow subsets of the questions to be selected, or to track the results, but the visuals are there.
You can see from this that each row works like its own application screen, yet they are contained within the ListView and it really does correspond to the visual display of a List of data.
I switched over to Kotlin for this example. It’s just easier to do some of the layout in Kotlin, and the JSON handling is absolutely trivial using the built-in Kotlin serialization library. If you need to know more about Kotlin and JavaFX, you can check out the articles that I’ve written here. Even if you’re not familar with Kotlin you should be able to figure out what’s going on in these code samples as it’s pretty similar to Java in many ways.
The Data
The original data for this was a 50MB JSON file. I stripped out the first 10KB or so of data to use as a sample. The JSON data looks like this:
{
    "category": "HISTORY",
    "air_date": "2004-12-31",
    "question": "'This Asian political party was founded in 1885 with \"Indian National\" as part of its name'",
    "value": "$1000",
    "answer": "the Congress Party",
    "round": "Jeopardy!",
    "show_number": "4680"
}
I want to point out that this is the state that data came. If you’re offended that the field names are backwards, and the “question” is actually the Jeopardy! “answer” and response is in the “answer” field, or that the response is not in the form of a question…
Well, so am I. But I wasn’t about to fiddle with the JSON data to fix it.
And I de-serialized it into a data object that has the same wrong field names:
@Serializable
data class JeopardyQuestion(
    val category: String = "",
    @SerialName("air_date") val airDate: String = "",
    val question: String = "",
    val value: String = "",
    val answer: String = "",
    val round: String = "",
    @SerialName("show_number") val showNumber: Int = 0
)
You can see how simple the Kotlin serialization library is to use. In this case, I just left everything as Strings because I’m not doing anything other than displaying it as Strings on the screen (except for round, which we’ll get to). If I was going to search or sort on value or airDate then I’d have to convert them to other, more appropriate, data types. But this works for the demo.
Let’s take a look at a sample data model:
class DemoListModel1(question: JeopardyQuestion) {
    val category: StringProperty = SimpleStringProperty(question.category)
    val airDate: StringProperty = SimpleStringProperty(question.airDate)
    val question: StringProperty = SimpleStringProperty(question.question.removeSurrounding("'"))
    val questionValue: StringProperty = SimpleStringProperty(question.value)
    val answer: StringProperty = SimpleStringProperty(question.answer)
    val round: ObjectProperty<QuestionType> = SimpleObjectProperty(QuestionType.fromString(question.round))
    val showNumber: IntegerProperty = SimpleIntegerProperty(question.showNumber)
    val revealed: BooleanProperty = SimpleBooleanProperty(false)
    val gotItRight: BooleanProperty = SimpleBooleanProperty(false)
    val gotItWrong: BooleanProperty = SimpleBooleanProperty(false)

    public fun unbindFrom(other: DemoListModel1?) {
        other?.also { otherModel: DemoListModel1 ->
            revealed.unbindBidirectional(otherModel.revealed)
            gotItRight.unbindBidirectional(otherModel.gotItRight)
            gotItWrong.unbindBidirectional(otherModel.gotItWrong)
        }
        question.unbind()
        round.unbind()
        answer.unbind()
        category.unbind()
        questionValue.unbind()
        showNumber.unbind()
        airDate.unbind()
    }

    public fun bindTo(other: DemoListModel1) {
        question.bind(other.question)
        round.bind(other.round)
        questionValue.bind(other.questionValue)
        category.bind(other.category)
        answer.bind(other.answer)
        showNumber.bind(other.showNumber)
        airDate.bind(other.airDate)
        revealed.bindBidirectional(other.revealed)
        gotItRight.bindBidirectional(other.gotItRight)
        gotItWrong.bindBidirectional(other.gotItWrong)
    }
}
The constructor allows us to create DemoListModel1 from JeopardyQuestion, simply putting the values from JeopardyQuestion into the corresponding Property fields in DemoListModel1. There are 3 BooleanProperty fields that aren’t populated from JeopardyQuestion and these are all used to control aspects of the display in each ListView row.
After that, we have two methods that allow the individual fields in two DemoListModel1s to be bound together. Since we’re going to use bidirectional binding on those 3 BooleanProperty fields, we need to pass the previously bound DemoListModel so that the unbinding can happen. These are basically convenience methods that allow this logic to be kept out of our custom ListCell. We’ll see this in a little bit.
So let’s look at that:
    val format = Json { ignoreUnknownKeys = true }

    public fun getData(): List<JeopardyQuestion> {
        val fileData: String = DemoApplication1::class.java.getResource("JEOPARDY_QUESTIONS.json")?.readText() ?: ""
        val data: List<JeopardyQuestion> = format.decodeFromString<List<JeopardyQuestion>>(fileData)
        println("The Data $data")
        return data.shuffled()
    }

    public fun loadModel(data: List<JeopardyQuestion>) = data.map { DemoListModel1(it) }
}
I left it as two methods because, if there was a database or service behind this, you’d use a Task in the Controller and call the getData() function from the background thread, and loadModel() from the FXAT. That’s just habit, but I didn’t bother with the Task since I’m only using a small dataset from a file resource.
The Layout and the Application
The layout for the application is just the ListView:
class DemoViewBuilder1(val data: ObservableList<DemoListModel1>) : Builder<Region> {
    override fun build(): Region {
        return ListView<DemoListModel1>().apply {
            items = data
            cellFactory = Callback { JeopardyCell() }
        }
    }
}
Here’s the Controller:
class DemoController1() {
    val model = FXCollections.observableArrayList<DemoListModel1>()
    val interactor = DemoInteractor1()
    val viewBuilder = DemoViewBuilder1(model)

    init {
        model.setAll(interactor.loadModel(interactor.getData()))
    }

    public fun getView() = viewBuilder.build()
}
And the Application itself:
class DemoApplication1 : Application() {

    val format = Json { ignoreUnknownKeys = true }
    override fun start(stage: Stage) {
        val scene = Scene(DemoController1().getView(), 820.0, 840.0)
        scene.addWidgetStyles()
        stage.title = "Jeopardy Questions!"
        stage.scene = scene
        stage.show()
    }
}

fun main() {
    Application.launch(DemoApplication1::class.java)
}
Finally, we’ll look at the enum for the “round”, which I called QuestionType:
enum class QuestionType(filePath: String) {
    JEOPARDY("Jeopardy_S38_OnSetLogo.png"),
    DOUBLE_JEOPARDY("JS37TOC-S38_DJ.png"),
    FINAL_JEOPARDY("JS37TOC-S38_FJ.png");

    val image = Image(QuestionType::class.java.getResource(filePath)?.toExternalForm())

    companion object {
        public fun fromString(stringName: String) = when (stringName) {
            "Jeopardy!" -> JEOPARDY
            "Double Jeopardy!" -> DOUBLE_JEOPARDY
            "Final Jeopardy!" -> FINAL_JEOPARDY
            else -> JEOPARDY
        }
    }
}
This is very similar to the Animal enum earlier. However, we’ve added a static fromString() function to make the mapping from the JSON String values easier.
The Custom ListCell
You can see from this that just about all of the components of the application are very straight-forward and simple. The Interactor gets the data and loads it into the Presentation Model, which is just a list of JavaFX Property POJO’s, the layout is just a ListView and the Controller doesn’t do much except instantiate things and get the Interactor started on fetching the data.
Which means that all the cool stuff must be in the custom ListCell! First let’s take another look at Cell.updateItem()
About Cell.updateItem() (Part 2 if you’ve read the Previous Article)
Let’s talk about what Cell.updateItem() actually does. First, here’s the source code for it:
 protected void updateItem(T item, boolean empty) {
    setItem(item);
    setEmpty(empty);
    if (empty && isSelected()) {
        updateSelected(false);
    }
}
That’s not much, actually. What do setItem(), setEmpty() and updateSelected() do? Here’s the setItem() code:
private ObjectProperty<T> item = new SimpleObjectProperty<T>(this, "item");

public final ObjectProperty<T> itemProperty() { return item; }

/**
* Sets the item to the given value - should not be called directly as the
* item is managed by the virtualized control.
* @param value the new data value to set in this cell
*/
public final void setItem(T value) { item.set(value); }
OK. From this we can see that there’s an ObjectProperty<T> in the Cell called item. T is just the generic type of the data that we’re putting in the Cell. And Cell.updateItem() just takes whatever new data is being put into the cell, and loads it into that property. Which explains the name, updateItem() - because that’s what it does. Along the way, it also updates empty and selected, which are also properties of the Cell.
I think that this is the way to view Cell.updateItem(). It’s data update function, and it should just do data update stuff. More specifically, item, empty and selected form the Presentation Model for the Cell, and that’s all that Cell.updateItem() should be doing, even when we override it - updating the Presentation Model.
It’s tempting at this point to consider item to be the Presentation Model for the Cell and to build a layout based on that. That’s not a bad idea, except for one thing: Since item is actually a Property wrapper around that Presentation Model, it will change constantly as the application runs. This is fundamentally different from the way we create standard Reactive layouts, where the Presentation Model is immutable, and only the values in its properties change.
This makes it very difficult to simply Bind your data properties in the Nodes in your layout to properties in the object contained in item, since whenever the value in item changes all of the field properties inside it change their references. So, if you do something like this:
  val someText = Text().apply{
      textProperty.bind(getItem().abcProperty())
  }
Then you are going to have problems. The first of which is that getItem() is going to return Null when this code is run as part of the constructor of your ListCell, that’s because nothing will have been loaded into the ListCell yet.
But even if you could get around that somehow, as soon as a new value is loaded into item, then getItem().abcProperty() would return an entirely new Property, and your binding on someText.textProperty() would become invalid.
Clearly, that’s a problem.
A better approach is to create an immutable Presentation Model of the same type as the ListCell data type (in other words, the same type as the object contained in item), and bind your Node properties to that object. Then manage the values in its fields, updating them as item changes.
And that brings us back to Cell.updateItem().
Since we know that any changes to item have to go through here, we can treat it as a virtual ChangeListener and use it to reset our immutable Presentation Model. Also, since we want our layout to respond to any changes in the underlying data in real-time, we Bind the fields in our Presentation Model to the fields in the new item. Let’s take a look at that:
public override fun updateItem(item: DemoListModel1?, isEmpty: Boolean) {
    model.unbindFrom(this.item)
    super.updateItem(item, isEmpty)
    graphic = if (!isEmpty && (item != null)) {
        model.bindTo(item)
        layout
    } else {
        null
    }
}
In this code snippet, model is the immutable Presentation Model in our ListCell. Now you can see the reason that we put the bindTo() and unbindFrom() methods into DemoListModel1. The other thing to note about this is that we are unbinding before we call super.updateItem(). This means that we are really treating updateItem() as a ChangeListener since we’re accessing both the old value in item and the new value that’s going in.
In Kotlin, if is also an expression, and the value of the last line in a block is the return value of that block. The if statement here will either populate graphic with Null or our layout depending on the the condition.
The Layout
Honestly, we could just stop this article right here, since you’ve seen all of the code specific to manipulating the data into and out of the ListCell. At this point the layout of the ListCell is just like any other layout, with an immutable Presentation Model that we bind to the various properties of our layout’s Nodes. But we’ll take a look at it anyway.
Here’s the entire ListCell:
class JeopardyCell() : ListCell<DemoListModel1>() {

    private val model = DemoListModel1(JeopardyQuestion())
    private val layout: Region

    companion object {
        val wrongAnswerPS: PseudoClass = PseudoClass.getPseudoClass("wrong")
        val rightAnswerPS: PseudoClass = PseudoClass.getPseudoClass("right")
    }

    init {
        layout = HBox(10.0, createImageBox(), createQuestionPanel(), createRightPanel()) addStyle "cell-box"
        text = null
    }

    private fun createImageBox() = StackPane(
        imageViewOf(Bindings.createObjectBinding({ model.round.value.image }, model.round))
    ) addStyle "image-box"

    private fun createQuestionPanel() =
        VBox(4.0, createHeadingBox(), wrappingTextOf(model.question, 440.0)) withMinWidth 450.0

    private fun createHeadingBox() = HBox(10.0).apply {
        children += Label() styleAs "question-value" bindTo model.questionValue
        children += headingOf(model.category)
        model.gotItRight.addListener(InvalidationListener {
            this.pseudoClassStateChanged(
                rightAnswerPS,
                model.gotItRight.value
            )
        })
        model.gotItWrong.addListener(InvalidationListener {
            this.pseudoClassStateChanged(
                wrongAnswerPS,
                model.gotItWrong.value
            )
        })
    } addStyle "heading-box"

    private fun createRightPanel() = VBox(2.0, createShowInfo(), createAnswerPane())

    private fun createShowInfo() = TextFlow(
        styledTextOf("Show ", "show-info"),
        styledTextOf(model.showNumber.asString(), "show-info"),
        styledTextOf(": ", "show-info"),
        styledTextOf(model.airDate, "show-info")
    )

    private fun createAnswerPane() = StackPane().apply {
        children += Button("Reveal Answer").apply {
            onAction = EventHandler { model.revealed.value = true }
            visibleProperty().bind(model.revealed.not())
        } styleAs "answer-button"
        children += createRevealAnswerBox()
        alignment = Pos.CENTER_LEFT
    }

    private fun createRevealAnswerBox() = VBox(2.0).apply {
        children += (Label() styleAs "label-answer" bindTo model.answer).apply {
            maxWidth = 180.0
            minWidth = 180.0
            isWrapText = true
        }
        children += createRightWrongBox()
        visibleProperty().bind(model.revealed)
    }


    private fun createRightWrongBox() = HBox(6.0).apply {
        val rightRB = RadioButton("Right")
        val wrongRB = RadioButton("Wrong")
        rightRB.selectedProperty().bindBidirectional(model.gotItRight)
        wrongRB.selectedProperty().bindBidirectional(model.gotItWrong)
        ToggleGroup().apply {
            toggles += listOf(rightRB, wrongRB)
        }
        children += listOf(rightRB, wrongRB)
    }


    public override fun updateItem(item: DemoListModel1?, isEmpty: Boolean) {
        model.unbindFrom(this.item)
        super.updateItem(item, isEmpty)
        graphic = if (!isEmpty && (item != null)) {
            model.bindTo(item)
            layout
        } else {
            null
        }
    }
}
This layout code makes extensive use of a library of factory methods and extension methods (which is a Kotlin thing) to compress the layout code so that it’s just layout, with as much configuration code as possible off somewhere else where we don’t need to worry about it. Most of the meanings are intuitively obvious (I hope). For instance: styledTextOf(StringProperty, String) creates a Text bound to the specified StringProperty and with the specified CSS selector appended to its StyleClass list. Even if you don’t really understand the syntax, you should be able to get the idea about what it’s doing.
The main layout is an HBox with 3 sections: an image, a “Question Box” and then a Pane with show info and the interactive answer stuff. These are all built in their own builder methods.
The PseudoClass code is there to change the background colour of the header box to correspond to whether or not the question was answered correctly.
Since the “Show Information” section is composed of some static text and some bound values, a TextFlow was used. This seemlessly puts the various pieces together into a single element.
The interactive part is where most of the complexity lies. Basically, it’s a StackPane with two children, only one of which is visible at any given time. The visibility is controlled by model.revealed; the Button is visible when it’s false and the revealAnswerBox when it’s true. Clicking the Button does nothing more than set model.revealed to true.
The revealAnswerBox is just a VBox with a Label showing the answer and an HBox holding the RadioButtons. The RadioButtons are in a ToggleGroup so that only one can be selected at any given time. Each RadioButton has its selected property bound to one of model.gotItRight or model.gotItWrong. Selecting one of these RadioButtons will trigger a change in one or both of the PseudoClasses that control the background colour of the question heading box.
What’s important to note here is that all three of the interactive elements are bidirectionally bound (well, the Button is an action) to the model properties which are, in turn, bidirectionally bound to the item properties. And the item is actually a reference to one of the DemoListModel1 objects in the list backing the ListView. This means that clicking the Button or selecting one of the RadioButtons triggers a permanent change to the related field in one of the items in the ObservableList.
And this is important because when the user scrolls that row out of the viewport, then that ListCell is released to be reused for another row. But if the user scrolls that row back into the viewport, then those updated values are going to be loaded back into the ListCell through updateItem().
Here’s the Stylesheet:
.root {
   -theme-colour: #3612dF;
   -contrast-colour: #8F2F2F;
   -complementary1: #3c91e6;
   -complementary2: #daebfd;
   -wrong-colour: #de9dc0;
   -right-colour: #76a975;
   -image-background-colour: #17104d;
}

.label-heading {
  -fx-text-fill: -theme-colour;
  -fx-font-weight: bold;
  -fx-font-size: 20px;
}

.question-value {
  -fx-text-fill: -contrast-colour;
  -fx-font-weight: bold;
  -fx-font-size: 20px;
}

.show-info {
  -fx-fill: -contrast-colour;
  -fx-font-weight: bold;
  -fx-font-size: 14px;
}

.label-answer {
  -fx-text-fill: -theme-colour;
  -fx-font-weight: bold;
  -fx-font-size: 15px;
}

.heading-box {
  -fx-border-color: -theme-colour;
  -fx-border-radius: 4px;
  -fx-padding: 2px;
  -fx-background-color: -complementary2;
  -fx-background-radius: 4px;
}

.heading-box:wrong {
  -fx-background-color: -wrong-colour;
}

.heading-box:right {
  -fx-background-color: -right-colour;
}

.image-box {
  -fx-background-color: -image-background-colour;
}

.cell-box {
  -fx-border-color: -theme-colour;
  -fx-border-radius: 2px;
  -fx-padding: 2px;
}

.answer-button {
    -fx-background-color:
        linear-gradient(-theme-colour, -contrast-colour),
        radial-gradient(center 50% -10%, radius 200%, -theme-colour 45%, -complementary1 50%);
    -fx-background-radius: 6, 5;
    -fx-background-insets: 0, 1;
    -fx-effect: dropshadow( three-pass-box , rgba(0,0,0,0.4) , 5, 0.0 , 0 , 1 );
    -fx-text-fill: #F9CCA2;
}
Conclusion
The point of this tutorial is to help you to see a ListView as a container for a reusable layout allowing it to display a potentially large amount of date - not just as a vehicle to show a “list” of stuff. Essentially, this reusable layout is no different from any other kind of Reactive layout that you might create, except that you need to deal with the issue of loading new Presentation Models into it as cells are reused when they scroll into the viewport.
Once you see ListView in this light, it opens up a whole world of possibilities for interesting GUI designs. And it frees you from the spreadsheet-like confines of TableView.