Introduction
Everybody has this problem when they start out. There’s an image, property, FXML or CSS file that they want to load into its appropriate JavaFX object, and all they can get is some variant of “Null Pointer Exception”.
No matter what they do. It’s maddening.
If they are on the right track, they’re at least using Object.getResource(). Inevitably, however, they get lost trying to figure out where they should put the file so that Object.getResource() can find it. It’s extra frustrating, because Object.getResource() has no facility to tell you where it looked for the file. If it can’t find it, it just returns Null, which doesn’t seem very enlightening, and certainly not useful.
So where does Object.getResource() look for the file?????
That’s what we’re going to talk about here.
What’s With the Resources, Anyway?
Java applications are generally designed with the intention that you’re going to bundle them up into a Jar file and distribute them to client devices. That Jar file needs to be complete, and to have all the classes and files required to run the application. To that end, Java provides a mechanism to include files into a Jar file as resources, and methods to locate them at runtime.
In order to have your programs find your resources, you need to put those files in the correct place in your Jar file. This is 2024 (when I wrote this), and you should be using some kind of tool to manage your applications as projects. A good IDE is as start, but it’s even better if you use a build engine like Gradle or Maven to handle the actual build.
If you use one of these tools, and you put your files in the correct place in your source structure, then your resources files will be where they need to be at runtime, and your programs will find them.
Project Organization
First off, I’m going to assume you’re using some kind of build engine like Gradle, Maven or (gasp!) Ant. If you’re not, you should be as these handle all your dependencies and organize your project in a nice predictable way. To keep things simple, I’m going to talk specifically about projects built with Gradle, but Maven is also very similar.
On the Source Side
Gradle will expect that your project is divided into Source Sets. A typical project will have a “main” Source Set, and a “test” Source Set. Your production code and resources would reside in the “main” Source Set, while unit tests and related resources would go in the “test” Source Set.
Within a Source Set, the project is divided into code sections, and a “resource” section. It’s a best practice to have one code section for each programming language in your project. Most JavaFX projects will have a “java” code section, but they could also have a “kotlin” section or a “groovy” section. Inside each language section you will have folders that correspond to the individual packages in your project.
There will only be a single “resource” section in a Source Set. It’s really just a folder, and the files contained within it can be in whatever directory structure that the programmer wants to use.
On the “Build” Side
Part of the Gradle build process is to copy all the classes after they have been compiled into a directory structure starting with “build”. There will be a subdirectory called “classes” and all the compiled classes will be found in there. There will also be a subdirectory called “resources”. Under that there will be a subdirectory each for “main” and whatever other Source Sets are built. Under these subdirectories will be folders that follow the structures that were used in the “resource” folders of each Source Set on the source side.
It is possible to configure a Gradle build to do all kinds of wild and wonderful things when copying the files from source to build. Files can be selectively copied, renamed, moved to different locations. Files can be duplicated into different directories, duplicated and renamed - almost anything. We’re not going to worry about those things here, because if you’re doing that in your Gradle build, you’re probably not going to be reading this article.
What This Means
The biggest thing to keep in mind about all of this is that your code is going to run against the file and folder structure in the “build” subdirectory. This means that the real source of truth for how you should be looking for your resources is contained in the build subdirectory. If you are using an IDE like IntelliJ IDEA, you’ll be able to see the build directory right in your project structure window, and you can expand that folder and see exactly where Gradle has put your resource files.
If you’re stuck, then look in the build directory to see where your resources really are.
Let’s take a look at the structure of my WidgetsFX project:
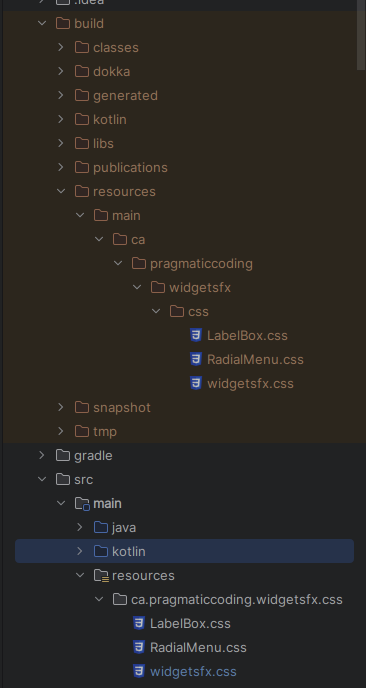
This is IntelliJ IDEA, and the orange part is the /build section of the project, rebuilt every time that Gradle does a build (or other operations). You can see how the files have been copied over. Perhaps the biggest thing to note is that /resources and /main have been inverted. We have /src/main/resources on the source side, and /build/resources/main on the build side.
Let’s look at the Jar file that Gradle creates:
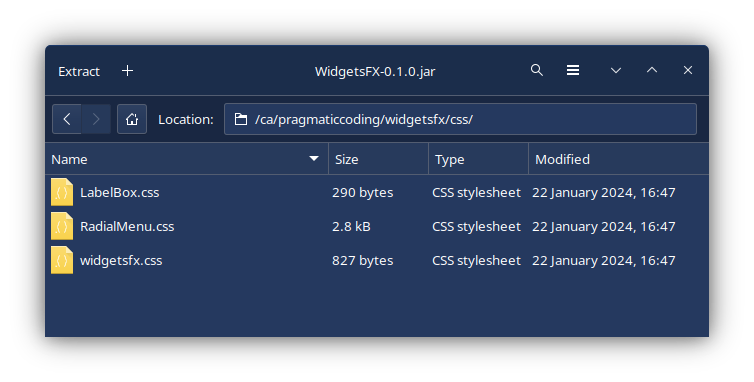
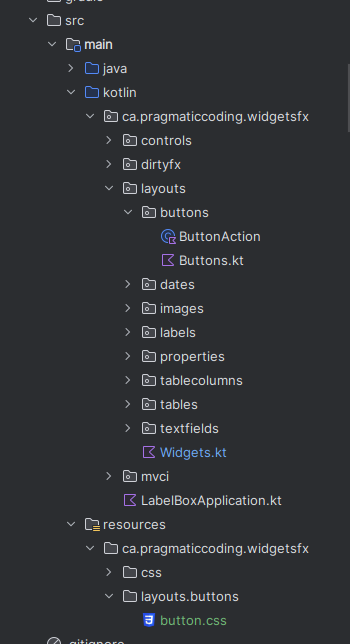
Here you can see that all three of my CSS files are placed into /ca/pragmaticcoding/widgetsfx/css. There’s no main or resources anywhere. Could it be that these resources are just mingled in with the classes in their respective package folders? There are no classes defined in ca.pragmaticcoding.widgetsfx, but ca.pragmaticcoding.widgetsfx.layouts.buttons has some. Let’s add a CSS file to that package to see what happens:
I’ve regenerated the Jar file, so we can have a look inside:
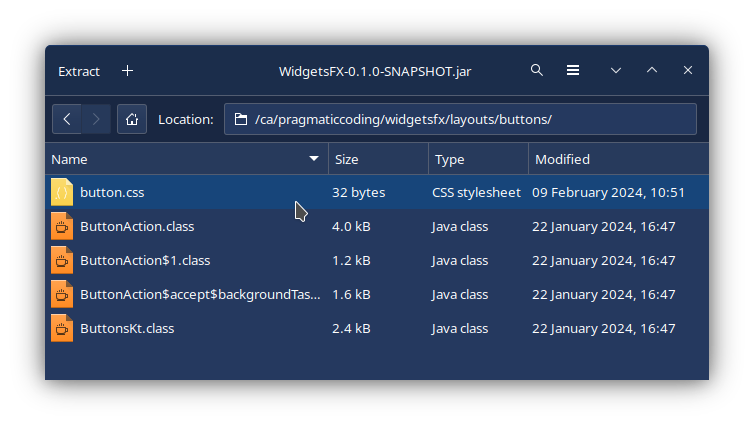
Sure enough, we now have button.css in our Jar file, right beside the class files that the build created for that package. This is also why, if you look any of this up on the Web, you’ll find lots of mentions of “classpath” in the explanations. It doesn’t look so much like classpaths in the resources folder, but when you peek into the Jar file you’ll see how the resources share the same classpath as the classes.
Now we have a better idea about what resources are, why we need them and how they get deployed in our IDE and our Jar files, let’s look at how we access them.
Finding Resources
This is where the trouble starts. You look up getResource(), and it’s in some class called Class.
It turns out that every class that you define has some (kind of) static field of the type Class, and you can even call Object.getClass() to get an instance of it. And Class has its own methods! One of those methods, it turns out, is Class.getResource().
If you look at the JavaDocs for Class.getResource() you’ll find this description:
Finds a resource with a given name. The rules for searching resources associated with a given class are implemented by the defining class loader of the class. This method delegates to this object’s class loader. If this object was loaded by the bootstrap class loader, the method delegates to ClassLoader.getSystemResource(java.lang.String).
Class loader? What’s that?
Good grief! This is getting complicated, from the JavaDocs for ClassLoader we have:
A class loader is an object that is responsible for loading classes. The class ClassLoader is an abstract class. Given the binary name of a class, a class loader should attempt to locate or generate data that constitutes a definition for the class. A typical strategy is to transform the name into a file name and then read a “class file” of that name from a file system.
It all seems very “meta”, but it’s actually not too bad if you take the time to read it slowly. It’s really just a class, like any other, and it has some method that locates your class file and does the actual instantiation of it into an object in memory. And just like any other class, it has methods that can be called, or even overridden in subclasses. One of those methods is ClassLoader.getResource(). The JavaDocs tell us that it will try to call its parent’s ClassLoader.getResource() first, otherwise it will use ClassLoader.findResource() to find the file.
However, in the JavaDocs, ClassLoader.findResource() is a dead end, it just says:
Finds the resource with the given name. Class loader implementations should override this method to specify where to find resources.
Great. All that for nothing.
Let’s go back to the JavaDocs for Class.getResource(), since it has some more information:
Before delegation, an absolute resource name is constructed from the given resource name using this algorithm:
If the name begins with a ‘/’ (‘\u002f’), then the absolute name of the resource is the portion of the name following the ‘/’. Otherwise, the absolute name is of the following form:
modified_package_name/nameWhere the modified_package_name is the package name of this object with ‘/’ substituted for ‘.’ (‘\u002e’).
At this point, we at least have an idea what “before delegation” means - it’s going to pass the actual work on to a ClassLoader, but first it’s going to do something with our resource name.
Before it goes looking for the resource, it’s going to massage the resource location String that you pass to it. This really boils to one of two things:
-
If your resource name starts with a “/”
We’re done, just pass on the location exactly as it is. -
If your resource name does NOT start with a “/”
Get the package name of theClass, transform every “.” separating the sub-packages into “/” and then put it in front of the resource name, separated with another “/”.
This tells us everything that we need to know. By understanding how this method is going to pass our resource location on to the routine that actually finds it, we can control where we want to put our resources.
Some Examples
First let’s look at the simplest example. An absolute path name starting with “/”:
/myResource.xyz
That’s going to be left untouched, the ClassLoader will be given:
/myResource.xyz
Now, let’s assume that we are calling this from com.example.package1.myClass, and we don’t use the leading “/”:
myResource.xyz
This is going to result in the following passed to the ClassLoader:
/com/example/package1/myResource.xyz
Now, let’s look at two examples with paths, instead of just file names. First:
/samples/myResource.xyz
Which, unsurprisingly, will result in this passed to the ClassLoader:
/samples/myResource.xyz
And then, once again called from com.example.package1.myClass,
samples/myResource.xyz
Will result in this passed to the ClassLoader:
/com/example/package1/samples/myResource.xyz
Calling it From Code:
So, how do you call Class.getResource()?
It’s pretty simple. However, most IDE’s will nag about possible NPE’s, so it’s cleaner if you handle the possibility that Class.getResource() will return Null in your code.
Remember that getClass() is pretty much a static method as far as we are concerned. So you can call it that way.
From Java
Generally, you won’t see anyone handling possible Null values from Class.getResource() properly in any examples on the Web. The usual implementation is something like this:
scene.getStylesheets().add(this.getClass().getResource(resourceName).toExternalForm());
Honestly, getStylesheets().add() won’t care if you pass it a Null value, but toExternalForm() will throw an NPE. IntelliJ IDEA complains about it and gives the following “improvement” to the code:
scene.getStylesheets().add(Objects.requireNonNull(this.getClass().getResource(resourceName)).toExternalForm());
This isn’t going to execute any better, but it gets rid of the annoying yellow squiggly under the code. You should probably check for Null and then only keep going if it isn’t Null, like this:
URL resource = this.getClass().getResource(resourceName);
if (resource != null) {
   scene.getStylesheets().add(resource.toExternalForm());
}
Of course, if this fails to load the resource, you won’t get any notice, and you’ll probably waste a lot of time wondering why your styleclass selector isn’t working. Perhaps you should put an else block on to it and throw a custom BadResourceException or something like that. You could also just put the original version in a try/catch block that throws a meaningful exception when it fails.
In Java, you can get access to the Class in a static fashion, you just access {ClassName}.class:
URL resource = ResourceDemo.class.getResource(resourceName);
This is useful if you have a resource in a different package from the one that the class the code is in, but you still need to access it. Pick some class that is in that package and use it’s class to load the resource. This feels a bit like a kludge to me, you might be better off by putting a resource loader class in that package and calling it instead.
From Kotlin
In Kotlin, it’s easy to avoid Null issues by using the ?.let operation. This is much like using Optional.ifPresent() in Java, and it feels like it inverts the logic by evaluating the resource and then doing something with it if it’s valid.
Note that, in Kotlin, ::class returns a KClass, which is kind of the Kotlin version of the Java Class. To get the Java Class we call KClass.java() which gives us access to getResource().
These first two examples are essentially the same, we’re taking an already instantiated object, getting the Class and then calling getResource() on it. In most cases we’ll need to convert the URL to a String, so we use the ?.toString() to do the conversion if it’s not Null. Then, if the result is not Null we pass it to let{} to load the resource into whatever JavaFX class needs it. Note that the it -> is only included here for clarity, you would leave it out in real life.
myObject::class.java.getResource(resourceName)?.toString()?.let { it -> doSomethingWithIt }
this::class.java.getResource(resourceName)?.toString()?.let {it -> doSomethingWithIt }
These examples, however, will silently fail if they don’t have an Elvis operator at the tail of the chain to catch them. Here’s what the first example might look like with this implemented:
myObject::class.java.getResource(resourceName)?.toString()?.
    let { it -> doSomethingWithIt }?: throw BadResourceException(resourceName)
Of course, you’ll have to provide the BadResourceException.
The next example is nifty. Here we just create an anonymous inner class instead of using something that’s already instantiated. It will get its package from whatever package it’s defined in. This is useful because it can be defined at the file level, outside of any classes:
object {}::class.java.getResource(resourceName)?.toString()?.let { it -> doSomethingWithIt }
Finally, we’re going to use ::class as if it were a static function. This is about as close as you can get to saying, “Hey! Use this other package.”, when you call getResource(). This can be useful if you have your resources grouped at some parent package level, and you need to get at them from a sub-package. Alternatively, you can declare a function that uses object {} at that parent package level and call that (which might be a better approach).
SomeClass::class.java.getResource(resourceName)?.toString()?.let { it -> doSomethingWithIt }
Resource Organization
While you can put your resources into the “resources” section in any way that you want, you should keep in mind that the resource methods in Java are designed to facilitate organizing your resources by package. This might be useful to you, but it’s also probably the thing that’s causing you the most trouble with finding your resources.
The Key Consideration - Uniqueness
When deciding how you are going to organize your resources, you have one key question to ask:
What is the scope in which a resource is going to be used?
This is because you can only have one resource with the same name in particular context, which roughly corresponds to a file in a directory. For a simple project with an uncomplicated layout, this question is largely moot because you don’t have opportunities for name collisions. However, when you start to use things like subprojects, or intend to overwrite resources from libraries, this becomes more important. Also, if you intend to use a standard resource name, but implemented in different contexts, this can become more complicated.
Possible Schemas
- Everything in
/resources - This is the simplest possible organizational scheme. Just dump all of your resource files into the root directory of
/resources. Although it feels unsophisticated, there’s nothing wrong with this, and it’s perfectly fine for small applications or any situation where there is no point in imposing unneeded structure and complication. It’s also easy to use, because every class in your application can access every resource with any complicated code gymnastics.
To access these resources, you’ll start off every resource name with/. - Divided Up By Type
- The next step up is to organize your resources by type. So create a subdirectory off
/resourcesfor each resource type. This would mean you might have directories like/resources/images,/resources/cssor/resources/sounds. You can use any other classification system that makes sense to you, including something that divides your application up, but doesn’t use the Java packages.
This makes it a little easier to keep track of what resources you have, but doesn’t really have any programming impacts over using a single directory. Once again, this can be a great approach for any application that needs a bit more organization to make it easier manage the resources but doesn’t have any conflict issues with different packages, modules or libraries.
Here too, it’s easy for every class in every package in your application to access any resource by starting every resource name with/{subdirectory}/. - Divided Up By Package
- When you start to have possible conflicts with names between packages, then you’ll need to divide your resources into packages. For instance, if you have three different logo image files, all used in different packages, but you just want to call each file
logo.png, then you’ll need to start dividing the resources by package.
To access resources organized this way, just use the resource name without a leading/. - Divided Up By Package and Type
- This is combination of the previous two methods. Within each package, have a subdirectory for each type of resource. For instance, you might have
/resources/com/example/package1/imagesor/resources/com/example/package1/subpackagex/css. This is the kind of layout that you’d probably use if you were writing a large, complicated application or a library of some sort.
To access these resources, you’ll start your resource name with the format{subdirectory}/. Note that there is no leading/. - Some Combination of the Above
- There’s no rule that says that you need to have only one organization schema in place. If you have resources with a small scope that you want to keep isolated from other parts of your application, then put them in package dependent locations. At the same time, if you have resources that at global in their scope, then put them in a location which isn’t package dependent.
Which method is best?
There really is no answer to this because the main driver is context. The best guide might be to simply to use the simplest possible scheme that works well for the project. For instance, if you’re building a library that is intended to be used by other projects, it would probably be best to consider “root” to be the base, unique, package for that library. That way you would avoid collisions with resources in the utilizing projects unless they deliberately chose to override your resource files.
In the same way, if you’re building a project that uses other libraries, you might want to keep all of your project’s resources off the root directory, in order to avoid collisions with resources from subprojects that are organized by package.
Source and Build Structures
Everything in this article assumes that you are using a generic kind of Gradle build that doesn’t do anything fancy with the resource copying functions.
That isn’t always the case, however. For years, I worked on applications that were connected to a multi-user, server based system. We had versions of that system for development, UAT and, of course, the live system. Our CI/CD system was Jenkins, and we had different projects for both UAT and Live, and we used Gradle for the application build.
Our developers ran the application from their IDE, and the base build just connected to our Dev system. There were environment variables that Gradle could pick up, and we had three versions of some parameter file. Let’s say, live.parms, dev.parms and uat.parms, and each one contained the information to connect to a different database system. In the /build/resources directory, it would just be called server.parms. In the UAT and Live Jenkins projects, we would set the environment variable to either UAT or LIVE and the build.gradle file had some logic in the copy section that would branch based on the value of the variable. One, and only one of those three files would be copied over into /build/resources/server.parms.
In our application code, we’d always call getResources("/server.parms"). But we didn’t have a /src/resources/server.parms file! However, it worked because the code, at runtime, doesn’t look at /src, it looks in /build.
Conclusion
Hopefully, at this point you understand why Class.getResource() doesn’t have any facility to show you where it looked when it didn’t find you resource. That’s because it’s really too straight-forward to bother having one. The rules for determining the where a resource should be found are actually quite simple and easy to understand when you understand how the build system works with Java to set things up for you.