Projects With Multiple Screens and Functions
One of the questions that seems to come up fairly often is about how to create a project that is composed of a number of different screens and functions.
How do you connect them together? How do they share data?
This seems at first glance to be daunting. Large applications, by definition, tend to be complicated with lots of shared functionality and cross-talk between components. In practice, it can be straight-forward.
This is a fairly long article, but mostly because we’re going to look at variety of different situations, and a couple of different approaches to some of them. We’re going to concentrate here on Model-View-Controller-Interactor, because its structure fits naturally with JavaFX and makes it easy to visualize how the pieces go together. But there’s no reason why the ideas here cannot be applied successfully to MVC and MVVM as well.
Sample Project
All of the situations and approaches described in the article are available in a sample project on GitHub. Not all of the code for any of the scenarios is reproduced in this article, so if you want to get a real feel for how the ideas are implemented, you should download the project and look at the code. Each scenario is organized into its own package, so it should be easy to find what you’re looking for.
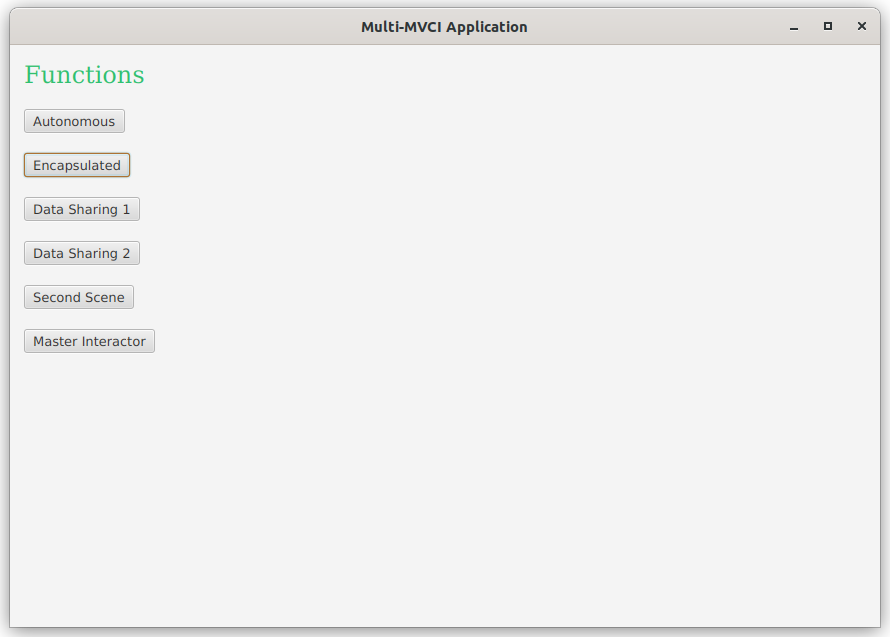
The application is built like a typical demo, with a set of a selector buttons for each scenario. It looks like this:
“Soup to Nuts”
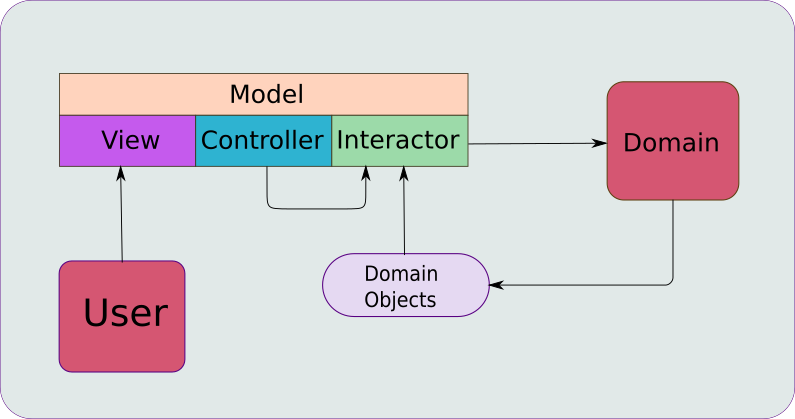
The key is to think of each function as a complete “mini-application” of its own, with its own MVCI structure. So you’ll have a structure that looks like this for each function:
Now, the only question is, “How do you link all of these into a single application?” The answer is to connect them via the Controllers.
It’s really no different from how you would compose a simple, single-screen, application where you have an Application class implementation that looks like this:
public class SimpleApplication extends Application {

    @Override
    public void start(Stage stage) {
        stage.setScene(new Scene(new SimpleController().getView()));
        stage.show();
    }
}
The recurring idea is that you instantiate the Controller somewhere, then you call its getView() method to get a JavaFX Region or Node that you can put into another layout or Scene in your application. This technique can be used as part of a Menu or as an action on a Button, or even just a sub-screen in some other layout.
A good way to think of this idea is that each of these MVCI constructs is a “soup to nuts” mini-application that presents itself as a custom Node. Once you’ve followed this structure, adding on of these functions to a screen is really no different from putting a TableView or a TextField (or any other Node, really) into your layouts.
Another important concept is that you’ll generally find the “shared” functionality of your application living in the “Domain” section. This is the place where you find services, API calls, brokers and business objects that are used throughout the application. You might have multiple screens and functions that require your application to interact with, say, a customer database, and the actual code that does connects to that database is going to be located in the “Domain” area. This code is generally things that you’ll call “brokers” or “services” and they accept and deliver “business objects”, or “domain objects” How you invoke those services, and how you use the results from them are going to be contained inside the Interactors. The important thing is to remember that the Interactors are where the “business logic” for specific functions that use those services are located.
The Sample Project
In order to show the different ways that you can integrate MVCI frameworks together I’ve created a sample application that has a BorderPane main screen with a set of Buttons that will control the content of the Centre region. Each possible content is composed of it’s own MVCI construct that can, in turn, contain another MVCI construct.
To make a point here, I’ve basically taken the entire content of my SWFX project and dropped it into this sample project. this project uses the awesome swapi.dev web API to lookup Star Wars character names. SWAPI is really useful for this kind of demonstration because it’s a real website with nifty content and it doesn’t require API keys. Also the SWFX project had the API calls split out from the Interactor so that it behaves as a service inside the application, meaning that the Interactor code really just contains logic related to the screens.
In the original SWFX project some of the code was in Kotlin, so I’ve converted the rest of it into Kotlin. I think this helps to make the point that the encapsulated content is really autonomous. It’s even in a different language! Kotlin might be new to you, but I’ll review the code a bit to explain anything that might not be clear.
Different Scenarios
In almost any application that you’ll build, you’re likely to have a “Main” MVCI construct that runs the show. That means, of course, that it will have its own View, and that where you’re going to insert the View of any subsequent MVCI constructs that you create - unless you’re going to put them into their own Scenes (more about this later).
For the sake of clarity, we’ll refer to the outer MVCI - probably the “Main” MVCI - as the “encapsulating” framework, and the sub-functions that are invoked from it the “encapsulated” functions.
While the basic ideas remain the same for just about any circumstance you might come up with to use this idea, there are some variants that you’ll need to think about…
Fully Autonomous Screens
The first situation that we’ll look at is the fully autonomous screen element. As mentioned earlier, we’ve basically got the entire content of the SWFX project dropped it into this sample project. Some of it was in Kotlin, so I’ve converted the rest of it into Kotlin. From this, you should be able to see how this screen comprises autonomous functionality, and it’s just inserted into the larger application via its Controller, which is the only component that’s accessed from the encapsulating framework.
You can see how similar this looks to the Application example. SwController is the Controller for an autonomous MVCI framework from the SWFX project. It’s this class that instantiated to create the MVCI framework, and then the View is grabbed and passed to the ViewBuilder for this layout.
public class Function1Controller {

    Builder<Region> viewBuilder;

    public Function1Controller() {
        viewBuilder = new Function1ViewBuilder(new SwController().getView());
    }

    public Region getView() {
        return viewBuilder.build();
    }

}
And the ViewBuilder for the encapsulating MVCI looks like this:
public class Function1ViewBuilder implements Builder<Region> {

    private final Region swContent;

    public Function1ViewBuilder(Region swContent) {
        this.swContent = swContent;
    }

    @Override
    public Region build() {
        StackPane results = new StackPane(swContent);
        results.setPadding(new Insets(4));
        return results;
    }
}
You can see here that this is a whole lot of almost nothing. The StackPane is just there to have it not be absolutely nothing. In fact you, could do it like this:
public class Function1ViewBuilder implements Builder<Region> {

    private final Region swContent;

    public Function1ViewBuilder(Region swContent) {
        this.swContent = swContent;
    }

    @Override
    public Region build() {
        return swContent;
    }
}
Which works just as well. From this it should be clear that we’re just stuffing the visual component from an autonomous MVCI onto the screen, without interacting with it in any other way.
You can actually do away with Function1 entirely, and just instantiate SwController in the MainMvciController. It’s left the way it is for consistency with the other examples.
One last thing to note here…where’s the Kotlin? There’s not one stitch of Kotlin code that you need to look at in this example because it’s irrelevant. It’s all in the SwController, and we just don’t care about how it works. So long as it has a getView() method that returns a Region, that’s all we need.
Where to Instantiate the Encapsulated Controller?
This is an interesting question, and I’m sure there will be different opinions on it. In a simple application, it can be such a trivial decision that it’s not worth wasting time on while in a complicated application it can become one of the most critical design decisions that you make.
There are two choices:
- In the Controller, and pass the View to the encapsulating ViewBuilder
- In the encapsulating ViewBuilder
The second option seems simpler. Just instantiate the encapsulated MVCI in the ViewBuilder and put its View in the layout. But there’s one big consideration: Side Effects.
If this encapsulated MVCI does something, especially update data, then it’s not really just View any more, is it?
That sounds like we’re just nit-picking on semantics. But it can be important. View is where we see user interaction, and just user interaction. If we’re adding components that do more than that, then we’re adding back coupling in the View that we’ve worked so hard to avoid. And that coupling always makes it harder to work with an application.
It can get even worse. Let’s say that this encapsulated MVCI can independently update data that also appears elsewhere in the View. Now we run the risk that data on the screen is out of date because of something that happened on the same screen! And if you put anything in the View that tries to cope with that, then you’re getting even further away from having the View be just a View.
On the other hand, if you instantiate the encapsulated Controller in the encapsulating Controller than you can treat that as a Controller. If there’s data sharing that needs to be coped with, then the encapsulating Controller can deal with it. Then you just pass the encapsulated View to the encapsulating View, and it can remain just a View.
For a fully autonomous example like this one, it basically moot. But in terms of establishing a consistent coding technique you’re better off instantiating the encapsulated Controller in the encapsulating Controller and just do it that way every time.
Functional Custom Node
The next example is to create a “custom component” that comprises an MVCI framework. For this we’re sticking with the SWFX functionality, but creating another class which will become our custom component.
The first challenge here is that we need to have our custom class extend some kind of Node. Which Node you pick depends on how close you want your custom class to be handled like a regular JavaFX Node class. Specifically, whether or not you want to instantiate it with new or if you’ll supply some static method that returns a Node class.
For this example, I wanted to have it act exactly like any other Node, so it’s instantiated with new. This means that it cannot just extend Region, because that doesn’t have the properties and methods to be a custom layout. So you need to pick a class that does have these methods. This example class extends StackPane, as that’s one of the easiest classes to deal with, and doesn’t have a lot of complex layout methods, but yet does enough. In this case, we’re only going to use the getChildren() method.
The second challenge is to structure it nicely. It is possible to have a separate Controller and ViewBuilder, and that will work perfectly. As a matter of fact, the JavaFX controls do that, but they call the ViewBuilder the “Skin”. It’s a bit different but the same idea. Rather than go down the Skinnable path for this example, it’s been simplified here into a single class that acts as Controller and ViewBuilder and has the name SwLookupBox.
To keep with the spirit of MVCI, the method that handles all of the custom layout is called buildView():
open class SwLookupBox : StackPane() {

   private val interactor: SwInteractor
   protected val viewModel = SwModel()

   init {
      interactor = SwInteractor(viewModel)
      children += buildView()
   }

   private fun searchForCharacter(postSearchAction: Runnable) {
      val searchTask: Task<Void?> = object : Task<Void?>() {
         @Throws(Exception::class)
         override fun call(): Void? {
            interactor.lookupPerson()
            return null
         }
      }
      searchTask.onSucceeded = EventHandler {
         interactor.updateModelAfterLookup()
         postSearchAction.run()
      }
      val searchThread = Thread(searchTask)
      searchThread.start()
   }

   private fun buildView(): Region = HBox(6.0).apply {
      children += Labels.prompt("Name:")
      children += TextField().apply {
         textProperty().bindBidirectional(viewModel.name)
      }
      children += Button("Search").apply {
         onAction = EventHandler {
            isDisable = true
            searchForCharacter { isDisable = false }
         }
      }
   }
}
OK, we actually have some Kotlin here. Here are some things that might confuse you, the rest of the code you can probably figure out:
- Declarations
- Declarations are backwards from Java, in the form “name : type”. This goes for variables, parameters and methods (which are called “fun” in Kotlin). Values can be assigned, and
newisn’t needed for constructor calls. - Object.apply{}
- The
applymethod takes a block of code and passes the object to it asthis. In Kotlin, you can leave out thethisif it’s clear that a method call refers to it. - children +=
- These lines equate to this.getChildren().add().
- Lambdas as The Last Parameter
- If the last parameter passed to a method or constructor is a lambda, it can be defined in {} outside the regular parameter list. So
EventHandler {}calls the constructor forEventHandlerand passes a lambda as its only parameter.
Since it’s really now a JavaFX Node, it’s instantiated from within the ViewBuilder for the encapsulating MVCI:
public class Function2ViewBuilder implements Builder<Region> {
    @Override
    public Region build() {
        VBox results = new VBox(6, Labels.h3("Star Wars Lookup"), new SwLookupBox());
        results.setPadding(new Insets(40));
        return results;
    }
}
You probably need to be careful that this approach doesn’t become a “slippery slope” situation, and start to pick and choose which elements of MVCI framework you discard when it’s not convenient. But if you really, really, really want your custom stuff to feel like a standard JavaFX Node, this is something to think about.
Screens that Accept and Return Values
Generally speaking, unless an encapsulated MVCI framework has side-effects, it’s not able to do anything unless it shares data with the encapsulating MVCI framework. Think about a control like a TextField, it needs to have a link to/from its Text property to your model to be of value. Encapsulated MVCI frameworks can work the same way.
Via Encapsulated MVCI
The general idea is that the encapsulated Controller needs to accept one or more properties from the encapsulating controller that it can bind to its own Model. In this case, we’re just going to pass the planet property to the encapsulated controller.
public class Function4Controller {

    Builder<Region> viewBuilder;
    Function4Model model = new Function4Model();

    public Function4Controller() {
        Function4Interactor interactor = new Function4Interactor(model);
        SwLookupController planetFinderController = new SwLookupController(model.planetProperty());
        viewBuilder = new Function4ViewBuilder(model, planetFinderController.getView(), interactor::convertToUpperCase);
    }

    public Region getView() {
        return viewBuilder.build();
    }

}
Let’s have a look at the SwLookupController. It’s in the starwars package, so it’s in Kotlin too:
class SwLookupController(val planetNameProperty: StringProperty) {
   private val interactor: SwInteractor
   private val viewModel = SwModel()
   private val viewBuilder: SwLookupViewBuilder

   init {
      interactor = SwInteractor(viewModel)
      viewBuilder = SwLookupViewBuilder(viewModel) { searchForCharacter(it) }
      planetNameProperty.bind(viewModel.homePlanet)
   }

   private fun searchForCharacter(postSearchAction: Runnable) {
      val searchTask: Task<Void?> = object : Task<Void?>() {
         @Throws(Exception::class)
         override fun call(): Void? {
            interactor.lookupPerson()
            return null
         }
      }
      searchTask.onSucceeded = EventHandler {
         interactor.updateModelAfterLookup()
         postSearchAction.run()
      }
      val searchThread = Thread(searchTask)
      searchThread.start()
   }

   fun getView(): Region = viewBuilder.build()
}
In our SwModel, we already have a property for homePlanet, so all we need to do to connect it to the encapsulating MVCI is to bind homePlanet to the supplied property from the encapsulating MVCI.
Via Functional Custom Node
Once again, all of the action takes place in the encapsulating ViewBuilder, rather than the Controller, with the custom Node approach:
public Region build() {
    SwPlanetFinder swPlanetFinder = new SwPlanetFinder();
    model.planetProperty().bind(swPlanetFinder.planetProperty());
    VBox results = new VBox(20, Labels.h3("Planet Finder Component"), swPlanetFinder, createUpperCaseBox());
    results.setPadding(new Insets(40));
    return results;
}
SwPlanetFinder is simply an extension of SwLookupBox with a getter for the planet property:
class SwPlanetFinder : SwLookupBox() {

   fun planetProperty(): ReadOnlyStringProperty = viewModel.homePlanet
}
Note that this is backwards from the previous approach. The SwPlanetFinder presents a getter for the planet property, and it’s the responsibility of the encapsulating View to handle the binding. This also matches the design of the properties for the standard JavaFX Node classes - provide getters for the properties.
Loading in a new Scene
This scenario comes up all the time with the FXML crowd. There’s something about the way that FXML is understood that makes beginners think that they need to load every layout into its own Scene. Then they get lost about how they might possibly share data between two Scenes.
You should be getting the idea by now that how you put your View on the screen has absolutely nothing to do with how the various functions are connected to each other. Load your View into a Panel in another View, use it like a custom component, call it from a MenuItem, or put it into its own Scene - it’s all the same in terms of connectivity.
In this example, we’re going to create an encapsulating MVCI that launches an extra window with our search functionality. There’s no attempt to do anything slick here, and the code doesn’t contain anything to stop you from opening multiple windows (it actually works fine when you do this), and they open up on top of the main window.
Instead of passing a View to the encapsulating View, we’re going to pass an action to open up the new window:
public class Function5Controller {

    Builder<Region> viewBuilder;
    Function5Model model = new Function5Model();
    SwLookupController planetFinderController;

    public Function5Controller() {
        Function5Interactor interactor = new Function5Interactor(model);
        planetFinderController = new SwLookupController(model.planetProperty());
        viewBuilder = new Function5ViewBuilder(model, this::launchWindow, interactor::convertToUpperCase);
    }

    private void launchWindow() {
        Stage stage = new Stage();
        stage.setScene(new Scene(planetFinderController.getView()));
        stage.show();
    }

    public Region getView() {
        return viewBuilder.build();
    }
}
You can see that the content of the new window is nothing special, just the same structure that we’ve used before.
Inside the encapsulating View, we’ll add a Button to trigger that action:
public Region build() {
      VBox results = new VBox(20, Labels.h3("Planet Finder MVCI"), createWindowButton(), createUpperCaseBox());
      results.setPadding(new Insets(40));
      return results;
  }

  private Node createWindowButton() {
      Button results = new Button("Launch Window");
      results.setOnAction(evt -> windowLauncher.run());
      return results;
  }
A Bigger Lesson From This
In reality, you’ll probably not be loading up Scenes very often. However, the idea that you might launch an Action to link your View element to the encapsulated MVCI can be useful. Imagine that you have a MenuItem that is supposed to start up an MVCI and load it into the GUI - you would do that through an action.
This would mean that you would replace the launchWindow() method above with something that instantiates an MVCI Controller, calls its getView() method and puts that onto the GUI somewhere. Then you pass that method reference to the MenuItem.
Screens that Use the Parent’s Interactor
This is where things really start to get interesting. Sometimes you have piece of functionality that’s used in a variety of places, so you don’t want to repeat the same code over and over. It has some of its own business logic, but how it works depends on the encapsulating function.
An example of this might be a “Customer Lookup Box”. Pretty much the View and some of the logic is going to be the same no matter where it’s used. But if you put it into an invoice inquiry screen, then you only want to see customers with Invoices, and if it’s a customer rewards screen, you only want to see customers enrolled in the rewards program. Or maybe it’s something way more subtle or complicated.
This kind of scenario comes up more often than you might expect in larger applications, and how you handle it can make a big contribution to how easy it is to develop and maintain that application.
What you need to do is to find a way to allow the encapsulated MVCI to delegate at least some of its functionality to the encapsulating MVCI. In just about every case, you’ll probably need to share data, too. So that’s what this example shows.
Handling Background Threads
This is the trickiest part. You need to run any blocking service requests off the FXAT and on a background thread. But where to do this? In the encapsulated Controller or the encapsulating Controller?
First, let’s look at how a basic situation is handled without multiple MVCI constructs. You have a flow that looks like this:
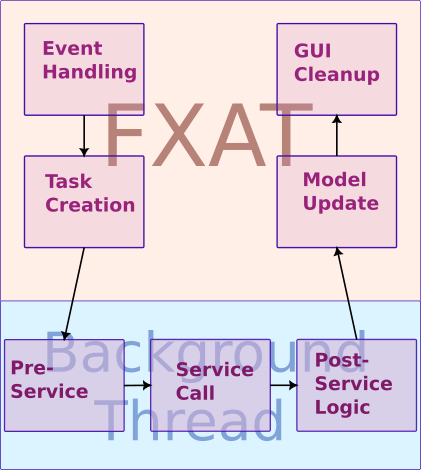
The process is triggered via the Event handling in the View which is going to invoke an action defined in the Controller. The Controller is going to instantiate and configure a Task, which all happens on the FXAT, and then start it up on a background thread. Typically, the Task's call() method is just going to invoke a method in the Interactor. That method will have any business logic that’s required to get ready to invoke some Service call, call the Service and the deal with any data that comes back. Then the OnSucceeded EventHandler of the Task is going to be invoked on the FXAT (that’s how we get back on the FXAT), and it will generally call another method in the Interactor that deals with the new data and updates the Model according to its business logic. Finally, a Runnable passed from the View to the Controller is invoked to perform any wrap-up stuff that’s required in the View.
Now, with an encapsulated MVCI, you’ll still have just one stretch of actions that take place on the background thread, but the flow will be a little bit different:
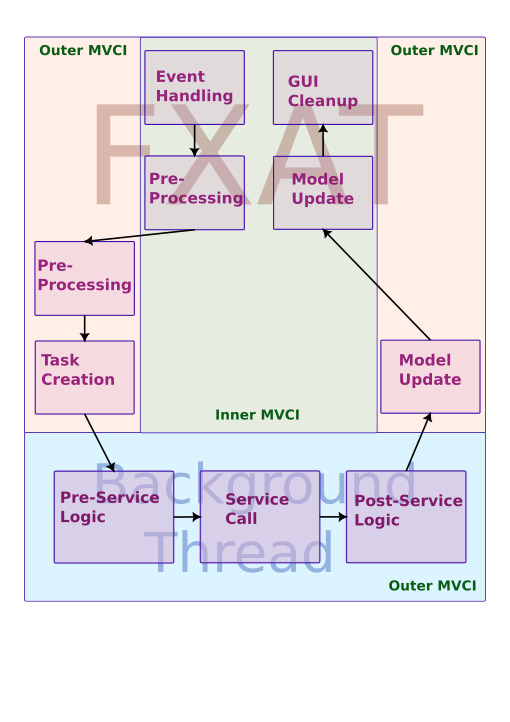
You can see that all of the background stuff is “owned” by the outer MVCI. So that’s where the Task needs to go. Everything that happens on the inner MVCI happens on the FXAT. Just knowing this makes it easier to figure out how to implement it.
The example for this is in the sample project, but contains too many classes to include the complete code in this article. It has two MVCI constructs (the inner and outer), and a dummy Broker with a dummy domain object so that the entire process can be easily visualized. The data elements in both of the Models is manipulated just so that it’s easy to see what code has been executed as the processing runs.
Let’s take a look at how the boxes in the diagram above are implemented in code:
- Event Handling
- This happens in the inner View. Some
Node, like aButtontriggers an Event which is passed to itsEventHandler. This will do some GUI stuff and then call theaccept()method of aConsumerfrom the Inner Controller, passing it aRunnablecontaining the code to reset the GUI after the work is complete.
button.setOnAction(evt -> {
            button.setDisable(true);
            buttonAction.accept(() -> {
                button.setDisable(false);
            });
        });
- Pre-Processing (Inner)
- The inner Controller calls a method in the inner Interactor to handle any set-up that needs to be done before passing control over to the outer MVCI. Then the inner Controller calls the
accept()method of theConsumersupplied by the outer Controller, passing in aRunnablecontaining all of the inner MVCI post Task processing.
private void performLookup(Runnable postActionGuiStuff) {
    interactor.preLookupProcessing();
    outerLookupHandler.accept(() -> {
        interactor.postLookupProcessing();
        postActionGuiStuff.run();
    });
}
This code snippet shows all of the inner Controller handling for the lookup. This covers the steps “Model Update (Inner)”, and “GUI Cleanup” described below for the inner Controller.
- Pre-Processing (Outer)
- The outer Controller calls a method in the outer Interactor to handle any set-up that needs to be done before passing control over to the Task.
private void handleInnerLookup(Runnable innerRunnable) {
        interactor.preProcessLookup();
        Task<Void> task = new Task<Void>() {
            @Override
            protected Void call() throws Exception {
                interactor.performLookup();
                return null;
            }
        };
        task.setOnSucceeded(evt -> {
            interactor.updateModelFromLookup();
            innerRunnable.run();
        });
        Thread taskThread = new Thread(task);
        taskThread.start();
    }
This code snippet shows all of the outer Controller handling for the lookup. This covers all of the next three steps described for the outer Controller.
- Task Creation
- The outer Controller creates a
Taskto handle the background thread activity. It specifies actions to be performed when theTaskcompletes. Then the outer Controller creates aThreadto run theTaskand starts it. - Pre-Service Logic, Service Call & Post Service Logic
- The
call()method of theTasksimply invokes a method in outer Interactor which handles the background work. This would involve any business logic required to prepare for the call to the external Service, and the actual call to that Service. After the Service call, more logic will deal with the data returned from the Service call.
public void preProcessLookup() {
    model.setProperty4("Starting lookup\n");
    model.setProperty1("Pending...");
    model.setProperty2("Pending...");
    model.setProperty3(model.getProperty3().toUpperCase());
}
This is from the outer Interactor.
- Model Update (Outer)
- The
setOnSucceeded()method of theTaskspecifies first a call to another method in the outer Interactor which will update the outer Model using the data returned from the Service call. Any portion of the outer Model shared with the inner MVCI will be automatically updated.
public void updateModelFromLookup() {
    progressMessages += "Updating the Model\n";
    model.setProperty1(domainObject.getValue1());
    model.setProperty2(domainObject.getValue2() + ", " + domainObject.getValue3());
    model.setProperty4(model.getProperty4() + progressMessages);
}
This is from the outer Interactor.
- Model Update (Inner)
- The last step of the
setOnSucceededmethod in theTaskis to invoke theRunnablepassed from the inner Controller. ThisRunnablewill first call the inner Interactor to handle any updates to the inner Model required by the business logic.
public void postLookupProcessing() {
    model.setVariable2("All done");
}
This is from the inner Interactor.
- GUI Cleanup
- Finally, the last step of the
Runnablepassed from the inner Controller is to invoke theRunnablepassed from the inner View as part of the first step. This will put the GUI into the state expected while the backgroundTaskis not running.
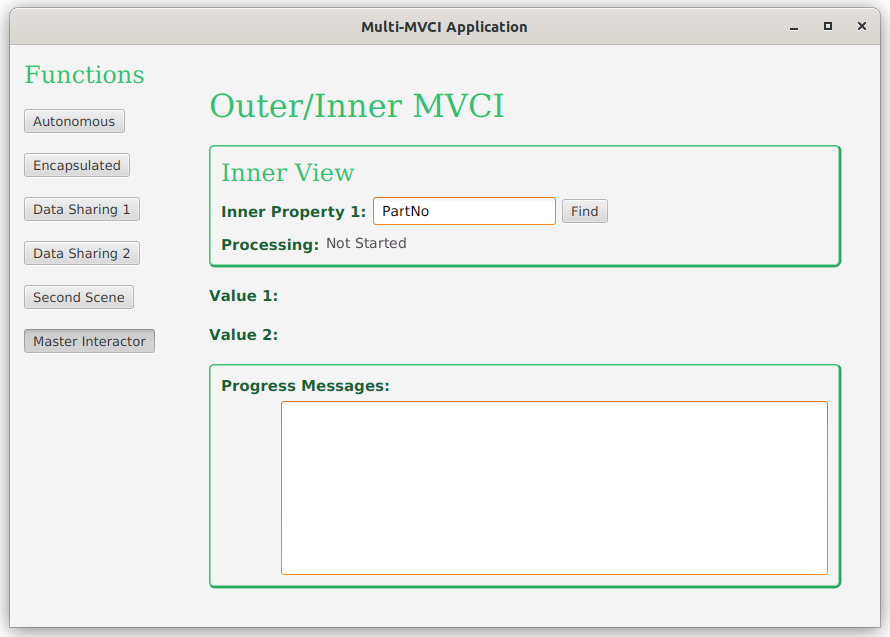
How it Looks
Here’s the screen before the button is clicked:
Right after the button is clicked, and while waiting for the “Service” to complete:
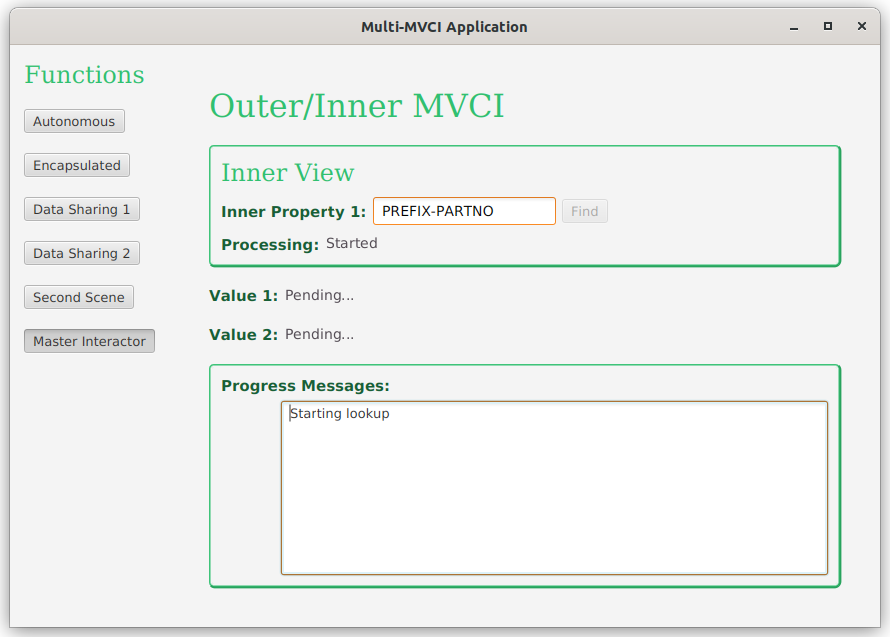
From here you can see that the Button is now disabled, and all of the inner and outer pre-processing has been performed.
And when it’s all done:
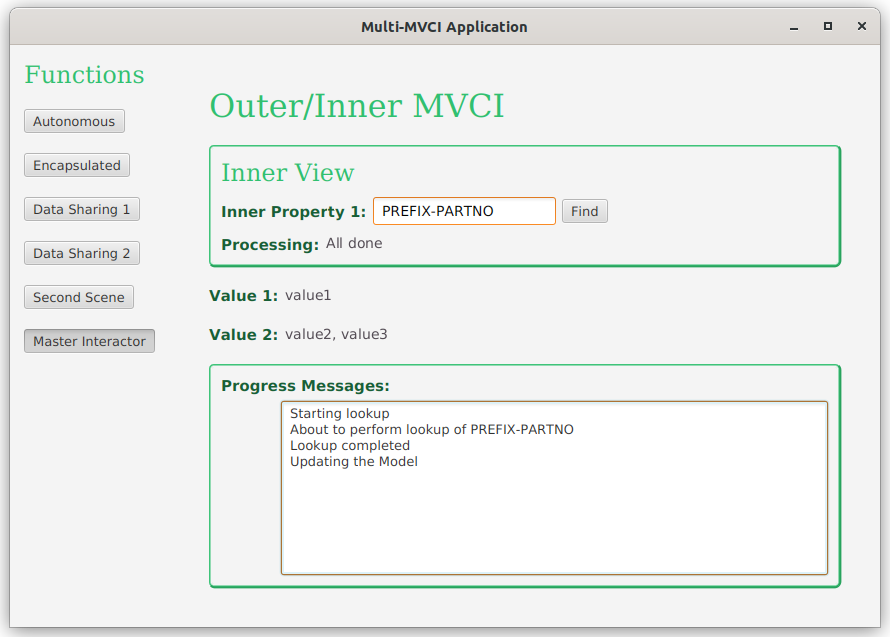
Now all of the post processing has been completed and the Button is re-enabled. Note that the intermediate status updates from the background process are only reflected on screen (and in the Model) after that process has completed.
Reasons Not to Do This
There are probably lots of genuinely good reasons to use this approach, but it does add a layer of complexity to your MVCI frameworks.
The question is whether or not you should go this way.
One alternative is to put *ALL of the business logic into the outer Interactor, and remove the inner Interactor, as it will now be empty. The result of this is that your inner framework is more of just a layout than a framework and you can treat it as such.
Generally speaking, if your reason for splitting the business logic between two frameworks is founded in something other the specific business logic of the frameworks, you should handle it some other way. For instance, if your reason is to share a database connection, control resource loads or optimize performance, those things should be handled at your Service level, or even lower. Doing this means that you can put all of the business logic for the inner framework inside the inner Interactor, and there’s no need to have any dependency on the outer Interactor - meaning that the inner framework becomes largely autonomous.
Conclusion
This is pretty long article about what turns out to be a fairly simple technique. But it works because of two much more important concepts that you should understand:
- Loose Coupling
- Essentially, this idea of joining together disparate bits and pieces into an application works because the MVCI framework provides very loose coupling. The layouts have no idea where the data models come from, nor how the action providers work. The layouts also have no knowledge of how they are contained on the screen and no dependencies on that at all. From the other end, the containing frameworks have no knowledge of the inner structure of the enclosed MVCI framework. They do know that they need to provide data elements and action handlers that are specified in the constructor of the enclosed Controller - but that just about it. The only other dependency is that the enclosed Controller will have a
getView()method. - Custom Nodes
- Another really big underlying idea is that any layout that you construct, and any sub-layouts inside them can be considered as a “Custom Node”. Even if you just create an
HBoxand put a couple ofLabelsinside it, you can think of that as a Custom Node. Even if it’s just aLabelwith some styling, you can still think of that as a Custom Node. And just like any otherObjectthat you create, its inner workings should be private from the rest of your layouts.
This last point is really about your perspective as a JavaFX programmer. Don’t think of your GUI’s as a mish-mash of components configured and glued together - think of it as a hierarchy of custom components working together. And this idea scales upwards - from configured Labels right up to the top of your application structure. Just make sure each component is complete within itself and hides its innards from the rest of your code.