Introduction
This article is an introduction to and a “how to” for the framework that I’ve developed for building Reactive JavaFX applications. It’s called “Model-View-Controller-Interactor”, or just, “MVCI”.
MVCI was created as a practical solution to the challenges that are posed by JavaFX, specifically when it’s used as a Reactive programming tool. It’s easier to understand than the other frameworks while not making any compromises on functionality or technical correctness.
Motivation and Development
My introduction to JavaFX was building GUI applications to augment and extend a complicated legacy enterprise application. My team had some experience with Swing, but decided to move over to JavaFX when version 2 came out in 2014. We felt that Swing screens looked dated tired, and JavaFX had a much more modern look and feel - as well as a more modern programming approach - than Swing did. The dated look and feel of Swing might have had much to do with our lack of skill to create anything better, but the JavaFX screens looked better right out of the box.
Right or wrong, that was the direction I chose and we began a multi-year journey to learn how to deal with JavaFX while under pressure to deliver new functionality to the organization at an acceptable pace.
What we didn’t realize was just how difficult JavaFX is to learn by yourself and, since it was brand new, there was nobody out there to teach it, or write about it with real knowledge and experience. Inevitably our process was full of mistakes, horrible code and lots of places where we had to re-think our approach to various challenges.
Over the course of this I learned not to bother with FXML since it just complicated our code. I tried to implement MVC, as best we understood it, and this added a lot of structure to our code and made things cleaner, but still left a lot of things unsolved.
I learned that scraping data out of the screen Nodes and loading them back into the Model every time the “Save” Button was pressed was a losing strategy. Binding the value properties of the Nodes to the Model was the way to go! This was a game-changer, as it totally changed our approach to screen building. I had started down the path to Reactive design without even knowing it!
I learned to bind the other properties of the Nodes to the Model, and I learned to bind, whenever possible, to the Model and not between the screen Nodes. This made our layout components independent of each other.
I also learned to put ALL of the business logic in one place. Don’t put logic to disable a Button in the layout code, but put it somewhere else and have it reflected in the Model. Then bind the Button.disableProperty() to that Model element.
As this went on, we had a set of guidelines and general principles to follow when building screens and functions but I still saw it as trying to fit into one of the accepted frameworks, usually Model-View-Controller. Some of the things we did seemed to break the designs of these frameworks, but they did result in better applications.
Finally, in the past couple of years, I’ve come to realize that what I had developed was something unique, and not an adaptation of any of the existing patterns. I think it’s worth sharing with other programmers that want to build better JavaFX applications.
Reactive Programming
Let’s talk a little bit about “Reactive” programming. What is it?
There’s a few ways to look at it:
- Static Layouts that Behave Dynamically
- This is a really important concept. Reactive systems allow you to create a layout as static elements, meaning that you don’t actually change the
Nodesthat are on the screen, add newNodesor take any away. Instead the screenNodesare connected to data elements that control how they work. Changes in those data elements result in dynamic changes to the screen that the user sees. At the back-end of the system, there are business rules that update those data elements as nothing more than data, without any knowledge of how those data elements will impact the screen. - State Data is a Pipeline Between the Business Logic and the View
- This is another way to look at it. The “State” of the GUI is represented by some collection of data which is connected to the various properties of the elements of the View. Either end can potentially change some of that data, at which point it is available to the other end instantly. Both ends of the pipeline are free to interpret that data in a context which has meaning to it, without understanding what it means to the other end. So a layout may use a Boolean State element to control whether a
Buttonis enabled, but the business logic end may interpret that same Boolean State element to mean that a date value somewhere is invalid.
In JavaFX this means that you have an Object composed of Observables of some sort. These can be Properties, Bindings, ObservableLists or any their relatives. These Observables are bound to various properties of the Node elements that make up the layout.
Generic Reactive programming descriptions talk about “streams”, which is essentially the function provided by the Observables and the Binding classes.
The simple truth is that JavaFX provides all of the tools to build Reactive applications and, in fact, it works best when you use it that way.
Why Use a Framework?
Frameworks are designed to limit coupling between the GUI, the business logic and the control logic. Excessive coupling is by far the biggest issue with application design, and it makes it very difficult to understand how an application works, to make changes, find and fix bugs, and to extend the application.
One of the ways to evaluate coupling is to look at how much of its functionality a component exposes to the rest of the application, and how much it “knows” about the functionality of other components of the application. The more of this that you have, the more coupling that you have.
When a component exposes some of its functionality to the rest of the application and that functionality is changed, then you have to look at all of the places that knowledge of that functionality is used, and evaluate how it needs to be changed as well. Often, you’ll find that some of those places are in functionality of other components that are also exposed to the rest of the application, so you need to track down where that knowledge is used and change them too. And so on, and so on…
These couplings are also called “dependencies”. Dependencies also have direction and we can say that, “This component is dependent on this aspect of this other component”. Coupling becomes even worse when you have multiple dependencies between two components that go in either direction. A good framework should also try to manage the direction of the dependencies, in order to limit complexity of the coupling.
At the end of the day, a framework is just a “Design Pattern”. That is to say, an accepted way of coding something that has already been thought out so that you don’t have to “reinvent the wheel” in your application code. Other programmers can look at your code and say, “I recognize this”, even if they’ve never seen your code before.
Why Use MVCI?
Because it works, it dovetails nicely with Reactive JavaFX, and it’s easy to understand.
We’re not going to talk a great deal about the other frameworks here, but there are two questions that need to be addressed:
- Why not use Model-View-Controller?
- For one simple reason: MVC does not allow for Reactive programming. You can bind View elements to the Model, but exclusively in a Read-Only mode. Any changes to the Model from the View have to be transmitted through the Controller. It’s a basic element of this framework. You can ignore this, but then you’re not using MVC any more.
- Why not use Model-View-ViewModel?
- MVVM does provide for binding between the ViewModel and the View elements, so that’s a step in the right direction. However, there’s no Reactive connection allowed for between the Model and the ViewModel. You end up with a lot of methods to handle data transfer between the ViewModel and the Model which creates an enormous amount of coupling. This gets very confusing very quickly.
Both of these answers sound a bit like technical nit-picking that you could probably just ignore. In practice though, these represent issues that you end up having to work around - even if you don’t realize it. It gets messy very quickly.
If you use MVCI, you really don’t have to worry about these things. They’re just not a factor. MVCI deals with it for you and you’re not going to get tangled up in unexpected consequences of your design decisions.
What Does MVCI Look Like?
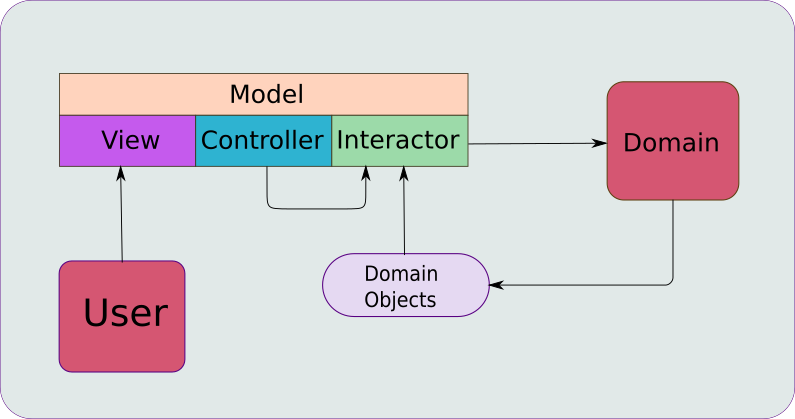
MVCI has four components: a Model, a Controller, a View and an Interactor. Let’s look at what each of these do:
- The Model
- The Model is the data representation of the “State” of the GUI. It’s just a POJO with the fields composed of JavaFX
Observabletypes. There’s no logic, or any other code that’s not directly related to sharing the data fields. - The View
- The View is not just a passive layout, but a complete user interface for the framework. This means that it has all of the logic to handle user clicks and to capture and handle any GUI events. The View is passed a reference to the Model, and it binds the properties of the various
Nodescontained in the layout to the properties contained in the Model. - The Controller
- The Controller is responsible for “how” things happen in the framework. It instantiates all of the other components, provides for integration with other parts of the application, defines “actions” for GUI events, and handles all of the threading.
- The Interactor
- The Interactor is the “business logic” component of MVCI. This is the place where Domain Objects can exist, and where calls to external API’s, persistence layers and other services are made. It’s able to see the Model, so it also contains the logic which updates the Model from data retrieved from services via Domain Objects.
Here’s a diagram of how it all goes together:
Dependencies in MVCI
Since managing coupling is the whole point of a framework, let’s look at how the dependencies work in MVCI.
Dependencies almost always manifest themselves in non-private methods, including the constructors. Every time you see a non-private method, you’re looking at a potential dependency. It also tells you the direction of the dependency because the other components become dependent on that method. At the same time, the parameters required by a non-private method represent dependencies in the other direction, as these are things that the calling objects need to provide.
From this perspective, you can consider constructors with parameters to be dependencies from the object back to the object that constructs it. Because every class needs a constructor, having one doesn’t increase the coupling in that direction at all, but adding parameters creates dependencies back to the constructing class.
Let’s look at where the non-private methods are found in MVCI:
- The Model
- You can see from the diagram above that all of the other three components have access to the Model. In fact, this is the main dependency in MVCI as the View, the Controller and the Interactor all have it as a dependency. As a POJO, it’s going to consist entirely of a bunch of field declarations, plus all of the accompanying getters and setters to allow other objects to access those fields. I’ve never seen a reason to have any constructor parameters in a Model.
- The Controller
- We’ll look at this a bit later, but the only non-private method in the Controller is something like a
getView()method that returns a reference to the View as aNodeor aRegion(usuallyRegion). In a complex application with multiple MVCI frameworks that need to share data or functionality, it is possible to have constructor parameters in Controllers, essentially creating dependencies on those external frameworks. - The Interactor
- The Interactor gets a reference to the Model passed to it from the Controller via a parameter in its constructor. This is generally the only parameter in the Interactor’s constructor. In order to do work, the Interactor needs to have a number of non-private methods that Controller can call. These all create dependencies on the Interactor in the Controller.
- The View
- From the perspective of non-private methods, the View as an instance of
Regionhas no dependencies at all (other than those ofRegion). However, it’s usually implemented via aBuilder, and that has at least one constructor parameter - the Model. Additionally, theViewBuildercan have constructor parameters to provide handlers for actions. These put dependencies from theViewBuilderto the Controller. In order to create the View, the Controller must pass a reference to the Model plus any action handlers required.
What Goes Where in MVCI?
Now let’s look at this from the other direction. How do you know where to put various pieces of functionality? MVCI is designed to make this extremely easy, so let’s look at the main items:
- Layout
- Layout goes in the View. This includes creating binding between the Model and the properties of the
Nodesin the layout. - Event Handlers
- Events are GUI elements, and their handlers go in the View. When EventHandlers need to perform actions that involve something other than the layout, they invoke “Action Performers” provided by the Controller.
- Action Performers
- Action Performers are functional elements that perform some kind of action. These are defined in the Controller. If an Action Performer is needed by the View so that it can invoke it from an
EventHandler, then it will be passed to the View via a constructor parameter. - Threading
- In JavaFX, threading is generally implemented using something like
Task. Creation and configuration ofTaskobjects and running them in backgroundThreadsis handled in the Controller. - Business/Application Logic
- Anything resembling business logic goes into the Interactor. This includes the initialization of
Bindingsin the Model and linking various Model elements to each other (unless such connections are so rudimentary that they are clearly not business logic). - Domain Stuff
- This goes somewhere else. Create a “Service”, “Broker” or “DAO” to handle it and call it from your Interactor.
- ChangeListeners
- These can go in one of two places. If the actions performed by the ChangeListener are entirely related to the View, then put it there. Otherwise it goes in the Controller, which will probably call a method in the Interactor to do the work.
The ViewBuilder
The MVCI framework doesn’t specifically call for a ViewBuilder, but I’d call this a “best practice”.
There’s a general rule in JavaFX:
Extend a class to add new functionality, use a Builder when all you are doing is configuring an existing
Nodesubclass.
What does “add new functionality” mean? In this case it really boils down to adding new non-private methods. In practice, you’re usually not going to add functionality, you’re just going to configure a Node or create a layout by adding configured Nodes via getChildren(). So builders are usually the way to go.
A “Builder” can be any method that returns a Node subclass. JavaFX provides a handy interface called Builder which just defines a single method, build(). It’s generic, so you specify the type for the returned Node subclass.
In MVCI we’re going to create a Region subtype (like Pane, StackPane, VBox or BorderPane) that we’re going to return as an instance of Region. So in the Controller, we’ll instantiate a ViewBuilder that implements Builder<Region> and pass any dependencies, like the Model to it in its constructor. Then we’ll call ViewBuilder.build() to get the View.
What I usually do is set the ViewBuilder as a field in the Controller and instantiate it in the Controller’s constructor. Then I create a delegate method in the Controller like this:
public Region getView() {
   return viewBuilder.build();
}
If you’re paying even the tiniest bit of attention, you’ll realize that this means that there’s no reference to the View itself that’s maintained inside of the MVCI framework! So there’s no formal dependencies to or from the View anywhere inside the framework. Of course, the Bindings used in the layout to create the View create coupling between the View and the Model, but this can be completely managed by ignoring them in the View, and concentrating on the ViewBuilder and its dependencies.
The other important thing to note is that the Builder allows us to return a Region instead of whatever actual class was used to create the layout. Region only exposes a small number of methods that are useful for controlling its presentation in another layout. Things like Region.setMaxWidht(), or Region.setPadding(). You can get rid of those by returning Node instead.
This is important because it turns your View into a “black box” screen component that you can use anywhere you can use any other Node or Region. And you can do this without worrying about about what’s going on inside it, or any of the other parts of the framework, because they don’t matter from this perspective.
An Example
Let’s look at how you’d actually code this up. This is just a simple example with enough data in the Model and enough features to give an idea of how it all goes together and works.
The Model
We’ll look at the Model first, since it’s the simplest class:
public class Model {

    private final StringProperty property1 = new SimpleStringProperty("");
    private final StringProperty property2 = new SimpleStringProperty("");
    private final BooleanProperty property3 = new SimpleBooleanProperty(false);

    public String getProperty1() {
        return property1.get();
    }

    public StringProperty property1Property() {
        return property1;
    }

    public void setProperty1(String property1) {
        this.property1.set(property1);
    }

    public String getProperty2() {
        return property2.get();
    }

    public StringProperty property2Property() {
        return property2;
    }

    public void setProperty2(String property2) {
        this.property2.set(property2);
    }

    public void bindProperty3(BooleanBinding binding) {
        property3.bind(binding);
    }

    public ObservableBooleanValue property3Property() {
        return property3;
    }

    public String getProperty3() {
        return property3.get();
    }

}
This is basically the JavaFX version of a “Bean”. Each field is final and private, and there are delegate methods for getting and setting the values. Finally, there are getters for references to the properties themselves. Note that there is no logic or any relationships between the fields established in the Model - it’s just a wrapper for Observable data.
The field property3 is a bit different. Since this is intended to be a read-only value based upon one or more of the other fields, it does not have delegate setter for the value. The getter for the property returns a type of ObservableBooleanValue which means that it’s read only, so no program can attempt to set its value via set(). There’s a method to allow the Binding to be set on the property. We’ll see how this works in the Interactor.
The Controller
public class Controller {

    private final Model model;
    private final Interactor interactor;
    private final ViewBuilder viewBuilder;

    public Controller() {
        model = new Model();
        interactor = new Interactor(model);
        viewBuilder = new ViewBuilder(model, this::saveData);
        setProperty1Listener();
    }

    private void saveData(Runnable postActionGuiCleanup) {
        Task<Void> saveTask = new Task<>() {
            @Override
            protected Void call() {
                interactor.saveData();
                return null;
            }
        };
        saveTask.setOnSucceeded(evt -> {
            interactor.updateModelAfterSave();
            postActionGuiCleanup.run();
        });
        Thread saveThread = new Thread(saveTask);
        saveThread.start();
    }

    private void setProperty1Listener() {
        model.property1Property().addListener(ob -> interactor.updateChangeCount());
    }

    public Region getView() {
        return viewBuilder.build();
    }
}
The constructor for the Controller is the bootstrap for the framework. It instantiates the Model first, then passes it to the constructors of the Interactor and the ViewBuilder. The Controller doesn’t actually do anything itself, but it does control how things are done. The saveData() method handles the background threading for the “Save” action, and calls Interactor methods to do the various stages of the work.
The method getView() is just a delegate to the build() method of the ViewBuilder. It’ll create a new view every time you call it, which shouldn’t really cause any problems as far as the framework is concerned. You could convert this to a “lazy load” model if you wanted to limit it to a single instance of the View.
Finally, just to show how it would work, there’s an InvalidationListener installed on Model.property1. You can see how it just calls a method in the Interactor to do the actual work.
The ViewBuilder
public class ViewBuilder implements Builder<Region> {

    private final Model model;
    private final Consumer<Runnable> actionHandler;

    public ViewBuilder(Model model, Consumer<Runnable> actionHandler) {
        this.model = model;
        this.actionHandler = actionHandler;
    }

    @Override
    public Region build() {
        BorderPane results = new BorderPane();
        results.setCenter(createMainBox());
        results.setBottom(createButton());
        results.setMinWidth(300);
        results.setMinHeight(200);
        return results;
    }

    private Node createMainBox() {
        VBox results = new VBox(10,
                new HBox(6, new Label("Value 1:"), createBoundTextField(model.property1Property())),
                new HBox(6, new Label("Value 2:"), createBoundTextField(model.property2Property()))
        );
        results.setPadding(new Insets(20));
        return results;
    }

    private Node createBoundTextField(StringProperty boundProperty) {
        TextField results = new TextField();
        results.textProperty().bindBidirectional(boundProperty);
        return results;
    }

    private Node createButton() {
        Button button = new Button("Save");
        BooleanProperty saveRunning = new SimpleBooleanProperty(false);
        button.disableProperty().bind(Bindings.createBooleanBinding(() -> (!model.property3Property().get() || saveRunning.get()),
                model.property3Property(),
                saveRunning));
        button.setOnAction(evt -> {
            saveRunning.set(true);
            actionHandler.accept(() -> saveRunning.set(false));
        });
        HBox results = new HBox(button);
        results.setAlignment(Pos.CENTER_RIGHT);
        return results;
    }
}
We’re not going to look at this too closely, because this article isn’t about creating layouts. The result is a BorderPane with a couple of Labels and TextFields in the centre, and a Button at the bottom. The two TextFields have their text properties bound to the two StringProperties in the Model, and the Disable property of the Button is bound to the BooleanProperty in the Model.
The OnAction EventHandler on the Button might need some explanation. One of the big problems with Buttons is that people can double click them - or at least click them while the action is still running. Unless you’re OK with that, you need to disable a Button as soon as it’s clicked, and then enable it when the action is completed.
Since we’re going to have some binding logic that disables the Button if Model.property1 is empty, we can’t directly disable the Button when it’s clicked. So we introduce a BooleanProperty that indicates that the action is running, and then we Bind the Disable property of the Button to a combination of the two properties. Then we control that property that indicates the action is running to ensure that the Button stays disabled.
If you go back to the Controller, you can see how the Runnable that sets that BooleanProperty back to false is invoked when the Task has completed.
The Interactor
public class Interactor {

    private final Model model;
    private int changeCount = 0;
    private DomainObject domainObject;
    private Service service = new Service();

    public Interactor(Model model) {
        this.model = model;
        createModelBindings();
    }

    private void createModelBindings() {
        model.bindProperty3(Bindings.createBooleanBinding(() -> !model.getProperty1().isEmpty(), model.property1Property()));
    }

    public void updateModelAfterSave() {
        model.setProperty1("");
        model.setProperty2(domainObject.getSomeValue());
        changeCount = 0;

    }

    public void saveData() {
        domainObject = service.saveDataSomewhere(model.getProperty1() + " --> " + changeCount);
    }

    public void updateChangeCount() {
        changeCount++;
    }
}
First, take a look at the constructor, and you can see how the Interactor contains the business logic to Bind the value in Model.property1 to the value in Model.property3. This idea, that the save action shouldn’t be allowed if the value in Model.property1 is empty, is business logic - so it belongs here, in the Interactor. No way should this Binding be defined in the View.
There’s also a method, updateChangeCount(), that supports the InvalidationListener in the Controller.
Finally, we have the two methods that handle the save. The first, saveData() is the code that runs on the background thread. It can read data from the Model, but it cannot update it (that has to happen on the FXAT), while it can freely update other data stored as fields in the Interactor. The other method, updateModelAfterSave() is intended to run on the FXAT, it can freely read and write data in the Model, as well as all of the other fields in the Interactor.
Note that both of these methods are intended to run specifically on either a background thread or the FXAT, but they don’t have any logic (or knowledge at all, really) about the threads contained within them.
Domain Stuff
Just so that you don’t have to use your imagination to see how the Interactor interacts with services and domain objects, we’ve got some of that stuff too.
public class Service {

    public DomainObject saveDataSomewhere(String string) {
        try {
            Thread.sleep(3000);
        } catch (InterruptedException e) {
            throw new RuntimeException(e);
        }
        return new DomainObject(string + " - Saved");
    }

}
The service is very simple, it only has one method, saveDataSomewhere(), and it just waits for 3 seconds and returns an instance of the DomainObject.
public class DomainObject {

    private final String someValue;

    public DomainObject(String someValue) {
        this.someValue = someValue;
    }

    public String getSomeValue() {
        return someValue;
    }
}
The DomainObject is just a POJO to hold a single data value.
Using the Framework
So, how do you get all this stuff on the screen?
You need to get the JavaFX engine up and running, and that means using the Application class, and using Application.start() to configure your Stage and Scene:
public class MvciApplication extends Application {
    @Override
    public void start(Stage stage) throws Exception {
        stage.setScene(new Scene(new Controller().getView()));
        stage.show();
    }
}
This is pretty simple, instantiate the Controller and then call getView() to get the View. Put the View in a Scene which is, in turn, put into the Stage. Show the Stage. Voila!
What it Looks Like
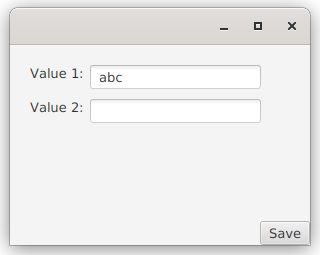
At the beginning:
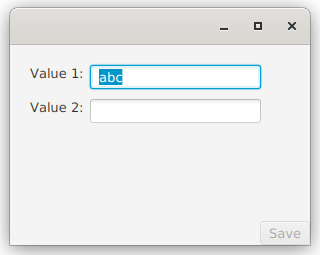
While it’s running:
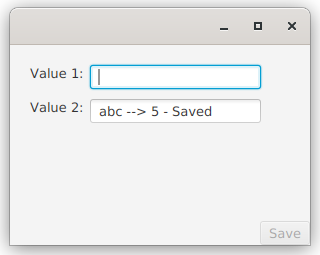
When it’s done:
Using MVCI with FXML
If, for some reason, you feel compelled to use FXML then you can still use this framework. The trick is to see the FXML file, the FXML Controller and the FXMLLoader together as the View component.
The hardest part is that you can’t have dependency injection via the constructor with the FXML Controller, since it’s instantiated via the FXMLLoader. So what you’ll need to do is run the FXMLLoader, pull the FXML Controller out of it and then cast it to whatever class you’ve actually made it. Then provide some setter methods to allow you to pass a reference to the Model and any of the action performers that your Controller defines. In the setter for the Model, you’ll need to include code to perform all of the bindings to the screen Node properties.
If you have little enough experience with FXML that the paragraph above sounds like mumbo-jumbo to you, then I’d suggest that you just put aside FXML and code your screens without it.
Other than that, you can put all of that FXMLLoader logic into Controller.getView(). Not a stitch of code in any other place in the framework needs to be changed to use FXML.
Conclusion
If you’re going to use JavaFX as a Reactive platform, which you should, then Model-View-Controller-Interactor is the way to go. It’s easy to understand and yet deals with all of the issues that you’re likely to encounter in a logic and straight-forward fashion.
Personally, I find it so easy to implement MVCI that even when I’m writing the simplest of example code I immediately just create the 4 classes that you need and go from there. I don’t feel any temptation to skip those classes and chuck everything into one place - there’s literally no advantage to that.