I decided to try writing a Hangman game that would look up words from the internet, just too see how much code it would actually take. The simplicity of the result surprised even me and it points out just how powerful reactive programming can be.
The Inspiration
I came across a question on the Internet from someone trying to create a virtual keyboard (for a Hangman game) that looked a bit like a physical keyboard, with each row of keys a little offset from the one above it. The person asking the question was trying to use a GridPane, which seems like it might be logical, but that became complicated because to create the offsets you needed to have each key span two columns so that you could skip the first column on the second row, and so on.
It turns out it’s extremely simple to write with just a few lines of code by using a VBox with the keys in three HBoxes. Then you can provide the offsets, by adding some padding to the left of the 2nd and 3rd HBoxes.
The code that was posted by the person asking the question was really, really complicated - apart from the GridPane - and I was struck by how really simple the code I had written was in comparison. So I asked myself, “Just how little code would it take to write the whole game?”
Hangman - The Rules
Hangman is a pretty simple game where you try find a hidden word by guessing at letters that might be in it. There’s a picture of a noose, and every time you guess a letter that isn’t in the word, a new body part is added to the picture. First, a head, then a body then the legs and so on. When the entire figure has been drawn, if you haven’t guessed the word, you lose. Usually, when you’re playing the game with paper and pens, the hangman is just a stick figure. Generally speaking, there are 7 body parts, so you get 7 wrong letter guesses before you lose.
The Program Structure
I decided to use an MVCI structure (MVC plus an Interactor to hold the game logic), because that’s generally best when doing anything non-trivial.
The Model
This is the place to start, because the Model really describes how the game logic is going to be translated over to the GUI.
If you think about it for a little bit, there’s really only two pieces of data required for the game; a word, and a list of letters that have been guessed. Every other aspect of the game play can be derived from just those two things. Furthermore, the word isn’t really going to be treated like a word, it’s just an ordered list of letters.
So the first two elements of the Model need to be ObservableLists; one with the letters of the word, and the other with the letters that have been guessed.
The next thing we need for the GUI is the number of wrong letters that have been guessed. This is just a count of all of the letters in guessed list that aren’t contained in the word list. Since this is game logic, it can’t be done in the View, but needs to be included in the Model so that it can be observed by the View. In the Model, we’ll create an IntegerProperty to hold this value.
Finally, we need a BooleanProperty to hold whether the game has been won, and another to hold whether it has been lost.
This is what the fields in the Model look like:
private final ObservableList<String> pickedLetters = FXCollections.observableArrayList();
private final ObservableList<String> word = FXCollections.observableArrayList();
private final IntegerProperty wrongLetterCount = new SimpleIntegerProperty(0);
private final BooleanProperty gameWon = new SimpleBooleanProperty(false);
private final BooleanProperty gameLost = new SimpleBooleanProperty(false);
Of course, the Model will also contain all of JavaFX Bean methods for these fields.
The Interactor
The game play for Hangman is pretty simple. There are just two actions; one to reset the hidden word, and another to add a letter to the list of guessed letters. So the Interactor has to support those two actions, and set up the Model with the relationships between those two lists and the three other fields.
Bindings in the Model
Let’s look at the Model setup first. It’s done in the constructor of the Interactor, which is provided a reference to the Model by the Controller when it’s instantiated:
public HangmanInteractor(HangmanModel model) {
       this.model = model;
       this.model.gameLostProperty().bind(model.wrongLetterCountProperty().greaterThan(5));
       this.model.gameWonProperty()
                 .bind(Bindings.createBooleanBinding(() -> hasGameBeenWon() && !model.isGameLost(),
                                          model.getPickedLetters(),
                                          model.gameLostProperty(),
                                          model.getWord()));
        this.model.wrongLetterCountProperty().bind(Bindings.createIntegerBinding(this::countWrongLetters, this.model.getPickedLetters()));
    }

private int countWrongLetters() {
    return Math.toIntExact(model.getPickedLetters().stream().filter(letter -> !model.getWord().contains(letter)).count());
}

private boolean hasGameBeenWon() {
    return (model.getWord().stream().allMatch(model.getPickedLetters()::contains));
}
The first element to look at is the wrongLetterCount property. It’s created via Bindings.createIntegerBinding(). There’s a method called countWrongLetters() which streams the pickedLetters List, filters out the ones that are in the word, and then counts them. The Binding is triggered every time the pickedLetters List changes.
The gameLost property is bound to the wrongLetterCount property, checking to see if it is greater than 5.
The gameWon property is calculated by streaming through the word List, and checking that each letter in the word is also in the pickedLetters List. Recalculation is triggered when either of the two letter lists is changed.
Game Play Methods
There’s only two actions in the game play; when a letter is selected, and restarting a new word. Here’s the code for both:
void processLetter(String letter) {
    if (!model.isGameWon() && !model.isGameLost()) {
        model.getPickedLetters().add(letter);
    }
}

void newWord() {
    model.setWord(wordAsList(words.remove(0).toUpperCase()));
    model.getPickedLetters().clear();
}

private List<String> wordAsList(String word) {
    return Arrays.asList(word.split("")).stream().filter(letter -> !letter.isEmpty()).collect(Collectors.toList());
}
That’s all pretty simple. The action for selecting a letter is just to add it to the pickedLetters List and then the Bindings will do the rest, updating the other three properties. The if statement around the action just prevents the addition of new selected letters after the game is over.
The newWord() method just clears the pickedLetters list and converts a new word string into an array of letters that are used to replace the contents of the word List.
Getting Words
But where does the array of words come from? A little Googling found a REST API on herokuapp.com that supplies random words. Rather than hit it each time to get a new word, it seemed more efficient to grab 100 words, pull only those with less that 10 letters and put them in a list. The API is hit once when the application is started, and the initial list just has the word “HANGMAN” in it until the API responds - that way it’s not empty if the user starts to play before the API can return a list.
If anyone feels the need to play Hangman more than about 100 times in a row, they’ll run out of words. It didn’t seem worth programming around this, and probably easier just to increase the number of words retrieved from the API to 200 or 1000 if it’s a problem.
Here’s the code to retrieve the words from the REST API, note that this code is expected to run on a background thread managed by the Controller:
void fetchWords() {
    try {
        HttpRequest request = Unirest.get("https://random-word-api.herokuapp.com/word").queryString("number", "100");
        Type collectionType = new TypeToken<Collection<String>>() {}.getType();
        ArrayList<String> wordArray = new Gson().fromJson(request.asString().getBody().toString(), collectionType);
        words = wordArray.stream().filter(word -> word.length() < 10).collect(Collectors.toList());
    } catch (Exception e) {
        e.printStackTrace();
    }
}
The code uses konghq.com’s unirest-java and unirest-object-wrappers-gson libraries to handle the REST and JSON work.
The Controller
Here’s the entire Controller, since it’s pretty simple:
public class HangmanController {

    HangmanInteractor interactor;
    HangmanModel model;
    Builder<Region> viewBuilder;

    public HangmanController() {
        model = new HangmanModel();
        interactor = new HangmanInteractor(model);
        viewBuilder = new HangmanViewBuilder(model, interactor::processLetter, interactor::newWord);
        fetchWords();
    }

    private void fetchWords() {
        Task<Void> fetchTask = new Task<>() {
            @Override
            protected Void call() {
                interactor.fetchWords();
                return null;
            }
        };
        fetchTask.setOnSucceeded(evt -> interactor.newWord());
        Thread fetchThread = new Thread(fetchTask);
        fetchThread.start();
    }

    public Region getView() {
        return viewBuilder.build();
    }
}
The constructor instantiates the Model, View Builder, and Interactor, then launches a background task to go fetch the words list from the REST API at herokuapp.com. There’s a getter for the View which triggers the build() method in the View Builder.
A Task is used to do the background processing to fetch the words from the internet. When the background task is completed, it calls the Interactor’s newWord() method which launches a new game.
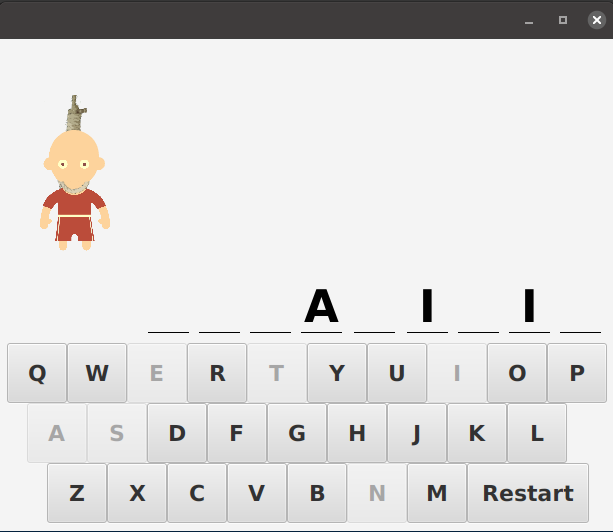
The View
Now all of the game mechanics have been completed, the Model has been set up, the game play actions are all handled and we can even retrieve a list of words from the Internet. All that remains is the GUI.
The GUI needs 4 components:*
- A virtual keyboard
- A hanged man
- Win/Lose indicators
- Puzzle word
I chose to use a BorderPane to hold the GUI because it seemed like a natural fit for a screen that has been divided up into logical sections. It should be possible to achieve something similar with just VBoxes and HBoxes, though.
It’s important to remember that the GUI is just strictly a GUI. It doesn’t contain any game logic at all, but simply handles the visual presentation of the game, and the interaction with the user. One other thing that you’ll notice is that none of the parts of the GUI have any direct interaction with any of the other parts. I could have written a separate class for each part, just to make the point.
The Virtual Keyboard
The virtual keyboard is a separate class, mostly because it has enough code in it that it makes sense to split it out and thereby keep the main GUI code cleaner. Also, this was the part that I started with to see how it could be done, and I like the idea of having it as a separate, reusable part.
The layout is super simple. It’s a VBox, and the VBox holds a set of HBoxes. Each HBox is a row of keys. The last row has the “Restart” button, which is a little special. Each row has a little more left padding than the one above it. In the spirit of DRY, the creation of the buttons and the HBox rows are delegated to methods which are called repeatedly. So there’s no duplicated code.
The letter Buttons and the “Restart” button are pretty much identical, except for the action an the “Restart” button. So the instantiation and formatting of the buttons is all done in the createButton() method.
The virtual keyboard takes two parameters in its constructor, one is a Consumer<String> which will handle the letter button clicks, and the other is a Runnable which will handle the restart. These are invoked via onAction event of each Button. The virtual keyboard has no knowledge of what these elements do, and it does not need to know. Besides invoking the Consumer and the Runnable, the onAction event handlers on the letter Buttons disables the button, while the “Restart” button re-enables all the buttons.
Here’s the code for the Virtual Keyboard:
public class VirtualKeyboard extends VBox {
    private static final List<String> row1Keys = List.of("Q", "W", "E", "R", "T", "Y", "U", "I", "O", "P");
    private static final List<String> row2Keys = List.of("A", "S", "D", "F", "G", "H", "J", "K", "L");
    private static final String restart = "Restart";
    private static final List<String> row3Keys = List.of("Z", "X", "C", "V", "B", "N", "M");
    private final Consumer<String> keystrokeConsumer;
    private Runnable restartHandler;
    private List<Button> allButtons = new ArrayList<>();


    public VirtualKeyboard(Consumer<String> keystrokeConsumer, Runnable restartHandler) {
        this.keystrokeConsumer = keystrokeConsumer;
        this.restartHandler = restartHandler;
        getChildren().addAll(createRow(row1Keys, 0d, false), createRow(row2Keys, 20d, false), createRow(row3Keys, 40d, true));
    }

    private HBox createRow(List<String> letters, Double leftPadding, boolean includeRestart) {
        HBox hBox = new HBox();
        hBox.getChildren().addAll(letters.stream().map(this::buttonSetup).collect(Collectors.toList()));
        if (includeRestart) {
            hBox.getChildren().add(createRestartKey());
        }
        hBox.setPadding(new Insets(0, 0, 0, leftPadding));
        return hBox;
    }

    private Node buttonSetup(String letter) {
        Button button = createButton(letter);
        button.setOnMouseClicked(mouseEvent -> {
            keystrokeConsumer.accept(letter);
            button.setDisable(true);
        });
        allButtons.add(button);
        return button;
    }

    private Button createButton(String letter) {
        Button button = new Button(letter);
        button.setMinSize(60.0, 60.0);
        button.setStyle("-fx-font-size: 22; -fx-font-weight: bold;");
        return button;
    }

    private Node createRestartKey() {
        Button button = createButton("Restart");
        button.setOnAction(evt -> {
            allButtons.forEach(eachButton -> eachButton.setDisable(false));
            restartHandler.run();
        });
        return button;
    }
}
The Hanged Man
This was probably the trickiest part of the whole screen. How to cycle through a series of 7 images as the number of wrong letters grows? A little bit of googling came up with the following image:
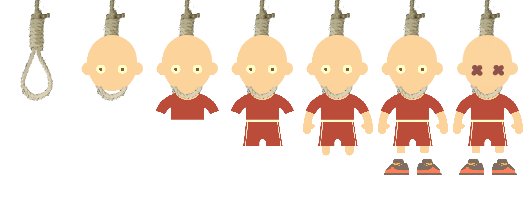
I liked the look of this, but I wasn’t thrilled with the idea of splitting it up manually to make 7 images out of it. It turns out that you don’t need to! The JavaFX ImageView class has a property called viewport, and you can manually manipulate this to show only part of an image. You can set the viewport by creating a Rectangle2D object with the correct size and positioning and use that. In order to handle the whole thing, I created a List of Rectangle2D, each with the correct offset, then bound the Viewport property of the ImageView to it.
I’ve since found out that this image is called a “Sprite”, and is commonly used in gaming to provide animation to characters that move around the screen.
The binding itself is interesting. It’s from the Bindings library and it’s called valueAt(). You give it an Observable List, and an Observable Integer and it will select the item in the List that corresponds to the Observable Integer. It’s simple, and it’s clean. I use the wrongLetterCount property from the Model to control the Viewport.
Here’s the code:
public Node createHangedMan() {
    Image image = new Image("/images/hangman.png");
    ImageView imageView = new ImageView(image);
    double cellWidth = image.getWidth() / 7;
    List<Rectangle2D> clippingShapes = IntStream.range(0, 7)
                                                .mapToObj(i -> new Rectangle2D(i * cellWidth, 0, cellWidth, image.getHeight()))
                                                .collect(Collectors.toList());
    imageView.viewportProperty().bind(Bindings.valueAt(FXCollections.observableList(clippingShapes), model.wrongLetterCountProperty()));
    StackPane results = new StackPane(imageView);
    results.setPadding(new Insets(30));
    return results;
}
It’s actually fairly simple. I put the ImageView in a StackPane because the contents of StackPanes are centred by default, with a little padding so that he’s not tucked up over to the left or crowded by the Centre panel.
Win/Lose Indicators
This part is pretty simple. I created a StackPane and put the two ImageViews into it. One with the the “Win” image, and one with the “You Lose” image. Both images were scaled the same, at a size that would fit in the area available. The Visible property of each image was bound to the appropriate property in the Model, either gameWon or gameLost.
Puzzle Word
The Puzzle Word, and the Win/Lose images are in a VBox in the Centre of the BorderPane. The Puzzle Word is actually a set of VBox’s held in an HBox. Each VBox has a Text with a letter above a Line. Once again, in order to stick to DRY, there’s a separate method to create each box.
public void buildWord() {
        wordBox.getChildren().setAll(model.getWord().stream().map(this::createLetterBox).collect(Collectors.toList()));
    }

    private Node createLetterBox(S```tring letter```) {
        VBox vBox = new VBox();
        Node letterText = bigText(letter);
        letterText.visibleProperty()
                  .bind(Bindings.createBooleanBinding(() -> model.getPickedLetters().contains(letter) || model.isGameLost(),
                                                      model.getPickedLetters(),
                                                      model.gameLostProperty()));
        vBox.getChildren().addAll(letterText, new Line(0, 10, 40, 10));
        vBox.setAlignment(Pos.BOTTOM_CENTER);
        return vBox;
    }

    private Node bigText(String letter) {
        Text results = new Text(letter);
        results.setStyle("-fx-font-size: 45; -fx-font-weight: bold");
        return results;
    }
That’s All it Takes
Really, that’s it. On the surface, this seems like a much more difficult thing to build, there’s all of the images, the virtual keyboard and keeping track of what letters have been played and which to show. But when you look at it closely, it all becomes very simple. None of the screen elements directly interact, and the virtually every element of the GUI is controlled by two arrays of letters and some bindings which combine them together.
The complete code can be found here: