Introduction
Once you’ve mastered the basic components of TableView layout and you try do something in the real world, you’ll inevitably run up against data that doesn’t seem to work nicely with TableView. We’re going to look at how to wrestle with real world data and how you can work effectively with it in your TableViews. The approach that we’re going to take is to try to understand how data moves into your TableView, and that really boils down to understanding how it gets into your TableCells.
This article assumes that you’ve read, or a least understand the concepts from, the first article in this series: TableView Basics. If you haven’t, then you might want to spend a few minutes reading it. The examples in this article are going to carry on using the same sample layout and data from that first article.
The first thing that we’re going to look at is something that you learn of in TableView 101 but you never seem to learn about; and that’s TableCell.updateItem()…
Observables and TableCell.updateItem()
When you define a TableColumn you need to define the data source for that column. The method call is defined like this:
public final void setCellValueFactory(Callback<TableColumn.CellDataFeatures<S,T>,ObservableValue<T>> value)
You’re installing a Callback that takes a CellDataFeatures and returns an ObservableValue<T> where T is the data type of the column. You can see that the TableColumn data source needs to be Observable, which usually means a Property or a Binding or something like that. In fact, the JavaDocs even give an example of using a data source which isn’t Observable and putting it in an Observable wrapper:
 firstNameCol.setCellValueFactory(new Callback<CellDataFeatures<Person, String>, ObservableValue<String>>() {
     public ObservableValue<String> call(CellDataFeatures<Person, String> p) {
         return new ReadOnlyObjectWrapper(p.getValue().getFirstName());
     }
  });
But here’s the enigma: Cell.updateItem() doesn’t take an Observable as one of its parameters:
protected void updateItem(T item, boolean empty)
What gives? We have to define the data source for the column as an Observable, but the cells for the column are given non-observable data! This has always confused me. Surely, it would make more sense to just pass the Observable in to the TableCell as an Observable so that it can be treated as an Observable.
Poking around in the source code for TableCell gives the answer. There’s a method called TableCell.updateItem(int oldIndex). This is one of the methods that actually calls Cell.updateItem(). There’s a comment for this method in the source code:
    /*
     * This is called when we think that the data within this TableCell may have
     * changed. You'll note that this is a private function - it is only called
     * when one of the triggers above call it.
     */
It turns out that “the triggers above” involve changing the row that the cell displays, or when the cell is edited by the user. But there has to be more.
I took the code from the TableView Basics article and added a button to the main screen with the following code:
    private Node addButton(ObservableList<OrderModel_1> tableItems) {
        Button button = new Button("Click Me");
        button.setOnAction(evt -> {
            System.out.println("Button has been clicked");
            tableItems.get(0).shippedProperty().set(true);
        });
        return button;
    }
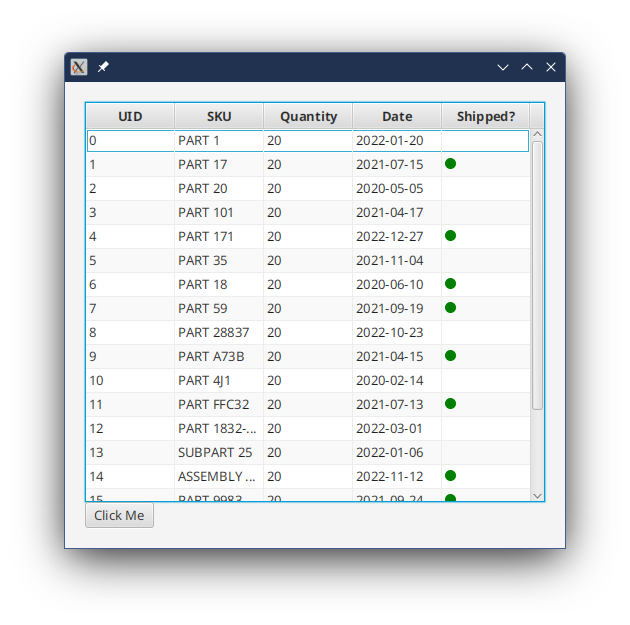
Then I added some code into the custom TableCell to print to the console whenever updateItem() was called. Initially, the screen looked like this:
and then I clicked the Button:
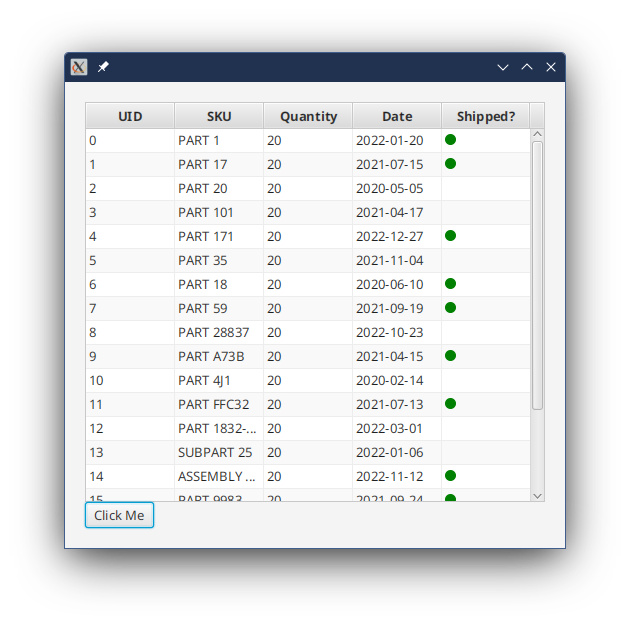
And the output on the console looked like this:
Cell: 0 has called updateItem()
Cell: 0 has called updateItem()
Cell: 0 has called updateItem()
Cell: 0 has called updateItem()
Cell: 0 has called updateItem()
Cell: 0 has called updateItem()
Cell: 0 has called updateItem()
Cell: 0 has called updateItem()
Cell: 0 has called updateItem()
Cell: 0 has called updateItem()
Cell: 0 has called updateItem()
Cell: 1 has called updateItem()
Cell: 2 has called updateItem()
Cell: 3 has called updateItem()
Cell: 4 has called updateItem()
Cell: 5 has called updateItem()
Cell: 6 has called updateItem()
Cell: 7 has called updateItem()
Cell: 8 has called updateItem()
Cell: 9 has called updateItem()
Cell: 10 has called updateItem()
Cell: 11 has called updateItem()
Cell: 12 has called updateItem()
Cell: 13 has called updateItem()
Cell: 14 has called updateItem()
Cell: 15 has called updateItem()
Cell: 16 has called updateItem()
Button has been clicked
Cell: 1 has called updateItem()
What this tells us is that there’s something in the code for TableView, TableColumn or TableCell that captures changes to the value contained in our data source Observable and invokes Cell.updateItem().
A really important take-away from this is that if you aren’t composing your TableView data models of fields of Observable values, then you’re missing out on an important feature. TableView is designed to automatically update its display whenever the underlying data changes. This means that you can treat your data model as just data, manipulate it how you like, and the TableView will stay updated without any need to reference back to your View to update it.
If you use ReadOnlyObjectWrapper to force your non-observable data values into your TableView, then you won’t get any of the wonderful goodness, and you’ll have to update your TableView in some tedious, manual way.
That’s all good, but what does Cell.updateItem() actually do?
What Cell.updateItem() Does
The first place to look is in the source code. So, here it is:
    protected void updateItem(T item, boolean empty) {
        setItem(item);
        setEmpty(empty);
        if (empty && isSelected()) {
            updateSelected(false);
        }
    }
To understand this code, you need this:
    public final ObjectProperty<T> itemProperty() { return item; }

    /**
     * Sets the item to the given value - should not be called directly as the
     * item is managed by the virtualized control.
     * @param value the new data value to set in this cell
     */
    public final void setItem(T value) { item.set(value); }
Now you can see that there’s a field in Cell called item that holds the value in the cell. Cell.updateItem() simply updates the value in item through the delegated method setItem().
By the way, this is why strange stuff happens if you forget to call super.updateItem() in your custom TableCell.updateItem().
Even more, this explains why it’s strange stuff, and not just wrong stuff. Because the way that we’ve been shown how to write updateItem() is to directly place the value of the parameter item into our Cell layout, not to use the field item in our layout. So, if you don’t call super.updateItem() then you won’t update the value in the field item, but your layout will change. Anything that uses the field item will be wrong, yet the cell might look correct.
And that, in itself, suggests that maybe we’re doing something wrong.
TableCells Without Overriding updateItem()
Let’s go back to the first custom TableCell from the TableView Basics article. We wrote it like this:
public class BooleanTableCell1<S> extends TableCell<S, Boolean> {

    CheckBox checkBox = new CheckBox();
    StackPane container;

    public BooleanTableCell1() {
        container = new StackPane(checkBox);
        container.setPadding(new Insets(8));
        setText(null);
        setGraphic(null);
    }

    @Override
    protected void updateItem(Boolean item, boolean empty) {
        super.updateItem(item, empty);
        if (!empty) {
            if (item != null) {
                checkBox.setSelected(item);
            } else {
                checkBox.setSelected(false);
            }
            setGraphic(container);
        } else {
            setGraphic(null);
        }
    }
}
You can see that we’re ignoring the built in ObjectProperty<Boolean> of Cell, and just stuffing the value of the passed parameter into our CheckBox. What if we used the item field instead?
public class BooleanTableCell4<S> extends TableCell<S, Boolean> {

    private final StackPane container;

    public BooleanTableCell4() {
        CheckBox checkBox = new CheckBox();
        checkBox.selectedProperty().bind(itemProperty());
        container = new StackPane(checkBox);
        container.setPadding(new Insets(8));
        setText(null);
        setGraphic(null);
    }

    @Override
    protected void updateItem(Boolean item, boolean empty) {
        super.updateItem(item, empty);
        if (!empty) {
            setGraphic(container);
        } else {
            setGraphic(null);
        }
    }
}
This works just fine and fits in better, in my opinion, with the concept of writing Reactive code for your views. In this case, the layout is defined statically yet behaves dynamically. We’ve done away with the CheckBox field, since we’re no longer referencing it from updateItem().
But we can do better. If you look back at the code for Cell.updateItem() you’ll see that it doesn’t just update the field item, it also calls setEmpty(), which is a delegate to the setter of a Property field in Cell called empty. This indicates that we can use the empty field in our layout constructor:
public class BooleanTableCell4<S> extends TableCell<S, Boolean> {

    public BooleanTableCell4() {
        CheckBox checkBox = new CheckBox();
        checkBox.selectedProperty().bind(itemProperty());
        StackPane container = new StackPane(checkBox);
        container.setPadding(new Insets(8));
        graphicProperty().bind(Bindings.createObjectBinding(() -> !isEmpty() ? container:null, emptyProperty() ));
        setText(null);
    }

    @Override
    protected void updateItem(Boolean item, boolean empty) {
        super.updateItem(item, empty);
    }
}
Now the Graphic Property is bound to the Empty Property and we can ditch the container field since we’re no longer referencing it from updateItem().
However, our updateItem() does nothing except call the super.updateItem() that it was overriding. So we can get rid of it:
public class BooleanTableCell4<S> extends TableCell<S, Boolean> {

    public BooleanTableCell4() {
        CheckBox checkBox = new CheckBox();
        checkBox.selectedProperty().bind(itemProperty());
        StackPane container = new StackPane(checkBox);
        container.setPadding(new Insets(8));
        graphicProperty().bind(Bindings.createObjectBinding(() -> !isEmpty() ? container : null, emptyProperty()));
        setText(null);
    }
}
Woa! This is nothing like the examples you’ll see on the web, or in the JavaDocs. As a matter of fact, the JavaDocs have this to say:
The updateItem method should not be called by developers, but it is the best method for developers to override to allow for them to customise the visuals of the cell.
I’m going to have to say that is rubbish. First of all, everyone knows that doing layout in updateItem() will result in truly bad performance of your TableView as layouts should only be created once per instance of a TableCell. Secondly, updateItem() is clearly all about data management, so you should leave it for those cases where you need to deal with data management.
BTW: All of the other custom TableCells from TableView Basics can be handled this same way.
Derived Columns
Simple TableViews will have a data model that has a single field for each TableColumn. This means that the setCellValueFactory() call for each TableColumn will just need to pull a single Property field from your data model. But what if you need to combine some together?
Binding in the CellValueFactory Callback
Let’s imagine that you have some sort of a customer database and you’re displaying data from it. Your database has separate fields for firstName and lastName and you need to put them together in some way.
The simplest approach is to create a Binding as the return value for the Callback that you create:
tableColumn.setCellValueFactory(cdf -> cdf.value.fNameProperty().concat(" ").concat(cdf.value.lNameProperty());
That will get the job done, but…
Should You Do This?
It seems obvious and simple, right? But let’s look at it from the other direction.
Suppose your database just had the names in a single field for the whale name and you wanted your TableView to have two columns; one for first name and one for last name. That’s easy enough for “John Smith”, but what about “Billy Bob Van Der Camp Esq”? The logic for that is going to be quite a bit more complicated. At some point, the logic required to sort this out goes beyond simply displaying the information on the screen and becomes something that should be considered “business logic”. When that happens, you need to put it the rest of your business logic - in the Model or the Interactor.
How do you do this?
The best approach is to set up your Presentation Model to deliver the information to your view. This allows you to still have a single Property to pull for your column, and the TableView doesn’t need to know that, behind the scenes, several different elements are being put together.
There’s two ways that you can do this…
Binding the Values in the Interactor
Let’s go back to the original case of combining the first and last names into a single value, but this time we’ll use the format, “{lastName}, {firstName}”. The first step is to create a StringProperty field to hold the result:
private final StringProperty name = new SimpleStringProperty("");

public StringProperty nameProperty() {
    return name;
}
public void setNameBinding(StringBinding binding) {
    name.bind(binding);
}
We’ve provided a method called setNameBinding() so that our Model/Interactor can provide the logic for the Binding. That code will go in the constructor for the Model/Interactor:
public class TableBlogInteractor {

    TableBlogInteractor(OrderModel_1 model) {
        model.setNameBinding(Bindings.createStringBinding(() -> createFullName(model.fNameProperty().get(), model.lNameProperty().get()),
                model.fNameProperty(), model.lNameProperty()));
    }

    private String createFullName(String fName, String lName) {
        return lName + ", " + fName;
    }
}
And here, createFullName() can be as complicated and baroque as you like, as long as it can still run on the FXAT without taking too long or blocking.
The net effect of this is that we’ve tailored the Presentation Model to the needs of the View at the cost of creating a bit more coupling in our system. On the upside, this coupling is confined to the Presentation Model, which is where we expect to see virtually all of the coupling.
This is the kind of architecture decision that teams come to blows over. On the one hand, we’ve moved complexity out of the View and kept business logic in one place. On the other hand, we’ve now disclosed some information about how the View is going to use the data - it’s going to put the first and last names together into a single display element. Counterbalanced against that, the View doesn’t know that nameProperty() is a bound value, it just sees it as another data element. In fact, it might even be a completely different data element from the underlying database. For instance; first name - “John”, last name = “Smith” and name = “Smitty” could be totally valid.
There’s no absolute right or wrong here. It just has to be an approach that makes sense to the team.
Binding the Values in the Presentation Model
Finally, there’s a “middle ground” approach where all of the logic for combining the names together resides in the Presentation Model itself:
public ObservableStringValue nameProperty() {
    return Bindings.createStringBinding(() -> createFullName(fName.get(), lName.get()),
            fName, lName);
}

private String createFullName(String fName, String lName) {
    return lName + ", " + fName;
}
Personally, I’d lean towards this more than performing the Binding in the TableColumn creation code, with the same caveats that if the logic gets too complicated then it belongs with the other business logic in the application - in the Model or the Interactor. One of the benefits of this approach (over binding in the TableColumn code) is that nature of how the full name is created remains hidden from the View. This means that it can be changed, with the logic moved into the Interactor, without any changes required to the View.
Generally speaking, I think you’re better off having a single field (or something that looks like a field) in your Presentation Model for each column in your TableView. This keeps your View from having to understand relationships between the various data elements in the Presentation Model.
Complex Columns
Sometimes you need two or more distinct data elements to adequately display a column in a TableView. How do you handle that?
For instance, let’s assume that you want to show the full name in a single TableCell, but you want to display them stacked vertically to save horizontal space. This means that they’ll still be two data elements, the first name and the last name, but they’ll both be displayed in the same TableCell.
As another example, let’s say that you want to change the way that a TableCell is formatted based on one data element, but the data displayed in the cell is from another data element. This is the one that we’ll look at.
First off, you can’t really do what we did when combining the names, where the two data elements are transformed into a single generic element. That’s because you can’t take them apart again to use the individual parts in your layout design.
Whatever you do, don’t put the diffent data elements into a List<Object>. It’s a kludge that you’ll see people do all the time and it’s simply horrible.
The answer is to create a custom object that will hold all of the data components that you need as fields inside of it. The data element in your TableView data model will be an ObjectProperty<CustomObject>.
However, this can become mind-numbingly difficult to deal with if you do it wrong. The temptation is to create this custom object composed of ObservableValues as fields. Then when you put this into ObjectProperty<CustomObject> you’ll have an ObservableValue composed of ObservableValues, and you’ll have to watch out. This is because if you bind those composed ObservableValues to elements of your GUI, they because orphaned when the enclosing ObjectProperty<CustomObject> changes its value. This means that you’ll have to unbind and rebind - well look at this later.
Using an Immutable Custom Object
Mutability makes complex stuff way, way more complex. And mutability makes really complicated stuff nearly impossible. ObservableValues, by their very nature, are mutable. You can keep things much simpler by making your custom objects immutable.
This means that in order to change one of the values inside them, you’ll need to partially clone the object and replace the old value with the new value and return the new object. If you do this, then you won’t need to worry about having multiple layers of ObservableValues to keep track of.
Let’s take a this…
We’ll use the same example data model that we used in the TableView Basics article, but we’ll add in a custom object that looks like this to replace sku:
public class ProductId {

    private final String sku;
    private final Boolean customPart;

    public ProductId(String sku, Boolean customPart) {
        this.sku = sku;
        this.customPart = customPart;
    }

    public String getSku() {
        return sku;
    }

    public Boolean isCustomPart() {
        return customPart;
    }

    public ProductId changeSku(String newSku) {
        return new ProductId(newSku, customPart);
    }

    public ProductId changeCustomPart(Boolean newCustomPart) {
        return new ProductId(sku, newCustomPart);
    }

    @Override
    public boolean equals(Object other) {
        if ((other instanceof ProductId)) {
            return (sku.equals(((ProductId) other).getSku()) && customPart.equals(((ProductId) other).isCustomPart()));
        }
        return false;
    }
}
You can see that ProductId is immutable. There’s no way to change either of the fields inside of ProductId. Just to make the point, a couple of convenience methods have been added to show how changing either field can be achieved by creating a new ProductId with the new field value and tnen returning that new ProductId. Once you have an instance of ProductId, however, its values for sku and customPart are locked in. We also have an implementation of equals() since the TableView code won’t invoke updateItem() if the old and new values are the same.
Now we can look at our new OrderModel data class:
public class OrderModel_2 {

    private final ObjectProperty<ProductId> sku = new SimpleObjectProperty<>();
    private final ObjectProperty<Integer> uid = new SimpleObjectProperty<>(0);
    private final ObjectProperty<Integer> quantity = new SimpleObjectProperty<>(0);
    private final ObjectProperty<LocalDate> date = new SimpleObjectProperty<>(LocalDate.now());
    private final StringProperty name = new SimpleStringProperty("");
    private final BooleanProperty shipped = new SimpleBooleanProperty(false);

    public OrderModel_2(int uid, String sku, boolean customPart, int quantity, LocalDate date, Boolean shipped) {
        this.uid.set(uid);
        this.sku.set(new ProductId(sku, customPart));
        this.quantity.set(quantity);
        this.date.set(date);
        this.shipped.set(shipped);
    }

    public ObjectProperty<ProductId> skuProperty() {
        return sku;
    }

    public ObjectProperty<Integer> uidProperty() {
        return uid;
    }

    public ObjectProperty<Integer> quantityProperty() {
        return quantity;
    }

    public ObjectProperty<LocalDate> dateProperty() {
        return date;
    }

    public BooleanProperty shippedProperty() {
        return shipped;
    }

    public StringProperty nameProperty() {
        return name;
    }

    public void setNameBinding(StringBinding binding) {
        name.bind(binding);
    }

    public static List<OrderModel_2> generateList() {
        List<OrderModel_2> results = new ArrayList<>();
        int uid = 0;
        results.add(new OrderModel_2(uid++, "PART 1",false, 20, LocalDate.of(2022, 1, 20), false));
        results.add(new OrderModel_2(uid++, "PART 17",true,  20, LocalDate.of(2021, 7, 15), true));
        results.add(new OrderModel_2(uid++, "PART 20", false,20, LocalDate.of(2020, 5, 5), false));
        results.add(new OrderModel_2(uid++, "PART 101", false,20, LocalDate.of(2021, 4, 17), false));
        results.add(new OrderModel_2(uid++, "PART 171", false,20, LocalDate.of(2022, 12, 27), true));
        results.add(new OrderModel_2(uid++, "PART 35",false, 20, LocalDate.of(2021, 11, 4), false));
        results.add(new OrderModel_2(uid++, "PART 18",true, 20, LocalDate.of(2020, 6, 10), true));
        results.add(new OrderModel_2(uid++, "PART 59",true, 20, LocalDate.of(2021, 9, 19), true));
        results.add(new OrderModel_2(uid++, "PART 28837",false, 20, LocalDate.of(2022, 10, 23), false));
        results.add(new OrderModel_2(uid++, "PART A73B",false, 20, LocalDate.of(2021, 4, 15), true));
        results.add(new OrderModel_2(uid++, "PART 4J1", true,20, LocalDate.of(2020, 2, 14), false));
        results.add(new OrderModel_2(uid++, "PART FFC32", false,20, LocalDate.of(2021, 7, 13), true));
        results.add(new OrderModel_2(uid++, "PART 1832-882B", false,20, LocalDate.of(2022, 3, 1), false));
        results.add(new OrderModel_2(uid++, "SUBPART 25", false,20, LocalDate.of(2022, 1, 6), false));
        results.add(new OrderModel_2(uid++, "ASSEMBLY 7K22",true, 20, LocalDate.of(2022, 11, 12), true));
        results.add(new OrderModel_2(uid++, "PART 9983", false,20, LocalDate.of(2021, 9, 24), true));
        results.add(new OrderModel_2(uid++, "PART GH887", true,20, LocalDate.of(2020, 4, 30), false));
        results.add(new OrderModel_2(uid++, "PART 1003",false, 20, LocalDate.of(2021, 3, 17), false));
        results.add(new OrderModel_2(uid++, "PART 31", true,20, LocalDate.of(2021, 10, 5), true));
        results.add(new OrderModel_2(uid++, "PART 98XB", false,20, LocalDate.of(2022, 3, 22), false));
        return results;
    }
}
This is almost the same except the sku field has been switched over to our ProductId class and the constructor and the static List creator have been updated to reflect this.
Now let’s look at the TableViewBuilder:
public class TableViewBuilder2 implements Builder<Region> {

    private final ObservableList<OrderModel_2> model;

    public TableViewBuilder2(ObservableList<OrderModel_2> model) {
        this.model = model;
    }

    @Override
    public Region build() {
        TableView<OrderModel_2> results = new TableView<>();

        TableColumn<OrderModel_2, Integer> uidCol = new TableColumn<>("UID");
        uidCol.setCellValueFactory(cdf -> cdf.getValue().uidProperty());
        results.getColumns().add(uidCol);

        TableColumn<OrderModel_2, ProductId> skuCol = new TableColumn<>("SKU");
        skuCol.setCellValueFactory(cdf -> cdf.getValue().skuProperty());
        skuCol.setCellFactory(tableColumn -> new ProductIdTableCell());
        results.getColumns().add(skuCol);

        TableColumn<OrderModel_2, Integer> quantityCol = new TableColumn<>("Quantity");
        quantityCol.setCellValueFactory(cdf -> cdf.getValue().quantityProperty());
        results.getColumns().add(quantityCol);

        TableColumn<OrderModel_2, LocalDate> dateCol = new TableColumn<>("Date");
        dateCol.setCellValueFactory(cdf -> cdf.getValue().dateProperty());
        results.getColumns().add(dateCol);

        TableColumn<OrderModel_2, Boolean> shippedCol = new TableColumn<>("Shipped?");
        shippedCol.setCellValueFactory(cdf -> cdf.getValue().shippedProperty());
        results.getColumns().add(shippedCol);

        results.setItems(model);
        results.setColumnResizePolicy(TableView.CONSTRAINED_RESIZE_POLICY);
        return results;
    }
}
The biggest change here is that we’re now creating a ProductIdTableCell for the sku column. Let’s look at that:
public class ProductIdTableCell1 extends TableCell<OrderModel_2, ProductId> {

    private static final PseudoClass redDisplay = PseudoClass.getPseudoClass("custom");

    public ProductIdTableCell1() {
        Text text = new Text();
        text.textProperty().bind(Bindings.createStringBinding(this::determineSku, itemProperty()));
        StackPane container = new StackPane(text);
        container.getStyleClass().add("cell-box");
        container.setPadding(new Insets(8));
        itemProperty().addListener(itemProperty -> container.pseudoClassStateChanged(redDisplay, determineCustomPart()));
        graphicProperty().bind(Bindings.createObjectBinding(() -> !isEmpty() ? container : null, emptyProperty()));
        setText(null);
    }

    private String determineSku() {
        return (itemProperty().get() != null) ? itemProperty().get().getSku() : "";
    }

    private boolean determineCustomPart() {
        return (itemProperty().get() != null) ? itemProperty().get().isCustomPart() : false;
    }
}
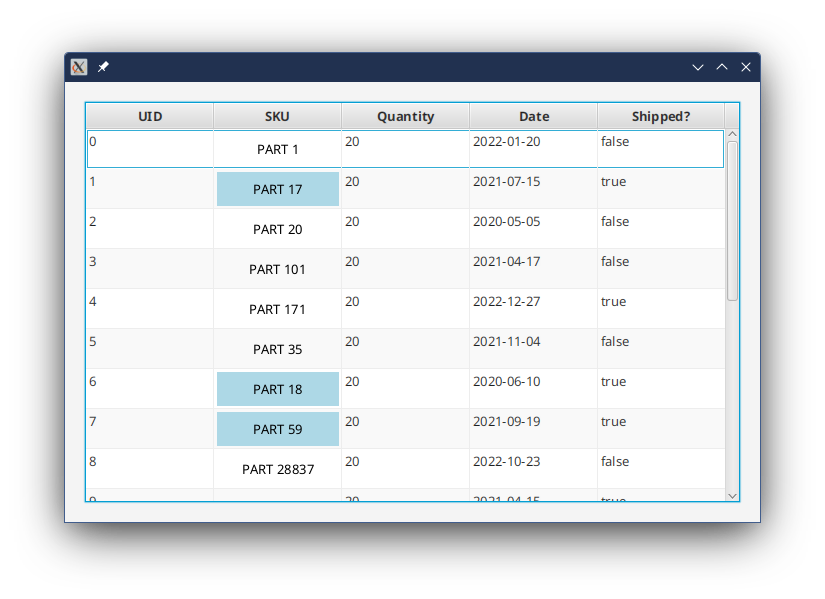
We’re sticking here with same concept of putting everything into the layout constructor and binding to the data value represented by item. This works because we know that there’s no way that the sku or customPart field can change without replacing the entire ProuductId contained inside item. The CSS file looks like this:
.cell-box {}

.cell-box:custom {
  -fx-background-color: lightblue;
}
And the Application to run it looks like this:
public class DataTableViewApplication extends Application {
    private final ObservableList<OrderModel_2> tableItems = FXCollections.observableArrayList();

    public static void main(String[] args) {
        launch();
    }

    @Override
    public void start(Stage primaryStage) throws Exception {
        Scene scene = new Scene(createContent());
        primaryStage.setScene(scene);
        primaryStage.show();
        scene.getStylesheets().add(DataTableViewApplication.class.getResource("css/tableblog.css").toString());
        fetchData();
    }

    private Region createContent() {
        VBox results = new VBox(new TableViewBuilder2(tableItems).build());
        results.setPadding(new Insets(20));
        results.setMinWidth(500);
        return results;
    }
    private void fetchData() {
        Task<List<OrderModel_2>> loadTask = new Task<>() {
            @Override
            protected List<OrderModel_2> call() throws InterruptedException {
                Thread.sleep(2000);
                return OrderModel_2.generateList();
            }
        };
        loadTask.setOnSucceeded(evt -> tableItems.setAll(loadTask.getValue()));
        Thread loadThread = new Thread(loadTask);
        loadThread.start();
    }
}
And the result looks like this:
The biggest quirk with this approach is that you need to deal with the possibility that the value in item will be null, and that attempts to call item.get().getSku() and item.get().isCustomPart() are going to fail with NPE’s. This is always going to be an issue with composed objects as Property values, since the possibility will always exist that the Property container will be empty.
The functions determineSku() and determineCustomPart() cope with this, and having them split out from the layout code keeps the layout code clean.
There’s another way to deal with this, and this involves bringing back the overridden setItem() method. Since we know that the only way to change the value in the item property is through setItem(), we are guarateed that any code we put in there to deal with a new item that is null is going to execute:
public class ProductIdTableCell2 extends TableCell<OrderModel_2, ProductId> {

    private static final PseudoClass redDisplay = PseudoClass.getPseudoClass("custom");

    private final StringProperty sku = new SimpleStringProperty("");
    private final BooleanProperty customPart = new SimpleBooleanProperty(false);

    public ProductIdTableCell2() {
        Text text = new Text();
        text.textProperty().bind(sku);
        StackPane container = new StackPane(text);
        container.getStyleClass().add("cell-box");
        container.setPadding(new Insets(8));
        customPart.addListener(itemProperty -> container.pseudoClassStateChanged(redDisplay, customPart.get()));
        graphicProperty().bind(Bindings.createObjectBinding(() -> !isEmpty() ? container : null, emptyProperty()));
        setText(null);
    }

    @Override
    public void updateItem(ProductId item, boolean isEmpty) {
        super.updateItem(item, isEmpty);
        if (!isEmpty && (item != null)) {
            sku.set(item.getSku());
            customPart.set(item.isCustomPart());
        } else {
            sku.set("");
            customPart.set(false);
        }
    }
}
Here we’ve created two now Property fields in the TableCell. One to hold the sku as a StringProperty and the other to hold customPart as a BooleanProperty. Now we can construct our layout to bind directly to these Properties, essentially treating them in exactly the same way that we would have treated item if it was a simple Property.
The code to deal with the empty or null value in the item is placed in the overriden updateItem() method. Note that this is all that this method does. It’s simply translating updateItem() into a method that performs the same function on the decomposed contents of ProductId.
Is this better than the first way?
I don’t think that it’s “better”, but it’s a different philosophic approach which is maybe just a little more in alignment with the way that the internal JavaFX code is written. It keeps the layout code a little bit cleaner, and concentrates all of the null value logic into the place where the value in item is updated. Personally, I’d probably use this approach.
Using Nested Properties
It’s possible that you’ll have a situation where you really need the components of ProductId to be Properties themselves. Perhaps there is some other part of your GUI that access the same data and you need to bidirectionally bind sku to the text property of a TextField. So how do you go about this?
You need to understand that once you start using Properties composed of other Properties your brain is going to start to hurt.
Want you’ll want to do is to Bind one of those composed properties and use the “Set it and forget it” layout approach. Except that, if you do, it’ll break.
We’ll start with a new version of ProductId, we’ll call it PropertyProductId:
public class PropertyProductId {

    private final StringProperty sku = new SimpleStringProperty("");
    private final BooleanProperty customPart = new SimpleBooleanProperty(false);

    public PropertyProductId(String sku, boolean customPart){
        this.sku.set(sku);
        this.customPart.set(customPart);
    }

    public String getSku() {
        return sku.get();
    }

    public StringProperty skuProperty() {
        return sku;
    }

    public void setSku(String sku) {
        this.sku.set(sku);
    }

    public boolean isCustomPart() {
        return customPart.get();
    }

    public BooleanProperty customPartProperty() {
        return customPart;
    }

    public void setCustomPart(boolean customPart) {
        this.customPart.set(customPart);
    }
}
This is much more consistent with the typical JavaFX data model we’re familiar with. The fields are implemented as JavaFX “Beans”, with delgated getter and setter methods and property fetchers.
Let’s imagine that you have an instance of this called productId. Now, you could do something like this:
TextField textField = new TextField();
textField.textProperty().bind(productId.skuProperty());
This is the kind of thing that we do all the time when creating layouts and binding them to elements of a data model. But what happens if we do this:
productId.setSku("FRED999");
TextField textField = new TextField();
textField.textProperty().bind(productId.skuProperty());
   .
   .
   .
productId = new PropertyProductId();
productId.setSku("ABC123");
What value do you expect to see in textField? “ABC123”?
No, you’ll still see “FRED999” because textField was bound to that particular instance of PropertyProductId that was stored in productId at the time it was bound. Even more, it was bound to the StringProperty in the sku field of that instance of PropertyProductId at the time it was bound. And that’s where it will stay bound until you force it to change.
It get’s worse when productId itself is an ObjectProperty<PropertyProductId>….
productId.bind(dataModel.productIdProperty())
productId.get().setSku("FRED999");
TextField textField = new TextField();
textField.textProperty().bind(productId.get().skuProperty());
   .
   .
   .
dataModel.setProductId(new PropertyProductId());
dataModel.getProductId().setSku("ABC123");
System.out.println(productId.getSku());
Oh no!
Let’s look at this. Our local productId is bound to our data model’s productId property. Then we’re going to stuff “FRED999” into the sku Property and bind it to the textProperty() of the TextField. Then, later on, some code somewhere is going to update our data model and change the value in its productId field. At that point, our local productId variable, which is bound to the data model value will change. So when the sku value is changed to “ABC123” in the data model, that change will be reflected in the local productId and the output from the println will be “ABC123”.
BUT the TextField will still display “FRED999”
That’s because the TextField is still bound to the to the StringProperty in the sku field of that instance of PropertyProductId at the time it was bound.
And, of course, that’s the nature of Properties. We expect their values to change at random times, which is why we use bindings.
The only way to deal with this is to use a Listener on the wrapping Property and then recreate the bindings when the outer Property changes. There is a function called Bindings.select() that can do this for you, but we’ll leave this for another day.
Let’s look at how we’d deal with this in our example TableCell. We’ll stick with the second version, since the overridden updateItem() method essentially fills the same role as a Listener:
public class ProductIdTableCell3 extends TableCell<OrderModel_3, PropertyProductId> {

    private static final PseudoClass redDisplay = PseudoClass.getPseudoClass("custom");

    private final StringProperty sku = new SimpleStringProperty("");
    private final BooleanProperty customPart = new SimpleBooleanProperty(false);

    public ProductIdTableCell3() {
        Text text = new Text();
        text.textProperty().bind(sku);
        StackPane container = new StackPane(text);
        container.getStyleClass().add("cell-box");
        container.setPadding(new Insets(8));
        customPart.addListener(itemProperty -> container.pseudoClassStateChanged(redDisplay, customPart.get()));
        graphicProperty().bind(Bindings.createObjectBinding(() -> !isEmpty() ? container : null, emptyProperty()));
        setText(null);
    }

    @Override
    public void updateItem(PropertyProductId item, boolean isEmpty) {
        super.updateItem(item, isEmpty);
        if (!isEmpty && (item != null)) {
            sku.unbind();
            customPart.unbind();
            sku.bind(item.skuProperty());
            customPart.bind(item.customPartProperty());
        } else {
            sku.unbind();
            customPart.unbind();
        }
    }
}
This doesn’t look that different from the previous version, and that’s because updateItem(), as has been pointed out, is functioning as a ChangeListener, since any updates to item have to go through here. So we can adapt to the fact that PropertyProductId is composed of Properties by binding our two property fields to the fields in the new item instead of using Property.set(). We clear out our internal properties by unbinding them.
Conclusion
Hopefully, you can see that the key to creating TableCells is to treat them like any other Reactive layout design, but one where the Data Model is constantly replaced. If the Data Model is a single ObservableValue, this is trivial and you can just treat it as an immutable model.
When the Data Model is more complex, you can handle this best by creating proxy Properties for the elements of your Data Model as fields in the TableCell, binding your layout to these proxies, and then handle the changing Data Models by simply updating the proxies.
I think that it’s a little disappointing that virtually every piece of documentation and tutorial available handles TableCell customization in the same, inelegant way. It’s amounts to little more than copypasta from the JavaDocs with the same approach of overriding updateItem() without any insight into what updateItem() actually does or why you should override it. There’s no mention anywhere about the item Property or the empty Property or how you might leverage them to come up with a simpler, more logical approach to TableCell design.
I think it’s interesting that when you remove the layout references from updateItem() and bind the layout directly to item and empty it starts to make more sense. In the end, it makes it much easier to conceive of ways to implement TableCells that use more complicated data structures and nested Property constructs.