Introduction
In this article we are going to look at the JavaFX classes that apply the “Observer Pattern” to lists of objects, ObservableList. You’ve probably encountered these before, as you need to use them to populate TableViews, ListViews and ComboBoxes. But what exactly is an ObservableList, and what can you do with it in your JavaFX application?
The JavaDocs for ObservableList aren’t particular helpful, as the introduction is very short:
A list that allows listeners to track changes when they occur. Implementations can be created using methods in FXCollections such as observableArrayList, or with a SimpleListProperty.
Which is, to say the least, a little bit underwhelming.
In this article, we’re going to take a look at the basics of dealing with ObservableList, so that you can understand what it really does and how to use it.
A Wrapper For a List
Taking a step back, List is actually an interface. It’s implemented by classes such as ArrayList, Vector and LinkedList and Stack. Undoubtedly, the most common implementation you’ll see in most applications is ArrayList.
ObservableList is also an interface, but it extends List. This means that anything that you can do with a List, you can do with an ObservableList. What ObservableList adds to List is a handful of convenience methods like setAll(), and some methods that deal with the “observable” nature of ObservableList. These “observable” functions boil down to adding and removing Listeners to/from the ObservableList.
[There’s also some functions that create FilteredLists and SortedLists, but we’ll look at these in the next article in this series.]
But ObservableList is still an interface, and that means that it doesn’t talk about “how” these functions are going to be delivered, just “what” these functions do. To understand the “how”, we need to look at implementations. But really, there aren’t any concrete, stand-alone, classes in JavaFX that implement ObservableList.
So how do you get something you can look at to see how they work? The answer is in that tiny introduction in the JavaDocs:
Implementations can be created using methods in FXCollections…
So that’s where you would have to look to see how it’s done. It turns out, if you do look, that you’ll find there is a hidden class called ObservableListWrapper that is used as the concrete implementation. Inside this class, it has some concrete implementation of List stored as a variable called backingList.
The List part of ObservableList is handled by this backingList. When you call a List function like add() on an ObservableList, it will eventually call backingList.add(). But before and after it calls backingList.add() it is going to do some “observable” stuff - which is largely about servicing the Listeners that have been attached to the ObservableList.
Creating an ObservableList
Since you’re most likely to want an ObseravbleList backed by an ArrayList, let’s look at how you would create one of those.
There are four methods in FXCollections that are going to be useful:
FXCollections.observableArrayList()
This will create anObservableListbacked by an emptyArrayList.FXCollections.observableArrayList(E... items)
This will create anObservableListbacked by anArrayListpopulated withitems.FXCollections.observableArrayList(Collection<E> col)
This will create anObservableListbacked by anArrayListpopulated with the contents ofcol.FXCollections.observableList(List<E> list)
This will create anObservableListbacked by the suppliedlist. Note that if you use this method you should not make any further changes to the backing list directly as that will not invalidate or trigger anyListenerson the returnedObservableList.
It’s highly likely that you’re interested in having an ObservableList because you need it to use a TableView, ListView or ComboBox. In these cases, you should be aware that these Nodes already have an ObservableList that you can access via getItems(). So you might not need to create your own ObservableList - depending on what you’re doing.
Understanding ListChangeListener
The Observer Pattern methods that are unique to ObservableList are:
addListener(ListChangeListener<? super E> listener)removeListener(ListChangeListener<? super E> listener)
You can see that you’ll need to understand the concept of ListChangeListener, or rather more importantly, ListChangeListener.Change.
ListChangeListener itself is actually an interface, and it’s pretty simple. It has only one method, and that’s, onChanged(ListChangeListener.Change<? extends E> c). When you’re adding a Listener to an ObservableList it’s up to you to create the Listener that implements ListChangeListener. And that boils down to writing the onChanged() method.
ListChangeListener is a functional interface, so you can define it using a lambda expression for the onChanged() method. But to write one, you need to understand ListChangeListener.Change, and this is where it gets a bit messy.
Understanding ListChangeListener.Change
Despite its singular name, a ListChangeListener.Change may actually contain several changes. The JavaDocs call it “a report of changes done to an ObservableList”. I think they use “report” to avoid using “List” or “Collection”, both of which would imply specific Java types - which ListChangeListener.Change is most definitely not.
The best way to think of ListChangeListenter.Change is as a self-referential iterable with an internal pointer. The pointer starts out in some initial, undefined state, and you’ll need to perform next() to move it to the first item. At that point all of the methods that fetch value will return the value associated with the internal pointer. There is a reset() method to put the pointer back in its initial, undefined state.
Within each change, there are three basic types of change that may happen:
- Permutation Change
This is where two or more members of the list are swapped around. - Add Change
A new member is added to the list. - Remove Change
A list member is removed.
Additionally a change may be classified as an “replace” if one or members are removed and new members added to the same locations in the ObseravbleList.
There are two methods, getFrom() and getTo() that specify the beginning and end of the sublist of values in the ObseravbleList that were changed.
Addition changes will return true to a call to the wasAdded() method. You can call getAddedSubList() to get a list of the elements that were added, and you can call getAddedSize() to find out how many elements were added.
Removal changes will return true to a call to the wasRemoved() method. You can call getRemoved() to get a List of all of the removed members, and getRemovedSize() to find out how many elements were removed.
Permutation changes will return true to a call to the wasPermutated() method. The method getPermutation() will return an array of the indices of the affected list members.
Exploring ListChangedListener.Change
In order to understand how to interpret ListChangedListener.Change we’ll need to write some code to create some changes, and to capture them and display what’s happened. Let’s take a look at that:
class ObListExample0 : Application() {

    private val obList: ObservableList<Int> = FXCollections.observableArrayList()
    private val messages: StringProperty = SimpleStringProperty("")

    override fun start(stage: Stage) {
        obList.addListener(ListChangeListener { change ->
            messages.value = "Change started...\n\n"
            var counter = 0
            while (change.next()) {
                messages.value += "Change element: ${counter++}\n"
                messages.value += "   From Index = ${change.from}\n"
                messages.value += "   To Index = ${change.to}\n\n"
                messages.value += "   wasAdded = ${change.wasAdded()}\n"
                messages.value += "   Added SubList = ${change.addedSubList}\n\n"
                messages.value += "   wasRemoved = ${change.wasRemoved()}\n"
                messages.value += "   Removed List = ${change.removed}\n\n"
                messages.value += "   wasPermutated = ${change.wasPermutated()}\n"
                if (change.wasPermutated()) {
                    messages.value += "   Permutated Indices = "
                    for (idx in change.from..<change.to) messages.value += " ${change.getPermutation(idx)}"
                    messages.value += "\n\n"
                }
                messages.value += "   wasUpdated = ${change.wasUpdated()}\n\n"
            }
        })
        stage.scene = Scene(createContent(), 480.0, 600.0).apply { }
        stage.show()
    }

    private fun createContent(): Region = BorderPane().apply {
        val listView = ListView<Int>().apply {
            items = obList
            selectionModel.selectionMode = SelectionMode.MULTIPLE
            prefWidth = 150.0
        }
        left = listView
        right = TextArea().apply {
            prefWidth = 280.0
            textProperty().bind(messages)
        }
        bottom = HBox(20.0).apply {
            children += Button("Add Item").apply {
                setOnAction {
                    obList.add(Random.nextInt(100))
                }
            }
            children += Button("Remove Item").apply {
                disableProperty().bind(listView.selectionModel.selectedItemProperty().isNull)
                setOnAction {
                    obList.removeAll(listView.selectionModel.selectedItems)
                }
            }
            children += Button("Sort").apply {
                setOnAction { obList.sort() }
            }
            children += Button("Change Item").apply {
                disableProperty().bind(listView.selectionModel.selectedItemProperty().isNull)
                setOnAction {
                    obList[listView.selectionModel.selectedIndex] = Random.nextInt(100)
                }
            }
            padding = Insets(10.0, 0.0, 0.0, 0.0)
        }
        padding = Insets(20.0)
    }
}

fun main() = Application.launch(ObListExample0::class.java)
We have a ListView on the left of our layout, which will show us which items are in the ObservableList, and allow us to select items to work with. The ListView selection mode is set to MULTIPLE.
On the right side, there’s a TextArea which is bound to the messages StringProperty. This will let us see the contents of the ListChangeListener.Change.
At the bottom are a set of Buttons that will invoke various actions on the ObservableList so that we can see how the changes are reported.
There is a ListChangeListener added to the ObservableList that just creates some text to add to messages. The StringProperty is cleared out for each new Change. It’s just a loop that iterates through all of the elements in the Change and then calls the various methods to show what’s stored in each element.
Adding Items
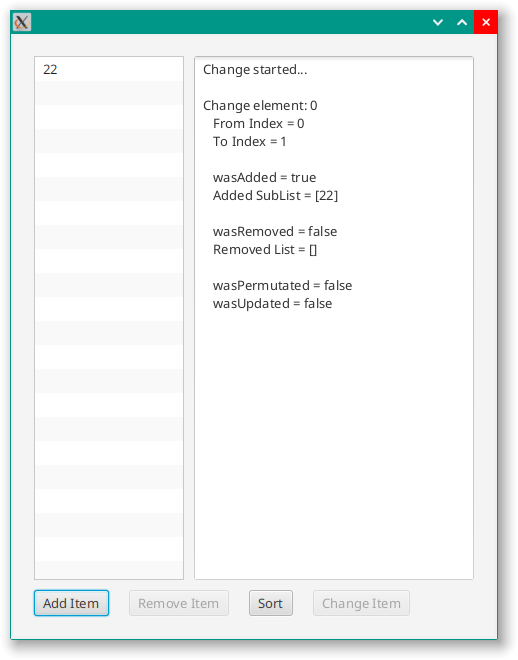
Let’s take a look at the application after it has been started and an item added:
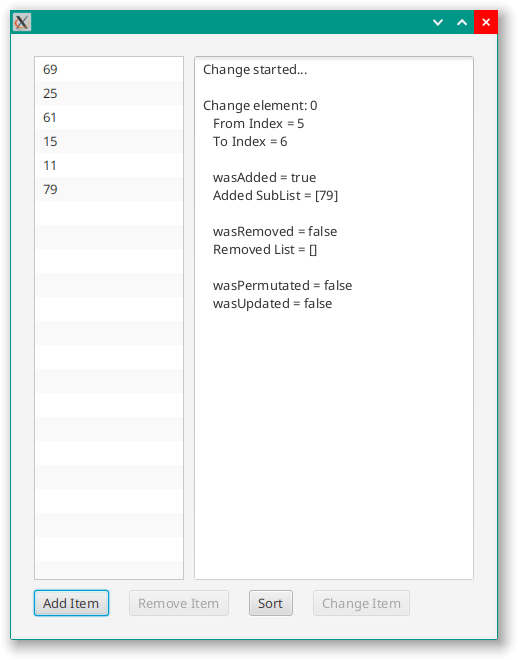
And this is what it looks like after the “Add” Button has been clicked a few times:
Removing Items
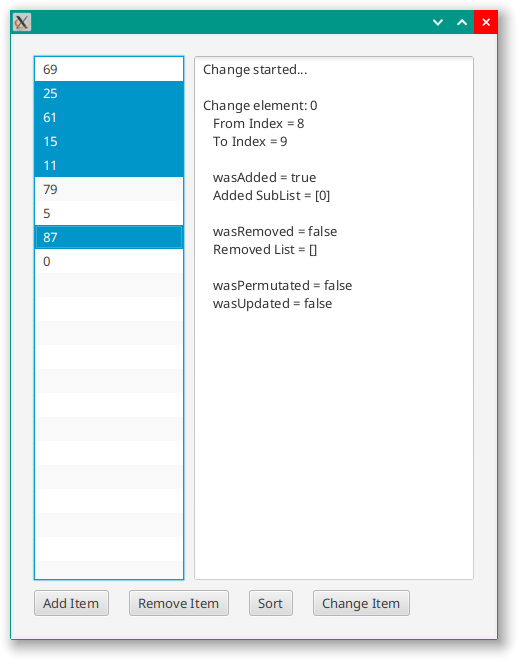
Removing items one at a time looks like you would expect it to after having seen the results for adding. It’s more interesting if you select elements that are NOT in a contiguous group in the list:
And then when we click the “Remove Item” Button, we get this:
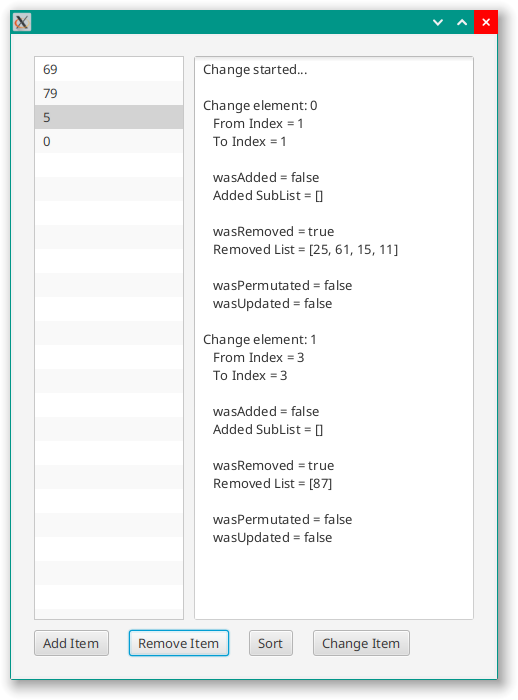
You can see that we get a Change element for each contiguous segment of the removal. In this case, we get three elements. Change element 1 had three items in it, while the other 2 each had one element.
You can also see that the from index for the element 1 says “3” even though it started at element 7 in our list before clicking the Button. That’s because each element uses indexes calculated from after the previous element was applied. In this case, since the elements “25”, “61”, “15” and “11” would have already been removed, that would have moved the last items from 7 to 3. Also note that remove doesn’t give the a different index for the to index. So you cannot use to in any meaninful way with a removal Change element.
And if you were wondering how you could get more than one element in a Change, now you know.
Permutating the List
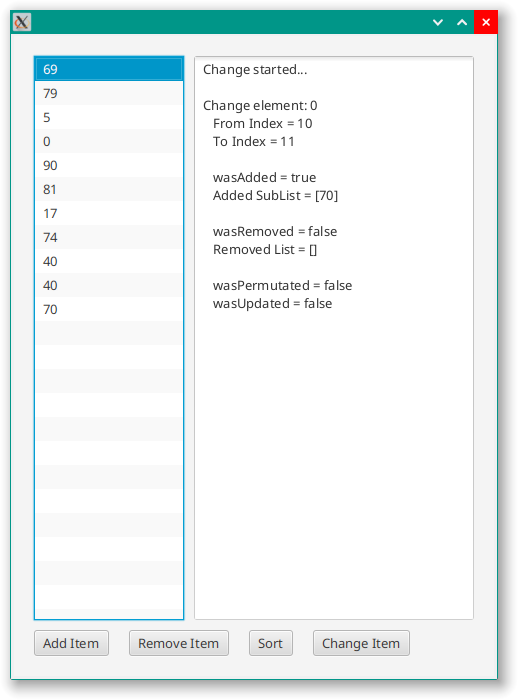
“Permutating” just means to move the items around. To simulate this, we’ll just use sort() on the list. It looks like this before we sort it:
After clicking “Sort”
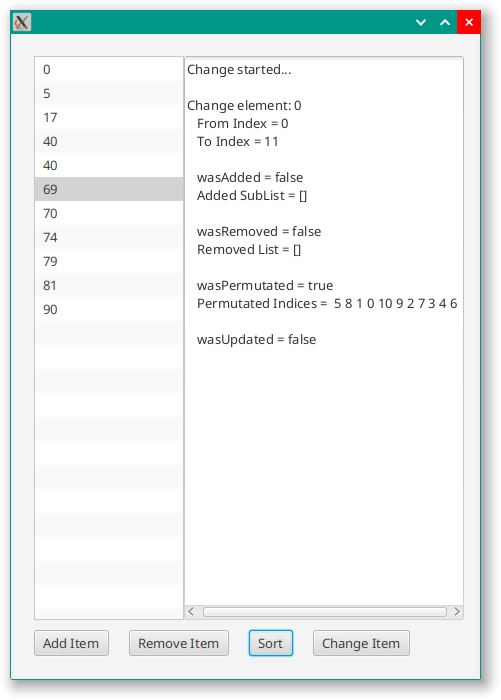
This is what you’d expect after seeing addition and removal in action. Note that the “From” and “To” indexes are populated in the Change data, and that the indices are presumably in the order in which they were moved.
Updating items
Our list is just Int primitives, so the meaning of “Update” is simply going to be to replace a value with a new value. Here’s what it looks like with an items selected, and just before we click on the “Change Item” Button:
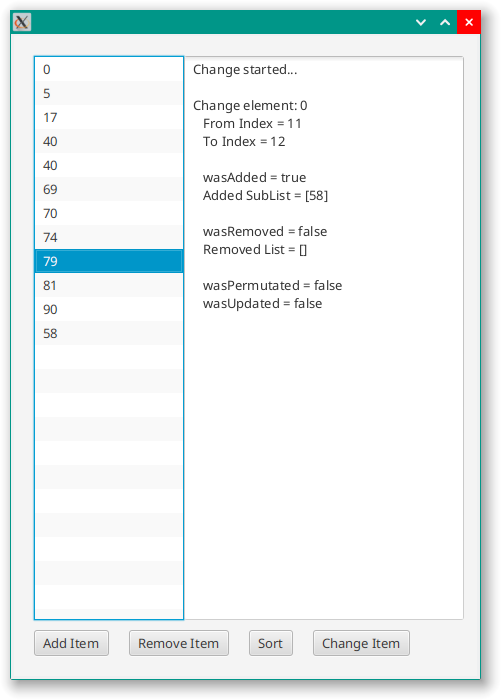
After clicking “Change”
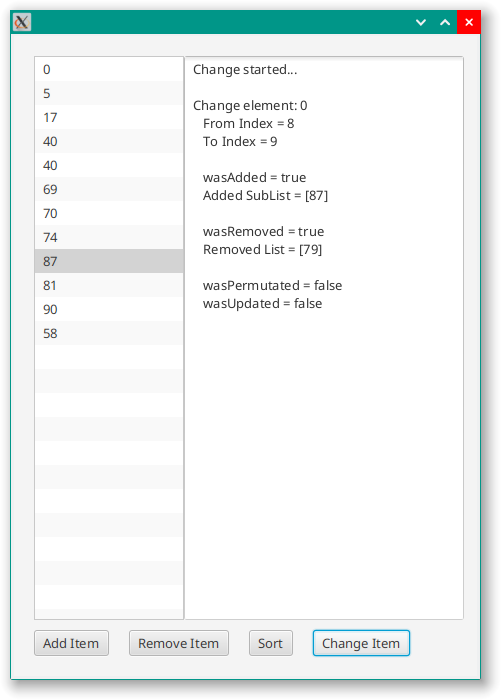
You can see that this is a single Change, and a single Change element. However, both wasAdded() and wasRemoved() return true. We also have an added sublist and a removed sublist, each with one item.
You should also note that wasUpdated() returned false. So it doesn’t look like wasUpdated() means what you probably thought it did. We’ll investigate this some more in the next artcle.
Using ObservableLists
Now that you understand how ObservableList delivers its changes to any listeners, you can see how fiddly it can be to try and doing anything with it. It just looks like a lot of work - and it hard to see how you could do anything useful that doesn’t get really complicated really quickly.
As a practical matter, what can you do with an ObservableList besides stuff it into a TableView?
Binding ObservableLists
If you’ve ever tried to use the observer pattern to do something practical with an ObservableList you probably found yourself dealing with ListChangeListener, which can be an amazing amount of work to do fairly simple things. Let’s say that you want to track the total of some field in an ObservableList of objects. You end up creating the total, then adding a Listener that adds a value in for new additions to the list, subtracts from the total for removals and does both for updates. If you think about it, you realize that you’ve ended up creating a transaction processor for an amount that should be readily available from the ObservableList at any time.
This is something that should be possible with a Binding! But how?
If you go back to the JavaDocs for ObservableList you’ll see that this interface extends, amongst other things, Observable. And Observable introduces the idea of “Invalidation”. And invalidation is the basis for Bindings, and this means that you don’t have to go through ListChangeListener to do a lot of things.
Let’s look at how the invalidation works first:
class ObListExample1 : Application() {

    val obList: ObservableList<Int> = FXCollections.observableArrayList()
    val messages: StringProperty = SimpleStringProperty("")

    override fun start(stage: Stage) {
        obList.subscribe { messages.value += "Invalidated \n" }
        stage.scene = Scene(createContent()).apply { }
        stage.show()
    }

    private fun createContent(): Region = BorderPane().apply {
        center = TextArea().apply {
            textProperty().bind(messages)
        }
        bottom = Button("Add Item").apply {
            setOnAction { obList.add(3) }
        }
        padding = Insets(20.0)
    }
}

fun main() = Application.launch(ObListExample1::class.java)
We have a TextArea to show messages and an ObservableList of Int. There’s a Button, and each time it’s pressed, it adds a new “3” to the ObservableList. We have an invalidation Subscription on the ObservableList that simply adds a new line to the messages that says, “Invalidated”:

As you can see, even though there is no code here that would re-validate the ObservableList, it invalidates every time an entry is added to it. That’s different from other Observables, but makes our life easier.
This is because all we need is for our ObservableList to invalidate for us to create a Binding with it. Let’s see how that would be done:
class ObListExample2 : Application() {
    private val obList: ObservableList<Int> = FXCollections.observableArrayList()
    private val messages: StringProperty = SimpleStringProperty("")
    private val totBinding = object : IntegerBinding() {
        init {
            super.bind(obList)
        }
        override fun computeValue(): Int = obList.sum()
    }

    override fun start(stage: Stage) {
        obList.subscribe { messages.value += "Invalidated \n" }
        stage.scene = Scene(createContent()).apply { }
        stage.show()
    }

    private fun createContent(): Region = BorderPane().apply {
        top = Label().apply { textProperty().bind(totBinding.asString()) }
        center = TextArea().apply {
            textProperty().bind(messages)
        }
        bottom = Button("Add Item").apply {
            setOnAction { obList.add(3) }
        }
        padding = Insets(20.0)
    }
}

fun main() = Application.launch(ObListExample2::class.java)
Our Binding is dependant on the ObservableList, but simply treated as Observable. Then, in computeValue() we do the Kotlin equivalent of streaming and collecting the stream as a sum (but it’s easier in Kotlin). When we add a new element to the list, it invalidates and the binding of value to Label.textProperty() will cause computeValue() to be called which will recalculate the total.
This is useful because this allows us to establish some aspect of the contents of the ObservableList as a Property and then bind it to something else, without any need to track and apply transactions manually. In my experience this is often way more useful than anything you can do with ListChangeListener.
One possible downside to this approach is that it involves recalculating the total from scratch every time that the ObservableList is invalidated. Is this likely to become a performance problem? Unless you’ve got literally thousands of items in your ObservableList, this is probably not going to be significantly slower than doing the transaction processing of using ListChangeListener.
This is a extremely important concept. We can ignore the complicated ListChangeListener stuff completely, and just treat our ObservableList like any other Obseravble class that will trigger an invalidation when it changes. And it just works.
Bindings Class Methods
The Bindings utility class has a number of static methods that deal with ObservableLists and return Bindings that reflect the state of ObservableLists.
The valueAt() Functions
There’s a whole group of these functions each of which come in two forms. All of them return some kind of Binding which is dependent on a particular value in an ObservableList.
Let’s look at the generic valueAt() function:
The first form is with an Integer index: valueAt(ObservableList<E> op, int index)). This will create a Binding that will invalidate whenever the ObservableList changes, and possibly calculate a new value.
The second form is with an ObservableIntegerValue as the index: valueAt(ObservableList<E> op, ObservableIntegerValue index). This will create a Binding that will invalidate whenever the ObservableList or the index change, and possibly create a new value.
One of the values of these methods is that they allow you to essentially treat a List of primitives or POJOs as Properties. Just wrap your List in an ObservableList and you can create a Binding for each value in the List.
In addition to valueAt(), there is also integerValueAt(), stringValueAt(), booleanValueAt(), and doubleValueAt() which will create Bindings of the appropriate types. There’s also methods for Long and Float types.
The bindContent() Functions
There are two versions of this function:
bindContent(List<E> list1, ObservableList<? extends E> list2)bindContentBidirectional(ObservableList<E> list1, ObservableList<E> list2)
The first version is used to keep an ordinary, non-observable List synchronized with an ObservableList. This is useful when you have been given a List reference from some other class or API, and you would rather have an ObservableList. You can create an ObservableList and then use bindContent() to keep that other List reference synchronized with it.
The one caveat with this Binding is that you cannot have changes coming in directly to the non-observable List.
The second version allows you to keep two ObservableLists synchronized with each other. This is useful if you have two ObservableLists from different sources and you cannot replace one or other of them but you want to keep them synchronized.
The isEmpty() Functions
There are two functions in this category: isEmpty(ObservableList<E> op) and isNotEmpty(ObservableList<E> op). These will return BooleanBindings that will be synchronized with emptiness or non-emptiness of whatever ObservableList you pass them.
The size() Function
This function is very simple, size(ObseravbleList<E> op) will return an IntegerBinding that is synchronized with the size of the ObservableList that you pass to it.
ObservableLists in Node Classes
The truth is that you’re most likely to be encountering ObservableLists when you deal with them in standard JavaFX Node classes. Virtually anything that is of a List nature in a Node subclass is going to be available as an ObservableList. For example:
- getStyleClass()
- getTransforms()
- getChildren()
- getStyleSheets()
- getItems()
All of these functions will return an ObservableList of some sort. With getItems(), which is in TableView, ListView and some other Nodes you have the option of calling setItems(), which means that you can actually replace the ObservableList involved.
Let’s say that you have some sort of Presentation Model in your application, and in this Presentation Model you have an ObservableList that you want to use to control one of these Node internal ObservableLists. If you can’t replace the ObservableList like you can with setItems(), then the easiest thing that you can do is to Bindings.bindContentBidirectional() to link the two ObservableLists.
The other approach that you can do is to install the internal list from a Node (through, for instance, Node.getStyleClass) as an element of your Presentation Model. But this has a couple of problems, especially if your Presentation Model is part of some sort of MVC, MVVM or MVCI framework:
- You cannot make the element in your Presentation Model
final. - You cannot reference the element in your Presentation Model until it has be initialized from the View.
- Except for
itemstheseObservableListsall contain very View-centric data elements.
The first two items are really just flip sides of the same problem.
Binding With Conversion
Let’s look “under the hood” to see how Bindings.bindContent() works. The method call eventually ends up calling the constructor of this class:
private static class ListContentBinding<E> implements ListChangeListener<E>, WeakListener {
    private final WeakReference<List<E>> listRef;

    public ListContentBinding(List<E> var1) {
        this.listRef = new WeakReference(var1);
    }

    public void onChanged(ListChangeListener.Change<? extends E> var1) {
        List var2 = (List)this.listRef.get();
        if (var2 == null) {
            var1.getList().removeListener(this);
        } else {
            while(var1.next()) {
                if (var1.wasPermutated()) {
                    var2.subList(var1.getFrom(), var1.getTo()).clear();
                    var2.addAll(var1.getFrom(), var1.getList().subList(var1.getFrom(), var1.getTo()));
                } else {
                    if (var1.wasRemoved()) {
                        var2.subList(var1.getFrom(), var1.getFrom() + var1.getRemovedSize()).clear();
                    }

                    if (var1.wasAdded()) {
                        var2.addAll(var1.getFrom(), var1.getAddedSubList());
                    }
                }
            }
        }

    }
    .
    .
    .
}
Hardly surprising, this boils down to a ListChangeListener, and you can see how it handles the three cases of adding, removing permutating in the source ObservableList. Especially interesting, though is that you can see that, even deep inside the JavaFX library, this code that just uses the standard building blocks that are available to all of us.
I’ve left out some of the housekeeping methods of this class, because they are not relevant to this discussion. Also, there’s a little added complexity around the WeakListener handling. While this is necessary in the JavaFX library, a compelling argument could be made that in application code you could make assumptions about the nature of the dependent List and if it’s unlikely that it would ever be disposed of then the WeakListener handling just adds unnecessary complications to the code base.
Let’s see how to add a conversion into this process. Rather than create a class to handle this, in Kotlin we can just create an Extension Function that we add to Observable List. Like this:
fun <E, T> ObservableList<E>.bindToList(boundList: MutableList<T>, mapper: (E) -> T) = apply {
    val listRef: WeakReference<MutableList<T>?> = WeakReference(boundList)
    val listGone: BooleanProperty = SimpleBooleanProperty(false)
    val listener = ListChangeListener<E> { change ->
        listRef.get()?.let { otherList ->
            while (change.next()) {
                if (change.wasPermutated()) {
                    otherList.subList(change.from, change.to).clear()
                    otherList.addAll(change.from, change.list.subList(change.from, change.to).map(mapper) as Collection<T>)
                } else {
                    if (change.wasRemoved()) {
                        otherList.subList(change.from, change.from + change.removedSize).clear()
                    }

                    if (change.wasAdded()) {
                        otherList.addAll(change.from, change.addedSubList.map(mapper))
                    }
                }
            }
        }
        listGone.value = (listRef.get() == null)
    }
    addListener(listener)
    listGone.subscribe { newVal -> if (newVal) removeListener(listener) }
}
Inside this function this refers to the ObservableList that this is called on, and boundList is the List that is going to be kept in sync with the ObservableList. I’ve tried to keep the WeakReference functionality that was in the original class, so the onChange method is going to check that the WeakReference to the bound List hasn’t been garbage collected. If it has, then it updates a BooleanProperty that has a Subscription which will remove the ListChangeListener from the ObservableList.
This logic is a little bit convoluted because the ListChangeListener would need to refer to itself in order to remove itself from the ObservableList.
This method has a second, Functional parameter that performs the mapping between the type of the ObservableList which is <E> and the type of the bound list which is <T>. In Kotlin this is (E) -> T, which would be Function<E,T> in Java. In the functions that call List.addAll() the collection of added entries is passed through the mapping function before being passed to the bound List. In Kotlin, map() is a native function of Collection so we don’t need past the elements through a Stream as you would have to do in Java.
Binding Conversion in Action
One place where you might want to us this is when you want to have a dynamic layout where the children of a container are going to change in response to some ObservableList of values in the Presentation Model. For whatever reason, you don’t want to use ListView for this purpose.
The fundamental challenge is that the children of a container have to be some subclass of Node, and you never put Nodes into a Presentation Model. Creation of Nodes is totally the responsibility of the View. If your business logic is adding elements from some routine, it can only put “data” into the Presentation Model, and not Nodes.
To demonstrate how to handle this with our conversion Binding let’s take a look at this code:
class ObListExample3 : Application() {

    private val obList: ObservableList<Int> = FXCollections.observableArrayList()
    private val messages: StringProperty = SimpleStringProperty("")

    override fun start(stage: Stage) {
        obList.subscribe { messages.value += "Invalidated \n" }
        stage.scene = Scene(createContent()).apply { }
        stage.show()
    }

    private fun createContent(): Region = BorderPane().apply {
        val listView = ListView<Int>().apply {
            items = obList
        }
        left = listView
        right = FlowPane().apply { obList.bindToList(children) { createLabel(it) } }
        bottom = HBox(20.0).apply {
            children += Button("Add Item").apply {
                setOnAction { obList.add(Random.nextInt(100)) }
            }
            children += Button("Remove Item").apply {
                disableProperty().bind(listView.selectionModel.selectedItemProperty().isNull)
                setOnAction { obList.remove(listView.selectionModel.selectedItem) }
            }
        }
        padding = Insets(20.0)
    }

    private fun createLabel(labelInt: Int) = Label(labelInt.toString()).apply {
        minWidth = 80.0
        minHeight = 30.0
        border = Border(
            BorderStroke(
                javafx.scene.paint.Color.RED,
                BorderStrokeStyle.SOLID,
                null,
                BorderWidths(3.0)
            )
        )
        alignment = Pos.CENTER
    }
}

fun main() = Application.launch(ObListExample3::class.java)
This layout has a ListView on the left and a FlowPane on the right, with two Buttons at the bottom. The ListView has items that are just the obList from the imaginary Presentation Model. The first Button generates a new value in obList with a random number, and the second Button deletes whatever item has been selected in the ListView
The statement obList.bindToList(children) { createLabel(it) } creates the Binding between obList and the FlowPane.getChildren() list. The mapping function takes an Int from obList and creates a Label with it.
In this example there’s a fair bit of code in createLabel() that formats up the Labels. This is just to make a point that you can create any kind of Node, as complicated as you like, that uses the data that the ObservableList supplies. And you should also note that this approach means that the only element that has any knowledge of how obList is going to be used in the layout is the View.
Here’s what it looks like when it’s running.
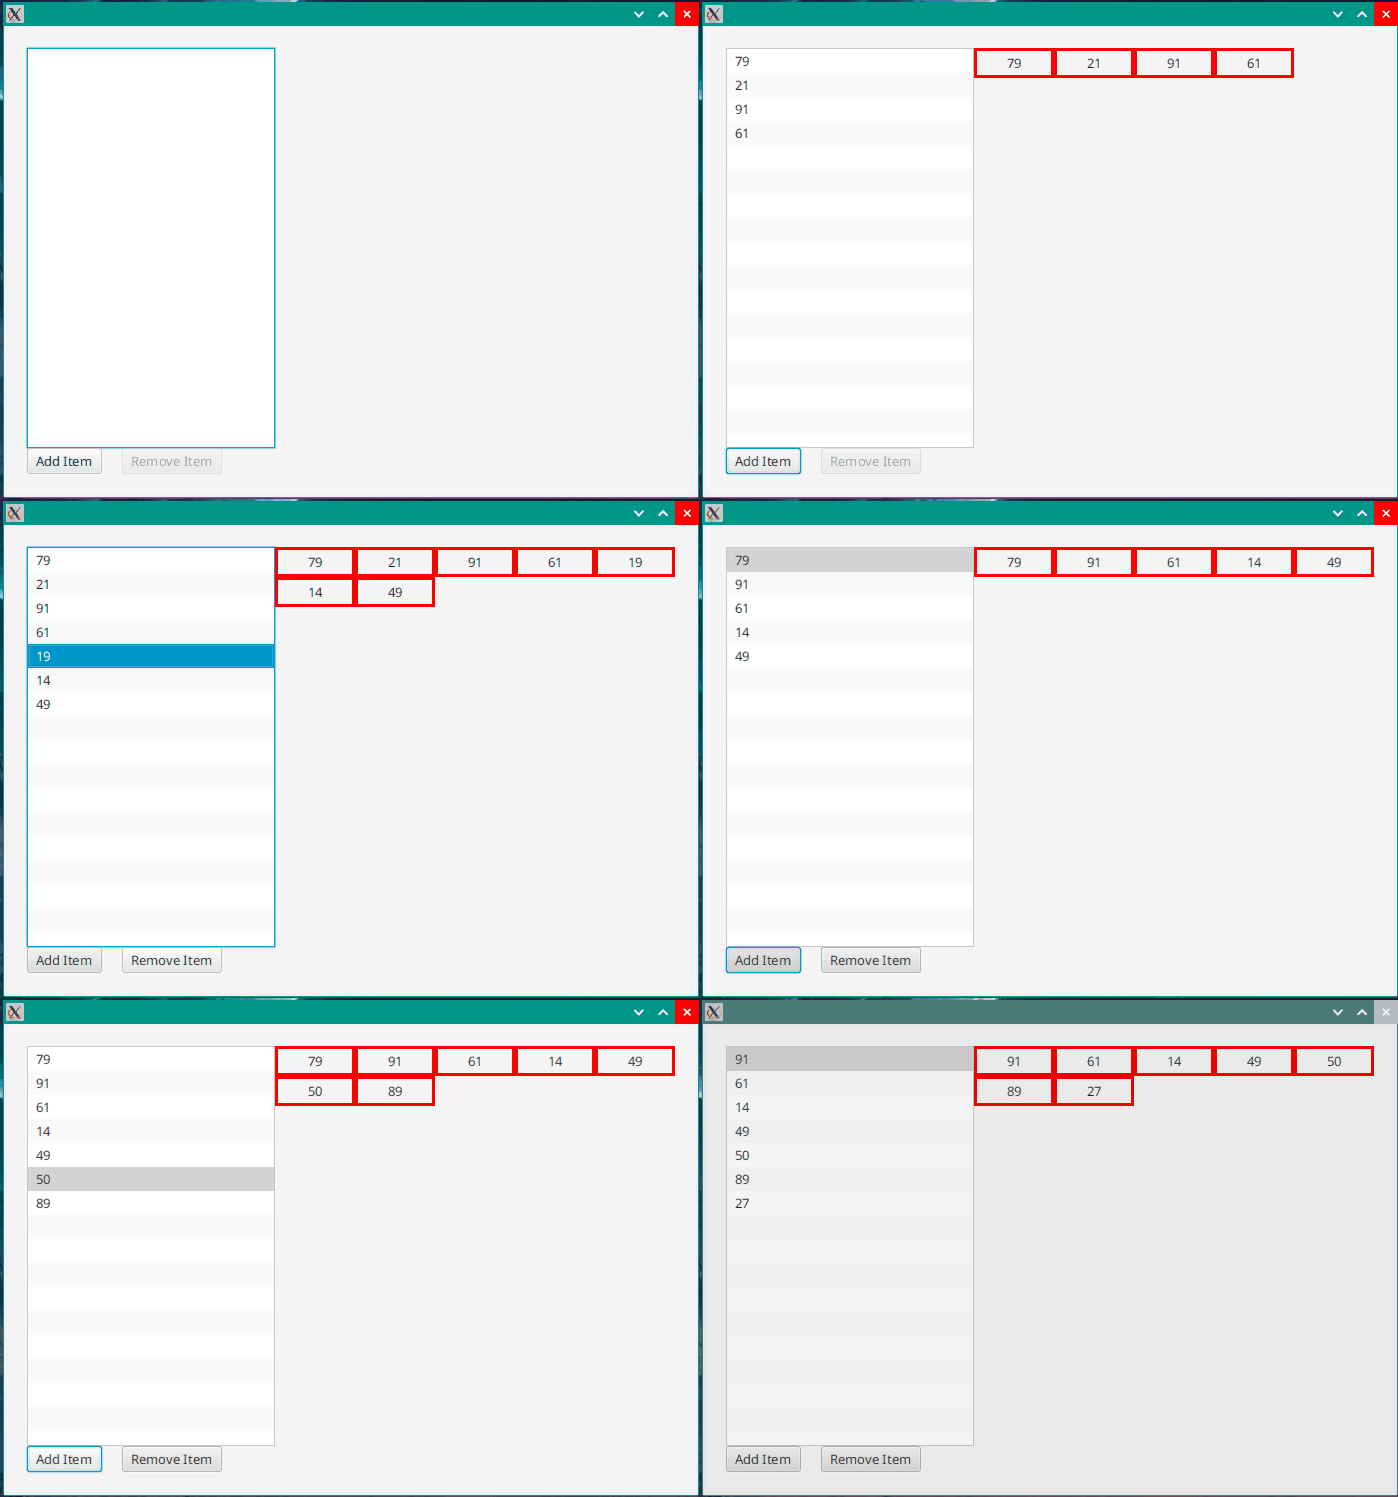
Just one final note about this: This approach is okay when the lists are fairly short and the Nodes are relatively simple, but when the list gets to be much much bigger you would be better off using a something like a ListView with a custom cell design. This is because ListView only creates a small number of Nodes and recycles them as you scroll through the list - which is much more efficient than this dynamic Node creation approach.
For Java, you can look at this StackOverflow answer which details the same thing as an implementation of the ListContentBindng extended to include a mapping function.
Conclusion
ObservableLists do three things at once:
- They implement the
Listinterface. So you can treat them just like aList. - They report on changes to their elements, and fire
ListChangeListenersthat are registered with them. - They implement the
Observableinterface, which means that they will invalidate when any of there elements are added, deleted, moved or replaced.
Most of us, most of the time are just creating an ObservableList to use with some element that requires one. In these cases we’re only actively going to leverage item 1 above, and just treat it like a List. Once in a very occasional while, we’ll need to do something that requires monitoring the exact nature of the changes to an ObseravbleList and we’ll be forced to deal with ListChangeListener.Change.
But if you do need to do something “observable” with an ObseravbleList, item 3 might be the most important one. It’s highly likely that you can leverage ObservableList's implementation of Observable to create a Binding, and the resulting code will be far simpler than dealing with ListChangeListener.Change. For some reason, this almost seems to be “secret knowledge” in the JavaFX world, even though it’s actually very easy to implement - as you saw above.