Introduction
One of the biggest advantages to JavaFX is it’s seamlessly integrated support for the “Observer” Pattern. This can also be one of the biggest challenges to learning JavaFX, because the library is so extensive it can become overwhelming.
In this article, we’re not going to go too deep into the details. This is intended for beginners so that they can get started and create their JavaFX applications the right way, and to avoid a lot of the pitfalls that many beginners fall victim to. By the end of this article you should have a good understanding of what JavaFX Properties are, how they work, and how you should use them.
The examples in this article are written in Kotlin. If you need some help understanding them, then refer to this article.
What is a Property?
A Property is a special type of object designed to contain a data value and to support the “Observer” Pattern. It does this by keeping track of whenever the value is changed, and running code that other Property objects have registered with it when the value changes. Properties can also “bind” to other Properties, so that when one or more of those other Properties changes, its value will be recalculated.
You can use this ability to create a network of connections that link almost every aspect of your GUI to a set of data that you create. This means that you can create your layout, connect the layout Properties to other layout Properties and Properties that you create, and then drop any references to the Nodes in your layout because you won’t need them any more. You can control the layout by modifying the Properties that you have created.
That’s it in a nutshell, but there’s a lot of details you’ll need to understand.
The exhaustive nature of the Property library in JavaFX and it’s integration with all of the classes that make up JavaFX make a compelling argument that JavaFX is primarily designed to be used as a “Reactive” framework. We’ll go into this some more later, but for now we can just think of “Reactive” as what you get when you treat all your data as Properties and connect everything together through Bindings and Listeners.
Property Basics
There are a number of Property types, and we’ll see them all in a bit. For now, we’ll just look at StringProperty as an example. A StringProperty is a Property designed to hold a String (no big surprise there).
At it’s most basic, we can think of StringProperty as a container for a String. We have a get() method that returns a String and a void set(newVal : String) method to update the value. All of that is pretty straight-forward.
val stringProperty: StringProperty = SimpleStringProperty()
stringProperty.set("abc")
println(stringProperty.get())
We can see here that our StringProperty is implemented as SimpleStringProperty. That’s because StringProperty is an abstract class, while SimpleStringProperty is concrete. However, there are no new methods in SimpleStringProperty, and we literally only need it because of its constructors. This means that there’s no reason to retain a reference to a SimpleStringProperty as a SimpleStringProperty over retaining it as a StringProperty.
The most common thing you might do with a StringProperty is to bind it to another StringProperty using the bind() method. This would look something like this:
val x:StringProperty = SimpleStringProperty("abc")
val y:StringProperty = SimpleStringProperty("")
y.bind(x)
Now, any changes in x will be immediately reflected in y. Also, any attempt to call the y.set() method will now generate a runtime error, indicating that a “bound value cannot be set”.
But why would you want to do this?
Usually, one of those two StringProperties, either x or y is given to you from somewhere else. In JavaFX it will probably be an internal Property of some JavaFX class. Let’s take a look at a more typical example:
val x = SimpleStringProperty("abc")
val heading = Label()
heading.textProperty().bind(x)
Here we’ve replaced y with the textProperty() of a Label. Usually, x would be an element of a Presentation Model, or it might be a Property variable that’s global to your layout that you use to avoid coupling Nodes on your layout. Either way, whenever x changes, the text on the screen associated with that Label will change.
Property-Like Objects
In JavaFX there are a number of types that behave very much like Properties but aren’t actually Properties. I think a lot of people use the term “Property” as a catch-all, meaning not just Properties but also these other types.
So let’s have a look at them…
ObservableValue
Sometimes you don’t want other code, or other people’s code, updating the value in your Property. Sometimes, you don’t want to be given something that you can update. In those cases, you can use the read-only ObservableValue interface. You can do anything you can do with a Property, but you cannot call set() or bind() on an ObservableValue.
Here’s an example:
fun createLabel(obVal : ObservableStringValue)= Label().apply{
   textProperty().bind(obVal)
}
This is a function that returns a Label with its textProperty() bound to a supplied Property, but, since it isn’t going to update the value in that Property it just asks for an ObservableStringProperty. The client code can pass a StringProperty, a StringBinding or any other class that implements ObservableStringValue.
ReadOnlyProperty
This is something that you’ll see much more than you will ever create. In fact, you’ll probably never create a ReadOnlyProperty. There are lots of Nodes in JavaFX that have Properties that they really, really don’t want you to change. Internally, Node will manipulate the value, but it’s only will to give you something that you can never change. That something is ReadOnlyProperty.
For instance, Region has a widthProperty() function that returns a ReadOnlyDoubleProperty. You’ll find a Region.getWidth() function, but you won’t find a Region.setWidth() function. Region has things that you can do to influence how it calculates its width, but you cannot directly set it. So Region.widthProperty() doesn’t give you something that will let you change the width directly.
For most purposes you might have, you can treat ReadOnlyProperty exactly like ObservableValue.
Binding
OK, Binding is a type as well as an action/method. You will need to get these straight in your head.
For the sake of clarity, I will always use Binding for the type, and “binding” for the action.
Every Binding will have a list of Properties that it is bound to, which are called its “dependencies”. Whenever any one of its dependencies changes, the next call to the Binding.get() will cause the Binding to recalculate its value.
It’s important to note that the dependencies are simply used to trigger a recalculation of the value. There is no rule that says that the Binding has to use any of these dependencies in its calculation, or that it cannot use other values that aren’t listed as dependencies. That being said, 99% of the time, the dependencies will be the values that are used in calculating the Binding's value.
More often than not, you’ll see Binding when you create one yourself, and usually you’ll use it as an argument to Property.bind(). However, you can pass a Binding around and it will behave pretty much the same as any ObservableValue.
ObservableLists
An ObservableList is very much like a Property wrapping a List of some sort. The key word there is “like”. ObservableLists are quite a bit different from the other Properties that we discuss here.
Instead of reporting on changes to a value, it reports changes to a list of values. These changes include additions to the list, removals from the list and replacement of items in the list.
Invalidation and Listeners
When you are talking about Properties and bind(), it’s all about “changes”. But there’s actually more going on than just that. There is a very, very important concept called “Invalidation”.
Simply put, Properties need a mechanism to tell other properties that they need to come and fetch the latest value that they hold, because the one that they last read may not be correct any more. This mechanism is called “Invalidation”. Whenever you call Property.set(), that will cause an internal valid flag inside the Property to flip to false. The only way to flip the valid flag back to true is to call Property.get().
So how do the other Properties know that our Property has been invalidated?
They know because they register Listeners with our Property. A listener is just a snippet of code that’s called by the Property that just invalidated and is donated by the listening object. Note that a Listener can be created by any code, and doesn’t need to be part of a Property itself.
Inside the Property it keeps a list of all of the Listeners that have been registered with it. When it is invalidated, the Property will then execute each of those Listeners, one after the other.

If a Property is already invalid, then it cannot be invalidated again and it will not execute any Listeners until after it has been revalidated.
Invalidation Chains
When a Property is bound to another Property it registers a special kind of Listener with that Property that simply invalidates the second Property too. Then, if that Property is, in turn, bound to another Property then its Listener will simply invalidate the third Property. And so on, and so on, and so on.
Normally, at some point at the end of the chain is a Listener that actually calls get() on the Property it’s listening to, and that will trigger the binding logic to call get() on the next Property back up the chain. All the way back to the beginning. And then coming back down the chain, all of those Properties will be revalidated.
These chains are why an invalidated Property might only possibly have a different new value. And why invalidation doesn’t mean that a value has changed. Let’s look at an example:
val x = SimpleIntegerProperty(3)
val y = SimpleBooleanProperty(false)
y.bind(x.greaterThan(7))
x.set(6)
There’s actually three Properties in this snippet of code, not two. That’s because x.greaterThan(7) creates a Binding and that’s what y is bound to.
The line x.set(6), will invalidate x, and then the Binding that was created from x.greaterThan(7), and then y. However, even though y has been invalidated, it’s value hasn’t changed, and is still false. But anything that’s listening to y can’t know that until it calls y.get(), which will cause x.greaterThan(7) to re-evaluate (which will call x.get()) and then everything will be re-validated.
This is important to know and to understand, but it’s not something that you’ll need to deal with every day. A more usual use case for this is something like this:
val x = SimpleIntegerProperty(3)
val label = Label("Too Big!")
label.visibleProperty().bind(x.greaterThan(7))
x.set(6)
You can count on the fact the that internal workings of Label are going to respond immediately when its visible Property invalidates, and it will call visibleProperty().get() right away, causing everything to revalidate.
Invalidation Listeners
The first kind of Listener than can be registered with a Property is an InvalidationListener. An InvalidationListener is one that fires whenever the Property becomes invalid, and the code that it executes is a Runnable. It is totally up to the InvalidationListener to decide if it wants to call get() on the Property which would revalidate it - but it’s usually recommended to do so.
While you may or may not use InvalidationListeners yourself, you should know that they are the foundation of all of the other techniques described here. ChangeListeners, Subscriptions and Bindings all rely on InvalidationListeners internally.
ChangeListeners
ChangeListeners are different from InvalidationListeners in two ways:
- They trigger only when the value actually has changed.
- They receive both the old value and the new value of the
Observablein theirConsumer.
Here’s how you would create and register a ChangeListener on a Property
val x:StringProperty = SimpleStringProperty("abc")
x.addListener(ChangeListener{obVal, oldVal, newVal ->
        println("Value of $obVal has changed from $oldVal to $newVal")
})
You can see that a ChangeListener takes a reference to the Property itself, the old value and the new value. Since you get the reference to the Property this means that you can create a single ChangeListener and install it on multiple Properties and still be able to determine which Property triggered the ChangeListener.
Subscriptions
Now that you know about Listeners you should also know that you shouldn’t use them nowadays. We’ve got better stuff!
In version 21 of JavaFX, we got a new feature called Subscription. In a nutshell, Subscriptions provide the same functionality as Listeners but are better for two reasons:
- They are easier to use.
- They are easier to keep track of and to remove, especially when using lambdas to define the action code.
Three Types of Subscriptions
There are three different ways to create a Subscription, although all three involve calling a method named subscribe(). Let’s take a look at them, concentrating on the different parameters that you pass to subscribe().
Passing a Runnable [() -> Unit]
This is equivalent to creating an InvalidationListener. The Runnable that you pass to it will be invoked whenever the Property that subscribe() is called on invalidates.
Passing a Consumer [(x) -> Unit]
This is the equivalent to creating a ChangeListener and the Consumer will be invoked whenever the Property that subscribe() is called on changes its value. It’s way easier to set up than a ChangeListener however, and the only parameter passed to the Consumer is the new value of the Property.
There is one other important and useful feature of this Subscription: When this method is called, it immediately invokes the Consumer. Let’s look at what this means…
Imagine that you have some action that you want taken every time that a Property changes its value, so you set up a ChangeListener. You’d do something like this:
nameProperty.addListener(ChangeListener {obVal, oldVal, newVal -> someMethod(newVal)})
But what if its possible that nameProperty already has a value at the time that you add this ChangeListener and you want to run someMethod() on that original value. Then you’d have to do this:
nameProperty.addListener(ChangeListener {obVal, oldVal, newVal -> someMethod(newVal)})
someMethod(nameProperty.get())
This is intrinsically different from setting up a Binding on nameProperty which would automatically execute computValue() immediately when it’s created. This is a huge “gotcha!” for many programmers, because it’s so easy to forget that nameProperty might already have a value depending on the circumstances in which this listener is added.
With a Subscription, you don’t need to do any of that. This is enough:
nameProperty.subscribe{someMethod(it)}
The {someMethod(it)} will be executed immediately, passing whatever the current value of nameProperty happens to be.
Passing a BiConsumer [(x,y) -> Unit]
This is equivalent to creating a ChangeListener and it will be invoked whenever the Property this it is called on changes its value. The two parameters passed to the BiConsumer are the old value and the new value of the Property.
However, unlike the previous version, passed a Consumer, this version will not be executed immediately when subscribe() is called. It makes sense, though, as there won’t be an “old value” at this point either.
Removing Subscriptions
If you look at this example from above:
nameProperty.addListener(ChangeListener {obVal, oldVal, newVal -> someMethod(newVal)})
What if you later want to remove that ChangeListener? The only way to remove it is to call nameProperty.removeListener(), but that requires that you pass the Listener to removeListener(), which we don’t have. We would have to do this:
val changeListener = ChangeListener {obVal, oldVal, newVal -> someMethod(newVal)}
nameProperty.addListener(changeListener)
   .
   .
   .
nameProperty.removeListener(changeListener)
However, all the versions of subscribe() return Subscription. Which means that we can do this:
val subscription = nameProperty.subscribe{someMethod(it)}
    .
    .
    .
subscription.unsubscribe()
You should also know that Subscription contains methods to combine Subscriptions together, so that you can call unsubscribe() on all of the Subscriptions at the same time, or to pass them between methods and classes as a single parameter.
Bindings
There are three ways to create a Binding:
- The “Fluent API”
- Static methods in the
Bindingsclass - The “Low Level API” (creating a custom class)
Inside the JavaFX library, the Fluent API works by calling methods in the Bindings class which, in turn, creates custom Binding classes on the fly. So you can see that everything eventually boils down to custom Binding classes.
Because of that, we’ll look at them in reverse order:
Custom Binding Class
Let’s look at a simple example:
class NameBinding(private val fName: ObservableValue<String>,
                  private val lName :ObservableValue<String>) : StringBinding() {
   init {
     super.bind(fName, lName)
   }

   override fun computeValue() : String {
      return "${lName.get()}, ${fName.get()}"
   }
}
The first thing to note is that we are extending StringBinding. Just like with Properties, we have about 5 different common types of Bindings to hold different kinds of values.
The next thing to note is that we are accepting ObservableValue<String> as our dependencies. This means that we are accepting the widest possible range of Observable types that we possibly can. This will work with Property<String>, StringProperty, StringBinding and ObservableStringValue, which keeps our Binding as flexible as possible.
The init{} section in Kotlin is very much like a constructor in Java. This init{} section establishes the two passed parameters as dependencies for the binding by passing them to super.bind(). This is super important.
Finally, we have computeValue(). This is the method that’s called to actually figure out what the Binding's value is. Here we are just combining them together with a “, “ between them. Note that this method returns String not an Observable wrapping String.
In a nutshell, a Binding consists of a list of dependencies, and a computeValue() method which is called to, well… compute the current value of the Binding. Internally, Binding holds a copy of the latest value that it computed, and will return that if it is validated. However, when any of the dependencies becomes invalidated, the Binding will also become invalidated. The next call to get() will call computeValue(), reset the internal value and revalidate the Binding
Of course, you can also create something very similar as an anonymous inner class, if you like.
The Bindings Class
From the JavaDocs:
Bindings is a helper class with a lot of utility functions to create simple bindings.
That’s an understatement. There are literally hundreds of static methods in this class, and they all build Bindings.
If we wanted to do the same thing as our custom Binding example, here’s how we would do it with Bindings:
val binding = Bindings.createStringBinding({"${lName.get()}, ${fName.get()}"}, fName, lName)
This is the definition of the method:
public static StringBinding createStringBinding(Callable<String> func, Observable... dependencies)
In this case, it might be easier to think of Callable<String> as a Supplier<String>. It’s a function that takes no input parameters and returns a String.
It’s easy to see how this maps to our custom Binding. The first parameter corresponds to whatever code that we would put into computeValue() and the other parameters are the same dependencies that we passed to super.bind().
You should also know that Bindings has a method called concat() which is specifically designed to do this kind of Binding. We could use it instead:
val binding = Bindings.concat(lName, ", ", fName)
It’s clearly easier to use this method.
You should spend some time looking at the JavaDocs for Bindings. It’s worth the effort.
The Fluent API
The Fluent API provides a set of methods for Observables that allow you to transform, combine, compare and do various operations on the Observables, returning new Observables that are bound to the original Observable. That sounds like a mouthful, but it allows you to do things like this:
val binding = integerProperty.add(2)
Whenever integerProperty changes, binding will be updated to have a value 2 greater than integerProperty.
Keeping with our name combination example, we can do this:
val binding = lName.concat(", ").concat(fName)
In practice, the Fluent API is most useful when the operations are simple and not too plentiful. After a while, a big long string of .this() and .that() starts to become more difficult to read, understand and maintain. In those cases you’re better off using one of the other methods.
The ObservableValue.map() Function
Since JavaFX 19 there is a new facility that makes the Fluent API partially obsolete, ObservableValue.map() and ObservableValue.orElse().
ObservableValue.map() works very much like Stream.map() in that it creates a new ObservableValue by translating the value in the original ObservableValue. In many ways, it’s like a Binding with a single dependency. The parameter that you pass to ObservableValue.map() is a Function that transforms the value. And the result doesn’t have to be the same type as the input value either.
ObservableValue.map() is nice because you can do just about anything you want in normal Java/Kotlin code dealing with the value of the ObservableValue as a primitive. This is virtually guaranteed to be easier to read than the Fluent API unless the equivalent Fluent API calls are dead simple. I’ll give you the example from invalidation section above:
val x = SimpleIntegerProperty(3)
val label = Label("Too Big!")
label.visibleProperty().bind(x.map{it > 7})
Now, maybe that’s not simpler than x.greaterThan(7), but what if it was this?
val x = SimpleIntegerProperty(3)
val label = Label("Invalid!")
label.visibleProperty().bind(x.map{((it > 7) && (it < 20)) || (it == 23)})
That might get a bit ugly with the Fluent API.
The only place where you cannot use this instead of the Fluent API is when you are combining multiple ObservableValues together. However, you can use both ObservableValue.map() and the Fluent API together:
val binding = lName.map("The Name is: $it, ").concat(fName)
ObservableValue.orElse() is the companion function to ObservableValue.map() and it will return an ObservableValue with a fixed value if the original ObservableValue contains null.
Types of Properties
If you want to create a brand new place to store a value that you want to be observable, you’re going to need to instantiate a Property of some sort. There are a number of different types of Properties, and you’ll need to pick the right one. Notably, you’ll probably need to pick from one of these:
- StringProperty
- BooleanProperty
- IntegerProperty
- DoubleProperty
- ObjectProperty
ObjectProperty is used for pretty much anything that isn’t a String, Boolean, Integer or Double. This could be a LocalDate, BigDecimal, an Enum or any other custom class you have created.
But you’ll find out pretty quickly that you can’t instantiate any of these classes because they are all abstract. But each one of these classes has a concrete subclass that starts with “Simple”. For example, SimpleStringProperty. Instantiate using these classes, but type your variables as the super-class.
Like this:
val nameProperty : StringProperty = SimpleStringProperty("Fred")
val ageProperty : IntegerProperty = SimpleIntegerProperty(4)
val dateProperty : ObjectProperty<LocalDate> = SimpleObjectProperty(LocalDate.now())
Notice that I’ve used val here and not var. This is the same as using final in Java. It’s a good practice to establish all of your Properties as final. The value inside them can change, even if they are final, but it will probably break everything if something changes the variable reference for the Property itself.
Alway make your Property variable references immutable using "final" in Java and "val" in Kotlin.
The Node Properties
If you take a look at the JavaDocs for Node and any of its subclasses, you’ll find a section near the top called “Property Summary”, listing all of the Properties included in that class. For subclasses of Node you’ll also see a section that shows all of the Properties inherited from its super-classes.
Just about every aspect of the Node classes are represented by a Property.
Most notably, for Node itself we have disable and disabled, effect, focused, hover, id, layoutX and layoutY, managed, opacity, scaleX and scaleY, scene, style, translateX and translateY and visible. Additionally, all of the various EventHandlers are also stored as Properties.
What is important about these is that for virtually all of the Properties that are writeable, changing their values will impact the way that the Node behaves or appears in the layout. Things like scaleX/Y and translateX/Y will change the size and position of a Node and others like focused, disabled and hover will have corresponding PseudoClasses that can be styled.
Moving to Region and its subclasses, we get width, minWidth, maxWidth and prefWidth along with height,minHeight,maxHeight and prefHeight.
Utility classes also have Properties. Animations have things like autoReverse, cycleDuration, delay, status, while Transition adds interpolator. Task has all of its EventHandlers as Properties, along with progress, message, title, value, state and workDone.
In fact, throughout the entire library you’ll be hard pressed to find a single get{Something}() method that doesn’t delegate to somethingProperty().get(). They are literally everywhere.
This means that there's almost nothing in JavaFX that you cannot connect to using the Observer Pattern.
General Property Advice for Reactive GUI Applications
When you see the extent to which JavaFX incorporates the Observer Pattern into every element of every class, and when you see the wealth of library support to do so much with the Observer Pattern, it becomes obvious that JavaFX is designed from the ground up to be a Reactive library.
But what does that mean?
I’ll steal from WikiPedia
In computing, reactive programming is a declarative programming paradigm concerned with data streams and the propagation of change. With this paradigm, it is possible to express static (e.g., arrays) or dynamic (e.g., event emitters) data streams with ease, and also communicate that an inferred dependency within the associated execution model exists, which facilitates the automatic propagation of the changed data flow.
Well, that’s mouthful, but what it really describes is an approach where your code constructs a network that defines how data will move automatically between objects, and where data changes trigger predefined actions. Which is pretty much what Properties, Bindings, Listeners and Subscriptions do.
This means that your code shouldn’t be oriented towards doing stuff, but oriented towards connecting things together and setting up triggers to do things when certain conditions are met. And this looks vastly different from the imperative way that you would program up a Swing application. At first, it can seem difficult to do, but there is so much stuff that the Reactive features of JavaFX do for you - and do very well - that your application code becomes much simpler to understand than if you had built it in an imperative programming style.
Okay, so how should you use all this stuff? Here are some general guidelines you should follow:
Use a Presentation Model to Store Your GUI’s “State”
This is the key element of Reactive programming. Take all of the possible elements of the “State” of your GUI and represent them with Properties in a “Presentation Model”. This can include the following:
- The data stored in the
Nodes Propertiesshared betweenNodes- Values that influence how
Nodeswork - Values that are used to trigger actions.
Use Observer Pattern Methods in Your Layouts
This is probably the most important guideline. Do not use methods like set() in your layout code unless it is for something guaranteed to be static.
For instance:
label.setText(model.nameProperty.value)
and
val label = Label(model.nameProperty.value)
are most likely bad. However:
val label = Label("Name:")
is fine. Similarly:
hBox.setPadding(Insets(20.0))
is perfectly good. Providing, of course, that you not planning on changing the padding in the HBox or the text in the Label.
What you should be doing, when the values are not 100% static, is this:
label.textProperty().bind(model.nameProperty)
A good rule of thumb is that if some value in a Node Property might change, then create a separate Property and bind the Node Property to it. Then never access the Node Property again.
If that changing value is 100% local to your layout then you can just create a Property field in your layout class. But, if that changing value might be used outside of your layout code, then create it as a field in your Presentation Model so that it can be accessed by your application/business logic.
Use Bindings Whenever You Can
The primary tool for connecting data is Binding. Your first question should always be, “How can I do this with a Binding?” If you can’t figure out how, then maybe you’ll need to use a Listener or a Subscription.
Understand the Difference Between Actions and State Changes
The sounds banal, but actions are actions and state changes are state changes.
A ChangeListener or a Subscription is primarily a tool to convert a state change into an action.
Using a ChangeListener to do nothing more than to propagate state changes through your application is usually a bad idea. Even when the data elements being updated are primitive data types. You’re likely better off to put them into Properties and the use Binding to connect them. Yes, there’s overhead with Properties, but you’re highly unlikely to see any performance improvement by using Listeners and primitives instead.
There are some parts of JavaFX that are inherently actions. For instance, running an Animation will require an action (although Animations do have properties that can be bound). So if you need to run an animation in response to a state change, then you’ll need to use a Listener or Subscription to do so.
Responses to user interactions like mouse button clicks are usually actions. Basically, anything that uses an EventHandler of some sort is going to be an action. It’s entirely possible to use this code to update state elements that are then going to propagate through your application via Bindings.
It’s also possible to trigger business/application logic due to a state change. In this case again, Listeners and Subscriptions might be appropriate.
Making a change to a layout (meaning to add or remove Nodes), is also generally going to require an action. However…
Use Node Properties to Make Your Layouts Behave Dynamically
In a Reactive GUI, static layouts are generally best. These means that you generally do not add or remove Nodes. Two Node Properties are key here: managed and visible. A Node that has visible set to false will not appear in the layout. However, if its managed property is set to true, it will still be allocated space on the layout (which usually means that you’ll see an empty space). This is usually not desirable, so you can do:
node.managedProperty().bind(node.visibleProperty())
and it will disappear entirely.
Generally speaking, unless you’re doing something way out on the fringes of normal business applications, there’s no advantage to removing Nodes from your layout, and changing the layout is inherently slow. Even if you have hundreds of invisible/unmanaged Nodes in your layout, you won’t see any performance degradation as JavaFX won’t waste CPU cycles on them.
This means that you can have several container classes inside something like a StackPane and have the visible/managed Properties of each container bound to the selected Property of something in a ToggleGroup (like a CheckBox or a ToggleButton). Then only one container will be visible at any given time, depending on which element of the ToggleGroup is selected. To the user it will look like the layout is changing, but it isn’t really.
A Reactive JavaFX Example
Here’s about the simplest example I could think up that uses as many of these concepts as possible. A simple password change screen with a requirement that the new password is at least 8 characters long…
First, we have the Presentation Model.
class PresentationModel {
    val password: StringProperty = SimpleStringProperty("")
    val okToSave: BooleanProperty = SimpleBooleanProperty(false)

    init {
        okToSave.bind(password.map { it.length >= 8 })
    }
}
Presumably whatever business logic that would go along with this screen would require the new password in order to save it. Next, the minimum length of the new password would also be something that would be decided by the business logic, along with any other requirements about the password. So this stuff all goes into the Presentation Model.
Here’s the screen:
class ReactiveExample : Application() {
    private val model = PresentationModel()
    private val showWarning = model.okToSave.not().and(model.password.isNotEmpty)
    private val errorPC = PseudoClass.getPseudoClass("error")
    private val warningPC = PseudoClass.getPseudoClass("warning")
    override fun start(stage: Stage) {
        stage.scene = Scene(createContent(), 400.0, 300.0).apply {
            ReactiveExample::class.java.getResource("example.css")?.toString()?.let { stylesheets += it }
        }
        stage.show()
    }

    private fun createContent() = BorderPane().apply {
        center = createCentre()
        bottom = Button("Save").apply {
            disableProperty().bind(model.okToSave.not())
        }
        padding = Insets(40.0)
    }

    private fun createCentre(): Region = VBox(10.0).apply {
        children += HBox(6.0).apply {
            children += Label("New Password:")
            children += TextField().apply {
                textProperty().bindBidirectional(model.password)
            }
        }
        children += Label("New password must be at least 8 characters").apply {
            styleClass += "status-label"
            visibleProperty().bind(showWarning)
            model.password.map { ((it.isNotEmpty()) && (it.length < 5)) }
                .subscribe { newVal -> this.pseudoClassStateChanged(errorPC, newVal) }
            model.password.map { ((it.length >= 5) && (it.length < 8)) }
                .subscribe { newVal -> this.pseudoClassStateChanged(warningPC, newVal) }
        }
    }
}

fun main() = Application.launch(ReactiveExample::class.java)
First, showWarning is strictly a GUI concept, so it isn’t in the Presentation Model, it’s just a global variable in the layout code. We also have some PseudoClasses here to control the colour of the status Label. Application of PseudoClasses is inherently an “action” so we need to use Subscriptions to implement them. Finally, the visibility of the status Label is bound to showWarning, while the Button.disableProperty() is bound to model.okToSave.not().
Here’s the CSS file:
.root {}

.status-label {
  -fx-font-size: 14px;
  -fx-font-weight: bold;
  -fx-text-fill: black;
}

.status-label: warning {
   -fx-text-fill: blue;
}

.status-label: error {
   -fx-text-fill: red;
}
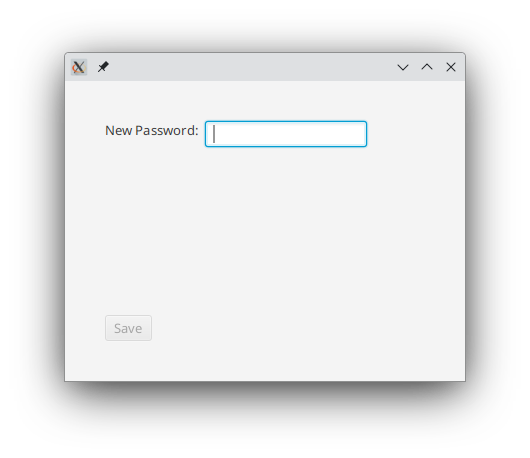
When it launches, it looks like this - with no status label and the Button disabled:
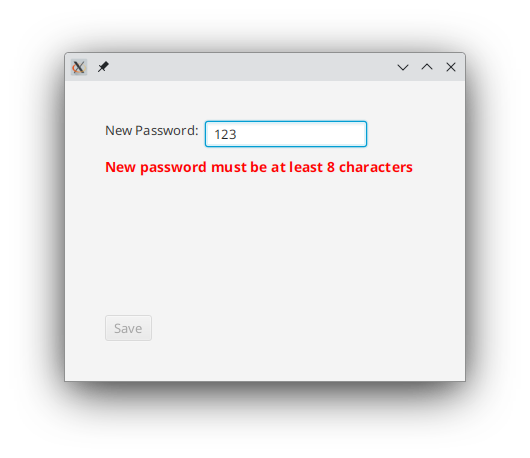
As soon as you type a few characters, the warning shows up:
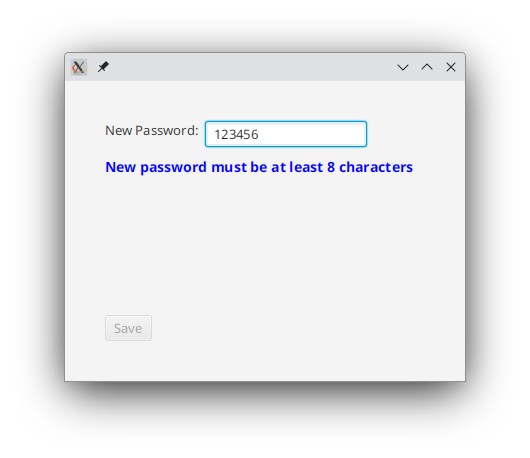
It changes to blue when you get closer to having enough characters:
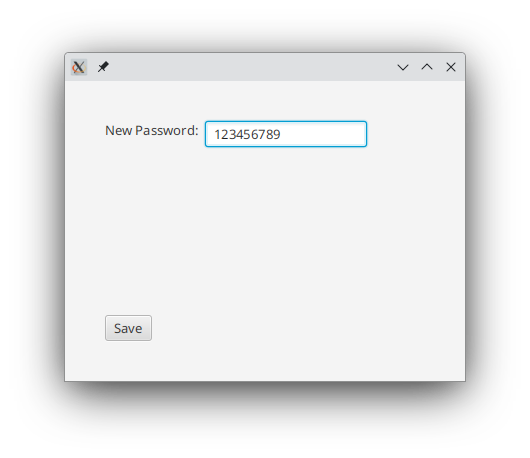
And then the Button enables and the status Label disappears once you have 8 or more characters:
You can see here that the layout itself is absolutely static. All of the Nodes in the layout are created, configured and inserted into layout without creating any variable references to them, and they are never accessed by any other code or any other part of the layout. Yet, the Label appears and disappears, changes colour and generally behaves dynamically. The Button changes from disabled to enabled based solely on the Binding that was created when it was added to the layout.
Finally, whatever business logic is going to save that new password has access to it directly from the Presentation Model. There is no reason to scrape it out of the TextField because the bidirectional Binding keeps it synchronized with the Presentation Model.
Conclusion
This article should have given you the answers to all the questions you’ve been scratching your head over about Properties. There’s enough information here to get a beginner started on the right track, and it might possibly be years before you’ll feel like you need to take a deeper dive into the subject to solve real problems that you encounter with writing real applications. And when you do get there, you can find out everything you’ll ever need to know from my Guide To the Obervable Classes.