Introduction
This is Part II of a series about setting up whole-home audio using SnapCast, Mopidy and RaspberryPi Zero’s (Pi0’s). Part I gives an introduction to how SnapCast works, how we’re going to use it with Mopidy, and instructions for setting up the SnapCast server.
In this article we’ll look at setting up the Pi0’s as SnapCast clients.
RaspberryPi Zero’s
The RaspberryPi Zero is one of the smallest of the RaspberryPi’s (with the Pico being a bit smaller). It looks like this:
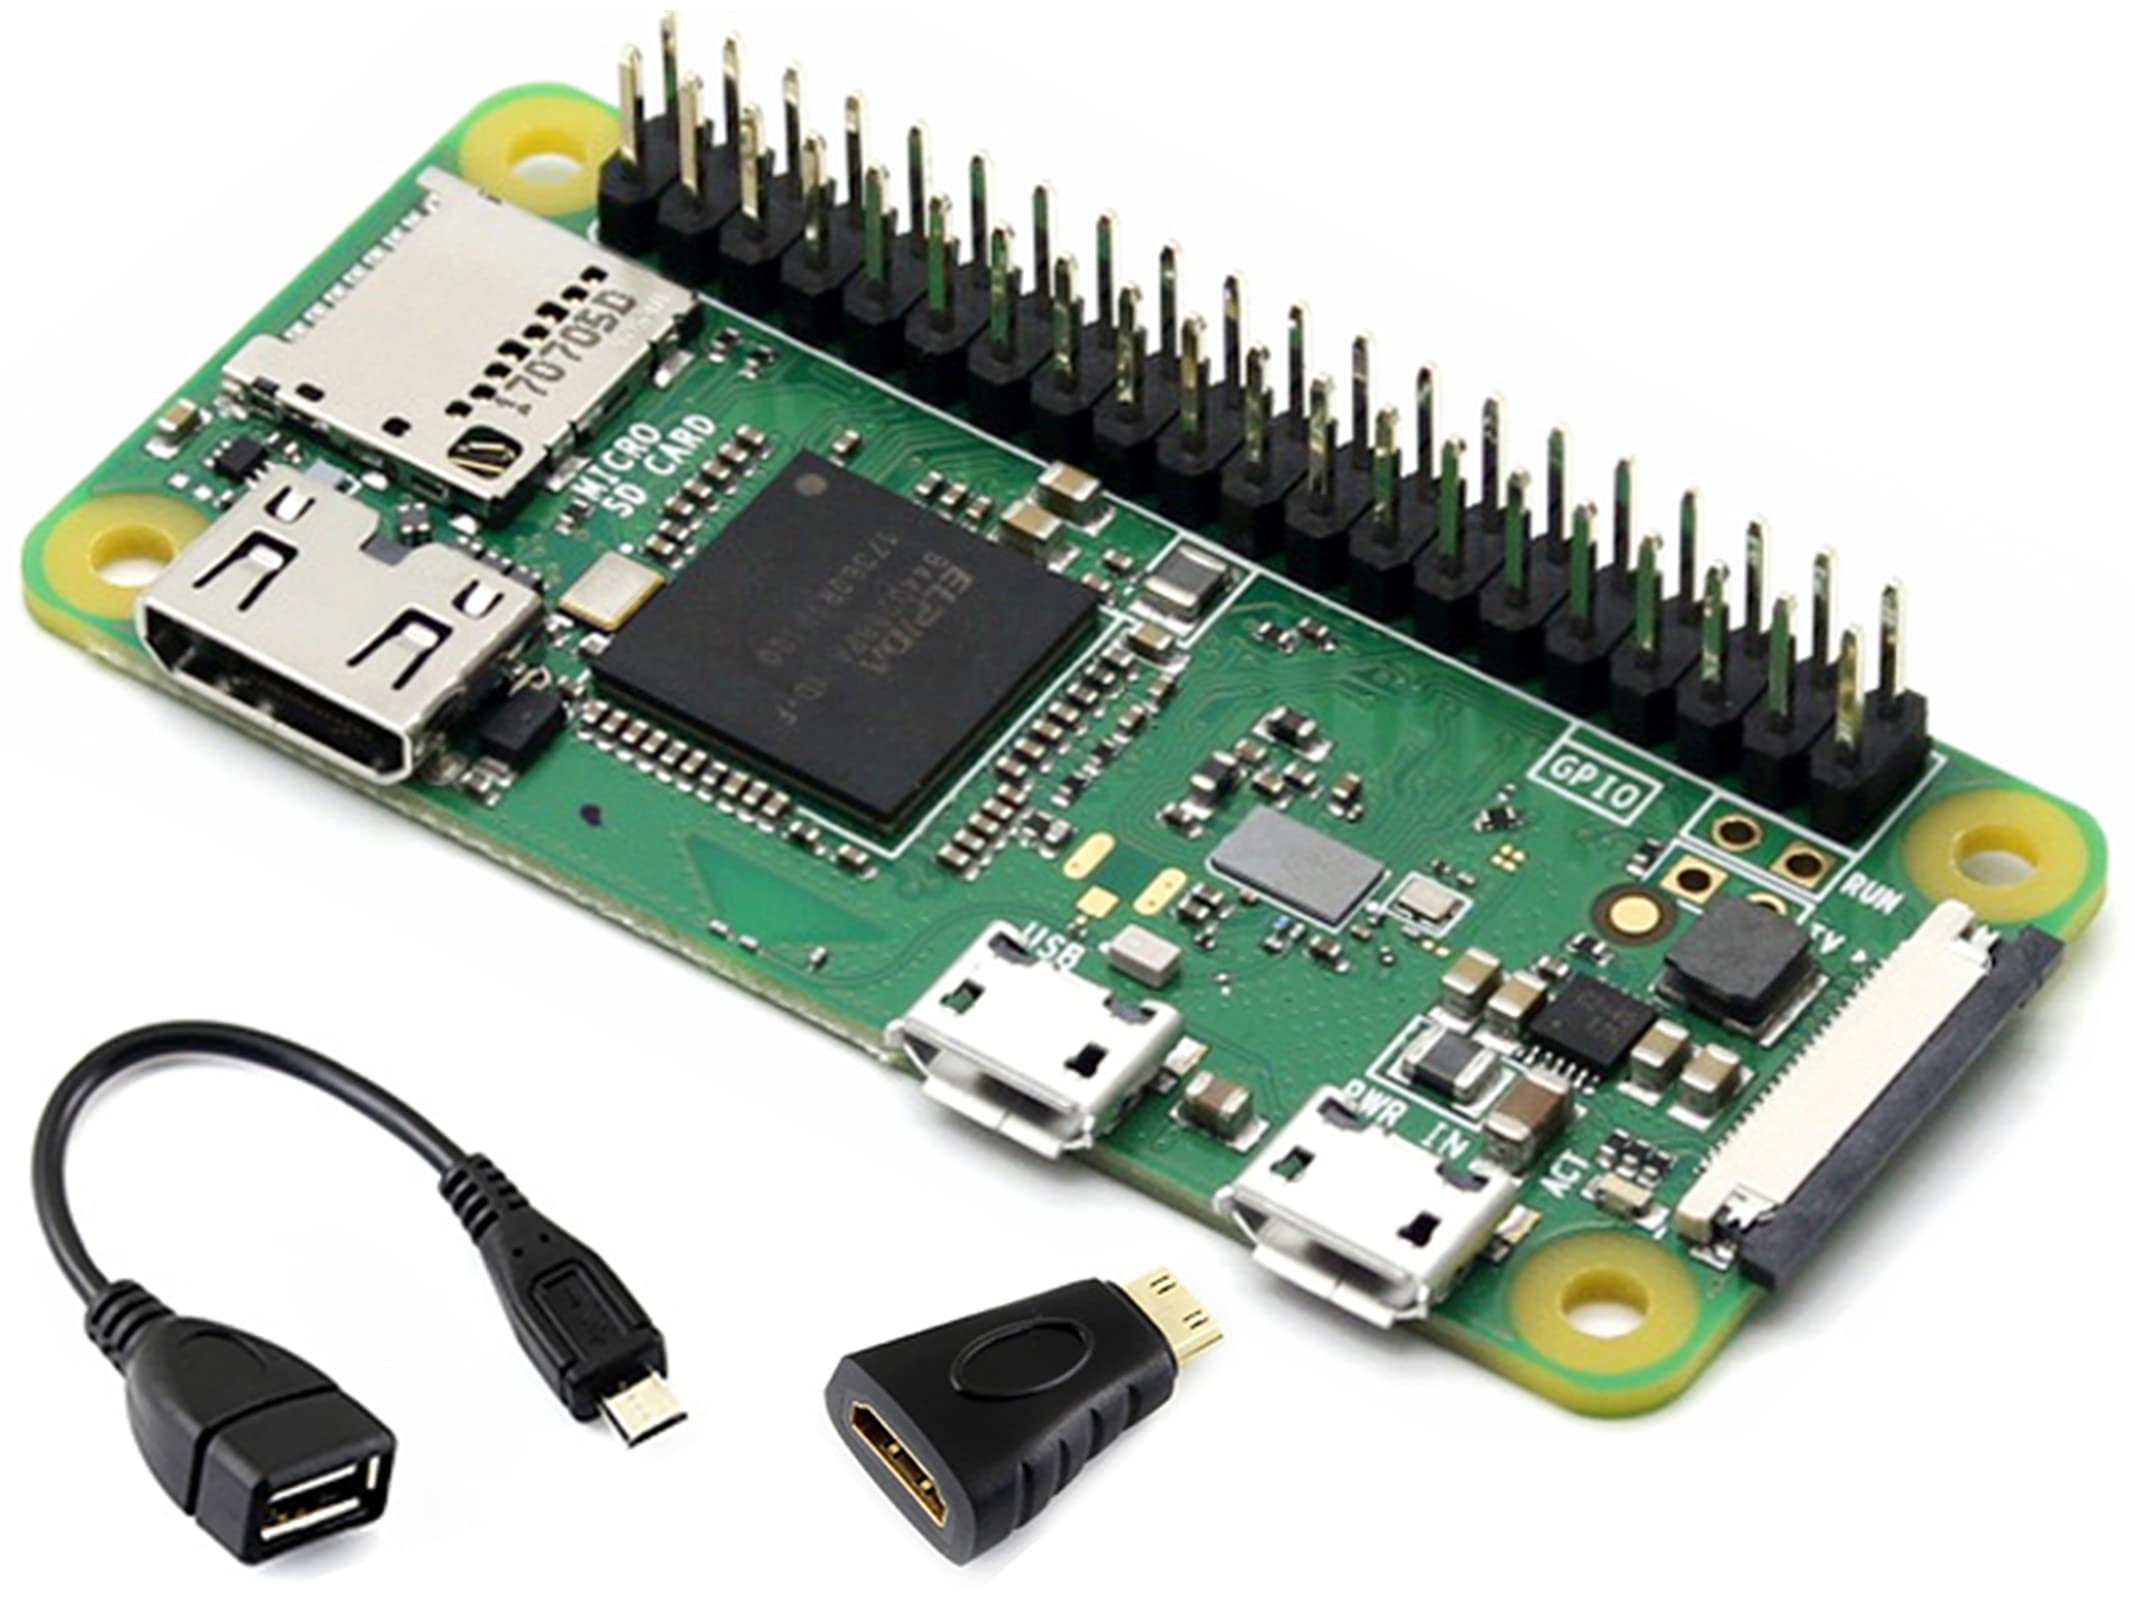
There’s no banana for scale, but the board is about 6cm long.
It has built-in WiFi, which some of the earlier full-sized Pi’s did not, that adds a little bit more versatility to it. It also has the full set GPIO pins, just like the larger models. It’s a bit less powerful than most of the other models, with less memory, but it will do just fine as a SnapCast client.
At the time that I did the installations there were images available for Raspbian based on Debian 12, also known as “Bookworm”. I didn’t see anything listed for Debian 13, or “Trixie” (there was, and I missed it). So I went with the older Bookworm-based Raspbian.
In these instructions I’m going to stick with the Bookworm, because that’s what I used. However, it is highly likely that you could install Trixie and then use the Trixie compatible version of the SnapCast client software and it would work just fine.
I consider these things, configured as they are, to be essentially “appliances”. They do a specific job, they’re not exposed to the outside world, and, once they are up and running, I don’t expect to be updated - ever. It is possible that one day there might be some new feature in SnapCast that I absolutely have to have, but I cannot imagine what that might be right now. They are working fine for me, and I wouldn’t be looking at upgrading just for bug fixes or minor changes. I certainly wouldn’t update just to move the devices to a newer O/S.
By the same token, it wouldn’t affect my homelab if the SnapCast project was halted and removed from GitHub tomorrow. My installation would just continue to work as it always had.
There’s really two elements that need to be configured on the RPi to make it work. The first is the audio hardware, and the second is the SnapCast client, which runs as a service. By far, the audio hardware was the most difficult to figure out, and required a fair bit of trial and error. Consequently, I didn’t create a step-by-step guide as I was doing it. I did end up with a process that I could follow 3 more times after I had figured it out.
For what it’s worth, when setting up the 2nd, 3rd and 4th clients I just SSH’d into the first one and typed history, then replicated the steps on the new RPi0.
Install the DAC Board
The RPi0 does not have any analog audio output, so you’ll need an add-on board to do this. For this project, I’ve used the Pimoroni DAC SHIM because it was readily available and inexpensive. It’s possible, even if you are using a larger RPi, that you’ll still need an external DAC of some sort to get adequate quality sound.
The Pimoroni SHIM looks like this:
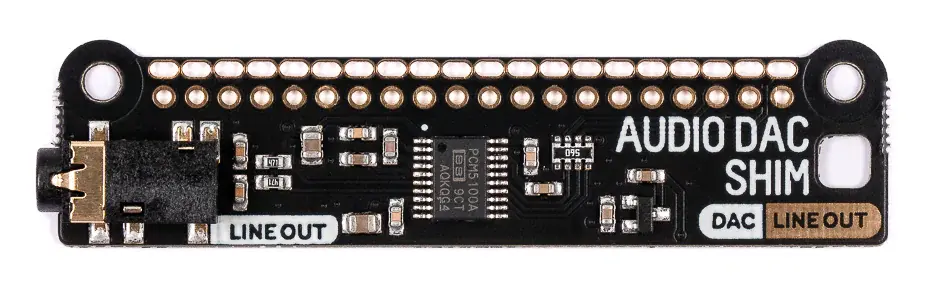
If you are using the Pimoroni board, then orient it such that the 3.5mm jack is over top of the SD card slot on the RPi0. Then line up the holes with the GPIO pins and push it down, all the way to the bottom. It should be a tight fit and require a fair amount of pressure to get it to slide down. But not so much that you would describe it as “forcing” it down.
That’s all it takes. Some of the HiFiBerry boards have the same kind of connection, so they should be just as easy. If you’re using something else, then RTFM to figure it out.
Install Raspbian
If you are new to Raspberry Pi’s, then you need to understand that they usually boot from an operating system loaded onto an SD card of some sort. The RPi0’s use MicroSD cards. 8GB or 16GB cards should be more than enough. Bigger ones work just fine. The operating system is loaded via some other computer that you have that can read/write to SD cards.
To load the O/S onto the the SD card you should use the official Imager software. The instructions for installing it are here. I’m using Ubuntu on my desktop system, so I was able to just use sudo apt install rpi-imager and it was all done.
When you run the imager, the first step is to pick the type of RPi device and then the O/S version. As of the time of writing this, the correct option was “Legacy”, not “Trixie”. This should give you the “Bookworm” based Raspbian, which is compatible with the SnapCast client software.
Once you’ve picked the output device, which should be your new MicroSD card, you’ll get an option to edit the settings. Do that.
Change the hostname to something that makes sense to you. I picked “snapclient0”, then “snapclient1” for the next one, and so on.
Set a username and a password, make note of both. Then input the WiFi connection details and set the time zone and locale.
In the “SERVICES” tab, enable SSH and use password authentication.
Click “SAVE”, and then pick “YES”. Go through the “Are you sure?” warnings and let it run.
When it’s done, stick the MicroSD card in the RPi0 and plug it in the power. Theoretically at least, in a little while, you should be able to SSH into it. In practice, I have found that they get stuck on the first boot waiting for some kind of keyboard input. So you might need to plug in a monitor, keyboard and mouse.
Be warned that the RPi0 only has two USB “B” ports, and one is taken up with the power input. So you’ll need a USB hub to connect both a mouse and keyboard at the same time. Also note that those two USB ports are very close together, so if you’re using a bunch of adaptors and converters, you’ll need to make sure that they fit when the power port is populated.
Secondly, the HDMI connector on the RPi0 is a mini HDMI, You’ll need a compatible HDMI cable or a converter for that.
I’m going off memory here, but I think that one of the key things you’ll need to do with the KVM hooked up is to tell the RPi0 not to load the GUI desktop at boot. This will speed up subsequent boots and boost your performance. Also, you’ll never use the GUI environment.
Once you’ve got the RPi0 fully booted, you should be able to SSH into it. I’d give it one more test boot, just to make sure completes a “hands free” boot, before disconnecting the KVM equipment.
I know these instructions seem a little vague, but there’s nothing difficult or tricky about this part, and the steps should be obvious as you run through it.
SSH into your RPi0 and start configuring the SnapCast client…
Edit The Firmware Configuration
This is how you tell the RPi to use the add-on board and not any native audio equipment.
The file you need to edit is /boot/firmware/config.txt. I’ve marked the lines that needed to be changed or added:
# For more options and information see
# http://rptl.io/configtxt
# Some settings may impact device functionality. See link above for details

# Uncomment some or all of these to enable the optional hardware interfaces
dtparam=i2c_arm=on  <---- uncomment
dtparam=i2s=on      <---- uncomment
dtparam=spi=on      <---- uncomment

# Enable audio (loads snd_bcm2835)
dtparam=audio=off

# Additional overlays and parameters are documented
# /boot/firmware/overlays/README

# Automatically load overlays for detected cameras
camera_auto_detect=1

# Automatically load overlays for detected DSI displays
display_auto_detect=1

# Automatically load initramfs files, if found
auto_initramfs=1

# Enable DRM VC4 V3D driver
dtoverlay=vc4-kms-v3d
max_framebuffers=2

# Don't have the firmware create an initial video= setting in cmdline.txt.
# Use the kernel's default instead.
disable_fw_kms_setup=1

# Disable compensation for displays with overscan
disable_overscan=1

# Run as fast as firmware / board allows
arm_boost=1

dtoverlay=hifiberry-dac   <--- add this line
gpio=25=op,dh

[cm4]
# Enable host mode on the 2711 built-in XHCI USB controller.
# This line should be removed if the legacy DWC2 controller is required
# (e.g. for USB device mode) or if USB support is not required.
otg_mode=1

[cm5]
dtoverlay=dwc2,dr_mode=host

[all]
gpio=25=op,dh   <--- add this line
You will also need a file called /etc/asound.conf. You’ll probably have to create it, and it needs to have just two lines:
defaults.pcm.card 1
defaults.ctl.card 1
Installing the SnapClient
The next step is to install the SnapClient service software. Just as with the SnapServer software, it’s best to download it from GitHub and then use dpkg to install it. It’s also advisable to make sure that all of your O/S elements are updated before you attempt the installation, so I’ve included those steps in here:
4  wget https://github.com/snapcast/snapcast/releases/download/v0.34.0/snapclient_0.34.0-1_armhf_bookworm.deb
5  sudo apt update
6  sudo apt upgrade
7  sudo dpkg -i snapclient_0.34.0-1_armhf_bookworm.deb
This will install the snapclient software and set it up as a service. You should set it up to run at boot:
sudo systemctl enable snapclient
In most versions of Linux, you use systemctl to control sevices on the system. The enable command in systemctl tells the system to load the service at boot time.
Before you do anything else, you should configure the client. Edit the file /etc/default/snapclient. The file should already be there, and it should look something like this when you are done:
# Start the client, used only by the init.d script
START_SNAPCLIENT=true

# Additional command line options that will be passed to snapclient
# note that user/group should be configured in the init.d script or the systemd unit file
# For a list of available options, invoke "snapclient --help"
SNAPCLIENT_OPTS="-h 10.93.50.107 -s 1"
Obviously, you’ll need to put in whatever IP address your SnapServer is running on, instead of mine. The -s 1 is important as it tells the SnapCast client to use the DAC board.
At this time, you should reboot the RPi0, which will cause it to load the new audio configuration and start the SnapClient service.
Testing and Debugging
If everything has gone well, then your SnapCast server should have received a connection request from your RPi0. This means that you should see it if you go back into your SnapCast web page.
If you issue the following command on your SnapCast server:
sudo journalctl -u snapserver -n40
You should see a line near the bottom that looks something like this:
Apr 02 18:28:40 snapcast snapserver[41889]: (Server) Hello from b8:27:eb:a3:3d:60,
         host: snapcast0, v0.34.0, ClientName: Snapclient, OS: Raspbian GNU/Linux 12 (bookworm),
         Arch: armv6l, Protocol version: 2, Auth: {"param":"","scheme":""}
If not, then your RPi0 hasn’t connected to SnapCast server. Back on the RPi0, you should be able to do this:
$ sudo systemctl status snapclient --lines 30
● snapclient.service - Snapcast client
     Loaded: loaded (/lib/systemd/system/snapclient.service; enabled; preset: enabled)
     Active: active (running) since Fri 2026-04-03 12:46:35 EDT; 3min 16s ago
       Docs: man:snapclient(1)
   Main PID: 17962 (snapclient)
      Tasks: 2 (limit: 373)
        CPU: 32.803s
     CGroup: /system.slice/snapclient.service
             └─17962 /usr/bin/snapclient --hostID SomeRoom --logsink=system -h 10.93.50.107 -s 1

Apr 03 12:46:35 snapcast1 systemd[1]: Started snapclient.service - Snapcast client.
Apr 03 12:46:35 snapcast1 snapclient[17962]: (Snapclient) Options '--host' and '--port' are deprecated. Please add the server URI as last command line argument
Apr 03 12:46:35 snapcast1 snapclient[17962]: (Snapclient) Version 0.34.0, revision 0ac55084
Apr 03 12:46:35 snapcast1 snapclient[17962]: (Connection) Resolving host IP for: 10.93.50.107
Apr 03 12:46:35 snapcast1 snapclient[17962]: (Connection) Connecting to host: 10.93.50.107:1704, port: 1704, protocol: tcp
Apr 03 12:46:35 snapcast1 snapclient[17962]: (Connection) Connected to 10.93.50.107
Apr 03 12:46:35 snapcast1 snapclient[17962]: (Connection) My MAC: "b8:27:eb:7b:b4:33", socket: 9
Apr 03 12:46:36 snapcast1 snapclient[17962]: (Controller) ServerSettings - buffer: 2000, latency: 0, volume: 90, muted: 0
Apr 03 12:46:36 snapcast1 snapclient[17962]: (Controller) Codec: flac, sampleformat: 48000:16:2
Apr 03 12:46:36 snapcast1 snapclient[17962]: (Player) Player name: alsa, device: lavrate, description: Rate Converter Plugin Using Libav/FFmpeg Library, idx: 1, sharing mode: unspecified, parameters: <none>
Apr 03 12:46:36 snapcast1 snapclient[17962]: (Player) Mixer mode: software, parameters: <none>
Apr 03 12:46:36 snapcast1 snapclient[17962]: (Player) Sampleformat: 48000:16:2, stream: 48000:16:2
Apr 03 12:46:36 snapcast1 snapclient[17962]: (Alsa) Using default buffer_time: 80 ms, default fragments: 4
Apr 03 12:46:36 snapcast1 snapclient[17962]: (Alsa) PCM name: lavrate, sample rate: 48000 Hz, channels: 2, buffer time: 80000 us, periods: 4, period time: 20000 us, period frames: 960
Apr 03 12:46:36 snapcast1 snapclient[17962]: (Stream) No chunks available
Apr 03 12:46:36 snapcast1 snapclient[17962]: (Alsa) Failed to get chunk
Apr 03 12:46:36 snapcast1 snapclient[17962]: (Controller) diff to server [ms]: -3.68704e+08
You should see that it is active in the “Active:” line. You should also see that it says “enabled” somewhere in the “Loaded:” line.
You should also see in the “CGroup:” line 2, that you have a host IP address that is correct for your SnapCast server.
Underneath the summary is most recent journal log output since the service has been started. You should see the interaction between the client and the server happening here.
You can push the white noise through the fifo again, and you should hear it through the RPi0. Just about anything that you can plug into a 3.5mm jack should work. A powered speaker, an amplifier, even headphones.
What If You Don’t Hear Anything
If you saw the client connecting to the server, but you don’t hear anything. Then you have a problem with your sound configuration or you haven’t included that “-s 1” in the client options. Check that last bit first.
You can confirm the sound devices with aplay:
$ aplay -l
**** List of PLAYBACK Hardware Devices ****
card 0: vc4hdmi [vc4-hdmi], device 0: MAI PCM i2s-hifi-0 [MAI PCM i2s-hifi-0]
  Subdevices: 1/1
  Subdevice #0: subdevice #0
card 1: sndrpihifiberry [snd_rpi_hifiberry_dac], device 0: HifiBerry DAC HiFi pcm5102a-hifi-0 [HifiBerry DAC HiFi pcm5102a-hifi-0]
  Subdevices: 0/1
  Subdevice #0: subdevice #0
That “card 1” should line up with your “-s 1”. If the DAC has some different number then use it for the “-s” option.
It took me a lot of fiddling about to find out how to get the setup right on the very first RPi0 that I set up, because I didn’t get any sound at the beginning. Looking back at my history stack from that first RPi0, I see that aplay was really the tool that let’s you figure it out.
You can use aplay to play a file. This let’s you eliminate the SnapCast elements and confirm that, yes, your RPi0 is sending sound through the DAC:
$ wget https://sample-files.com/downloads/audio/wav/pure-tone.wav
$ aplay pure-tone.wav
Take a good look at the man pages for aplay. There are lots of different options you can play with to understand what’s going on with you sound system.
Conclusion
At this point you should have a Raspberry Pi Zero running as a SnapCast client that you can send sound to from a SnapCast server!
I can say that the first one took me a couple of days to get running because the documentation just isn’t there, and there are quite a few moving parts to figure out at the beginning. However, if you are using a RPi0 and a HiFiBerry or Pimoroni DAC there is no reason that you need to have go through the same experience because all of the details are right here in this article.
This is Actually Easy
I’ve now set up 4 of these RPi0’s and it takes about half an hour all-in, including the 15 minutes or so that the Imager program takes to set up the SD card. Here is the entire history stack from the 4th one:
1  ip a
2  sudo apt update
3  sudo apt upgrade
4  sudo vi /boot/firmware/config.txt
5  wget https://github.com/snapcast/snapcast/releases/download/v0.34.0/snapclient_0.34.0-1_armhf_bookworm.deb
6  sudo dpkg -i snapclient_0.34.0-1_armhf_bookworm.deb
7  sudo systemctl status snapclient
8  sudo vi /etc/default/snapclient
9  sudo systemctl restart snapclient
10  sudo systemctl status snapclient
11  aplay -l
12  sudo reboot
13  aplay -l
14  sudo systemctl status snapclient
15  sudo vi /etc/asound.conf
16  sudo reboot
The ip a at the beginning was to make it easier for me to find the device in my DHCP leases and set the address as static there.
After line 10, I don’t think it was playing anything when I plugged it into the amp. Then you can see me checking aplay -l, rebooting it to make sure it had reread the configuration, then checking again. I finally realized that I had forgotten to create /etc/asound.conf, so I created it. Then another reboot, and sound was coming out of it.
At that point I disconnected from it and haven’t log in again until I started writing this article.
In Part III…
Part III is the final article in the series, and shows how to set up Mopidy to stream music and how to connect it to your SnapCast server. It also shows how you can use the Mopidy REST API to do some simple automation and stream recovery.