Introduction
When I initiated my project to build a homelab, I didn’t want a huge up-front expense. But I did have a need for whatever I built to be as reliable as possible. After all, I’m planning on replacing a fair number of cloud services - services that are generally pretty reliable - with home-hosted alternatives.
To me, this means redundancy.
I’ve looked at lots of photos of people’s homelab setups and good number of them, probably even the majority of them, seem to have one server doing most of the work. This is, of course, a single point of failure. In my book, that’s just not something that you do.
Proxmox is a great help here. While setting up high availability - where you set up a cluster of hosts, designate vital containers and VM’s, and then have them fail over to different hosts when their host fails - is difficult without having lots of fast disk space and multi-gigabit networking, you can still use backups to restore vital servers when a host fails.
But, how do you create an effective cluster of servers on a shoestring budget without turning your paycheck over to the electic company?
1 Litre PC’s
It wasn’t long after I started thinking about building a homelab that I started seeing videos, posts, and articles about “mini” PC’s that people were using. These were tiny little desktop computers that idled at about 7W and could handle a surprising amount of load.
It turns out that there are three basic product lines. HP has an EliteDesk series that they call “Mini”, Dell has an Optiplex line called “Micro” and Lenovo has a ThinkCentre line called “Tiny”. I’m not going to say that they are the same, but, they are all pretty close. These are all what are called “1 Litre” form factor PC’s, and they all use external power bricks instead of internal power supplies. A common term referring to these computers collectively is “Tiny Mini Micro”.
Here’s what the Lenovo version looks like, with a pen so that you can see the scale:
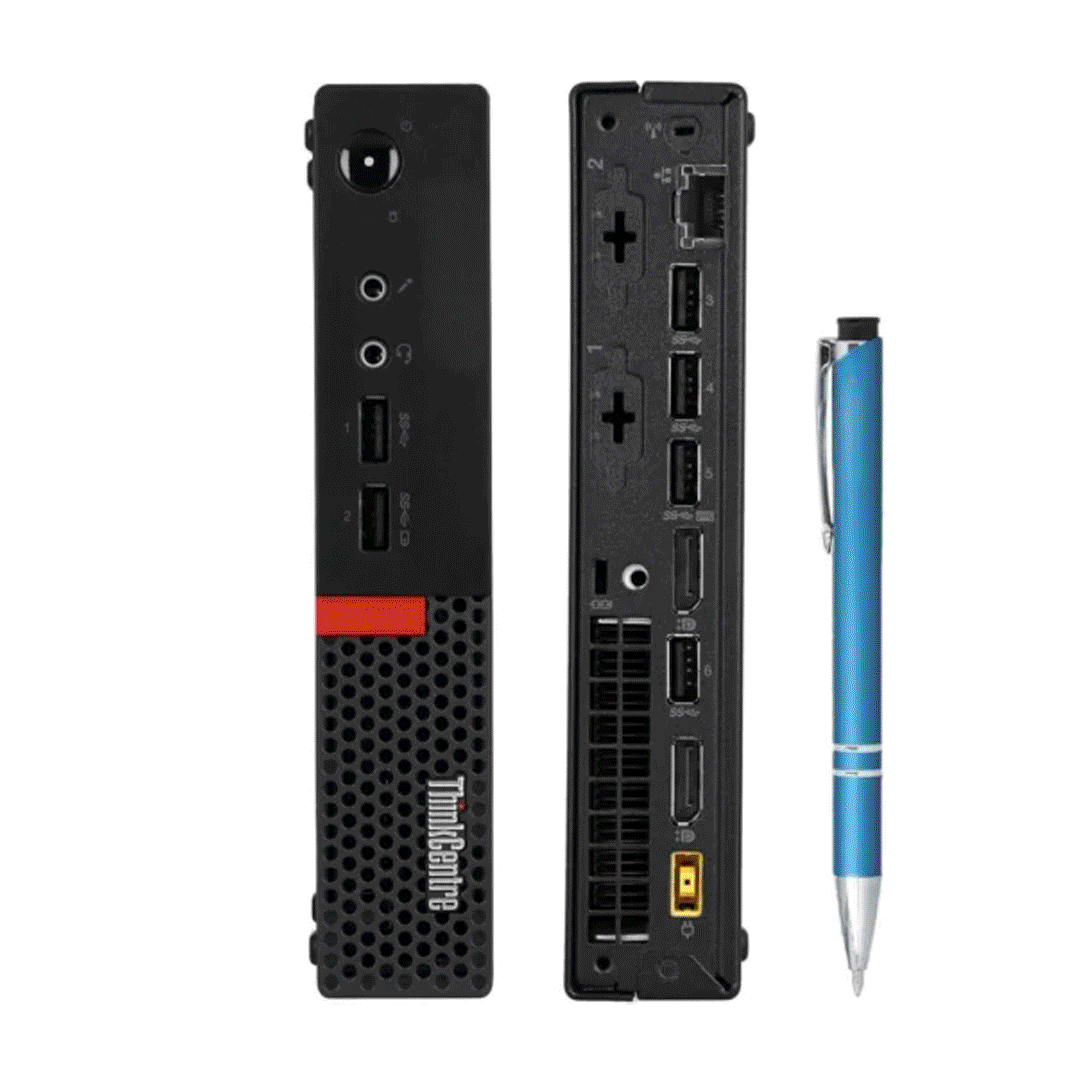
You can see that it’s pretty darned small.
These units were incredibly popular with corporate clients. They bought gazillions of these things because they just worked well for office applications, they were sturdy, and they were cheap. A lot of them were leased.
And when those leases ended…
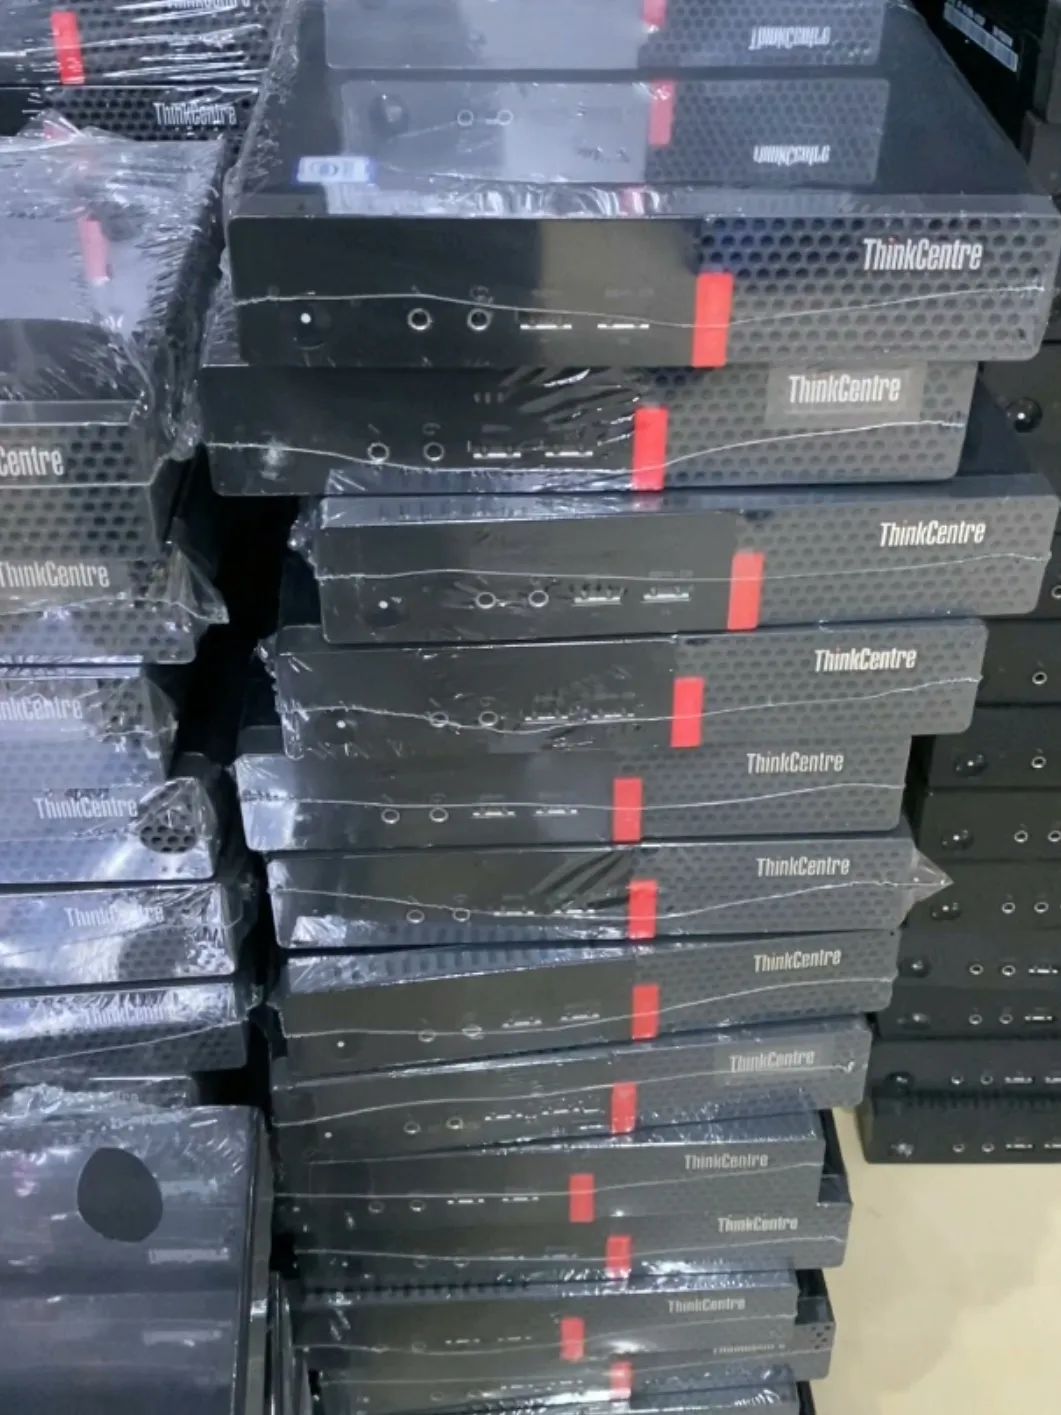
The leasing companies sold them off in bulk at wholesale prices to recover some of the value, and the companies that bought them have refurbished them and are reselling them. The result is that they are readily available at reasonable prices.
I was told that the advent of Windows 11 has caused a shortage of these units, and the prices have gone up a fair bit. Even so, they are still a great value.
Why Lenovo
In truth, you probably cannot go wrong with either of the three brands. These computers were all designed for the same, commercial, market and they are all executed well. In my area, I was seeing a lot of Dells and Lenovos available, but not so many HPs. I went with Lenovo because they seemed just a little bit more solid, and there was a bit more variety in the models available.
One thing I really wanted was to have all of the units in the cluster as similar as possible. I wanted them to be fungible. As I was planning to purchase them over time, I needed the supply to be consistent for at least a while.
You should also know that these computers, are still manufactured today and available to purchase new, although these are newer versions with more power and a higher cost..
The Hardware
Let’s take a look at these boxes and see what you get.
These have been in production for quite some time. You’ll be able to find models like the M73Q which have 4th gen Intel Core processors for peanuts, but those are probably not going to have enough computing power to be useful. I decided on the Lenove M910Q which has 6th or 7th generation Core processors.
You do need to be a little careful. All of these computers look identical, so you have to make sure that you are getting what you think you are getting and that you know what kind of processors go in which models. This product line is also still in production, so you can buy more recent versions with 10-12th generation Intel processors - although at a higher price.
Beyond that, they all come with a variety of different available processors. So, once again, be careful to make sure that you are purchasing what you think you are. Don’t pay an i7 price for an i3 equipped unit.
M910Q vs M710Q
If you look into these, you’ll see that there are two models which look and seem to be very, very similiar; the M910Q and the M710. What’s the difference?
You can see for yourself the spec-sheets:
As far as I can tell, these two units are nearly the same, except that the M910Q uses the Intel Q270 chipset instead of the B250 chipset in the M710Q. This means that the M910Q supports VPRO, while the M710Q does not.
Both models support the same set of processors and memory.
The place where I bought mine made no price distinction between the M710Q and the M910Q because the average customer wasn’t building homelabs. What they cared about was the CPU. The 7th gen Core i7 cost about double the 6th gen Core i5 models. The price of a system with the same CPU was the identical between the M710Q and the M910Q.
The Processors
The M910Q will take a variety of Intel laptop CPU’s from the 6th and 7th generations. It will support Core i3, i5 and i7 processors from both generations. Let’s take a look at the differences, while ignoring the i3.
The i5-7500T is about 10% faster than the the i5-6500T for multithreaded applications, and 8% faster for single-core applications. Both support 4 cores and 4 threads. You see the slightly smaller differences between the i7-6700T and the i7-7700T.
Of course the i7-6700T supports 8 threads, but the i7-6700T is just 16% faster than the i5-6500T for single-core performance. Multi-threaded performance is significantly higher.
The biggest difference is between the i5-6500T and the i7-7700T. Even here, the scores for Cinebench Single-Core come in at 132cb vs 168cb, while Cinebench Mulit-core is 464cb v 805cb. This last comparison is the biggest of all and probably significant for Proxmox host systems.
I’m not saying these performance differences are insignificant, but a Core i5-6500T went for about $50 CAD on eBay, while a Core i7-7700T from the same seller went for $120 CAD at the time that I bought my systems. I was seeing this difference in the prices of the M910Q’s in the store as well.
About 9 months later, you can buy i7-7700T CPU’s, the most powerful CPU’s compatible with these systems, for between $50-$70 (CAD) on eBay. That’s less than a stick of 16GB RAM for one of these. This means that upgrading is a very reasonable possibility.
Memory
The M910Q takes DDR4 laptop style, non-ECC SODIMM’s. There are two slots, and each can take up to 16GB of RAM, for a total of 32GB.
Most of the systems that I have seen for sale, on line or in person, are loaded with a single 8GB stick of RAM. I upgraded all of mine to 16GB when I bought them.
I’m kicking myself now, because that extra 8GB cost me about $25 and I could have taken them up to 32GB for about $50. As I write this, each additional stick of 16GB DDR4 is going to cost me about $75.
Of all of the resources that I worry about being a constraint after implementing quite a few services, it’s RAM. I’m nowhere close to getting critical, but I expect it will be the first thing to cause a problem.
A Look Inside
One of the cool things about the M910Q is that it just needs a single screw on the outside removed in order to gain access to the inside, and most maintenance thereafter is tooless. The top cover slips off, and then this allows a plate on the bottom to also be removed.
Let’s look at the view of the inside from the top:
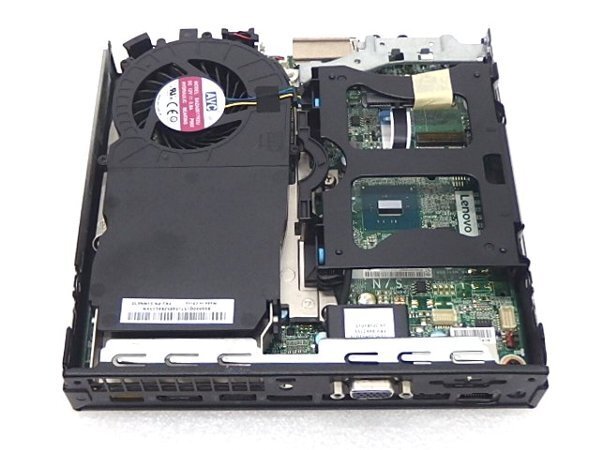
The CPU is socketed, and hidden away under the duct extending back from the fan. From the videos I’ve seen, I believe that you might need to undo some screws to remove the heat sink and access the CPU socket.
The black plastic construct to the right is the SATA drive cage. Squeeze that semi-circular plastic bar towards the cage and the whole thing pops out. The ribbon cable for the drive is held onto the cage with that yellow tape. On mine, it was zip-tied - which I think is the standard.
The cage will accept a 2.5” drive with a height of 7mm. You can install an SSD or an HDD.
Underneath it is an M.2 slot for a WiFi card, or something compatible with it. Some models come with the WiFi card and the antenna.
Pull off the plate on the bottom, and this is what you’ll see:
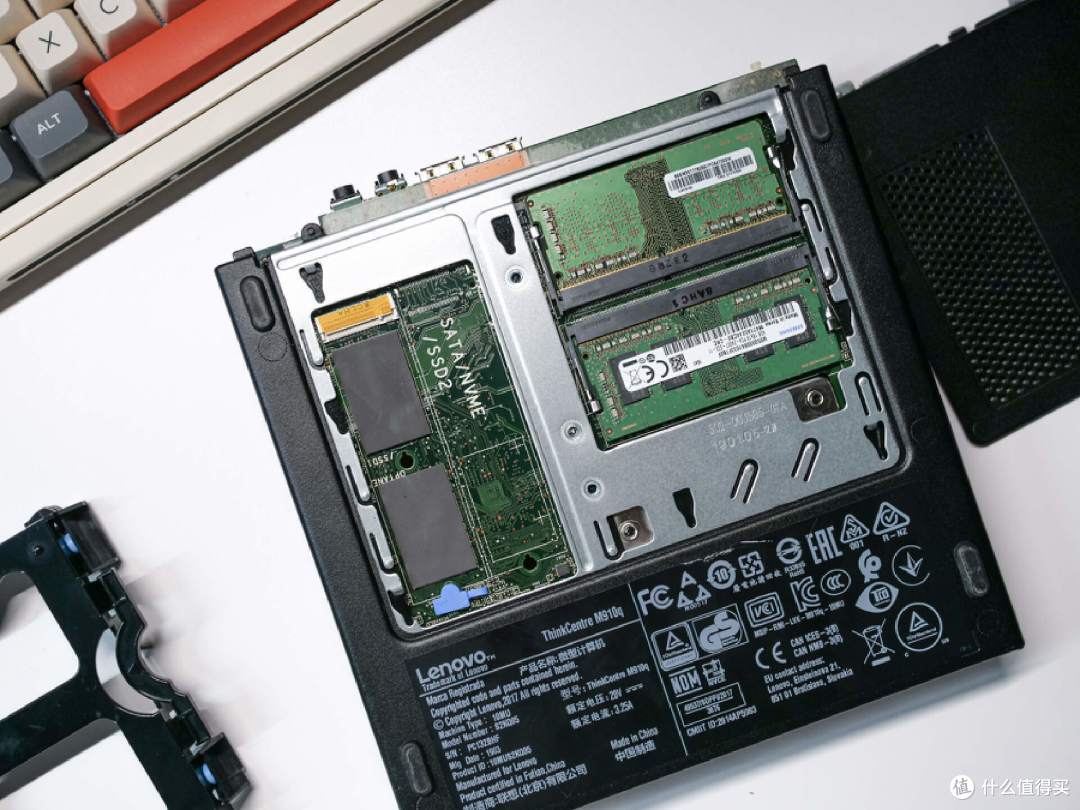
Don’t be fooled by the text on the PCB that says, “SATA/NVMU/SSD2”. It’s unpopulated on the M910Q and the M710Q. I believe that the M920Q and the M720Q might have that slot. In this picture, we have an SSD installed in slot #1.
The only other things under here are slots for the memory.
That’s pretty much it. There are a small number of options that might be installed in these. Mine have two DB9 serial ports, but others have additional DisplayPort ports. Presumably, you could swap these out, but the choices are fairly limited.
From what I have seen, some of the later HP EliteDesk Mini’s have a optional 2.5GB adapter on a daughterboard that can just be slotted in. But there’s nothing like that on the Lenovo’s.
In one of my units, I’ve installed a Coral TPU in the WiFi M.2 slot. This is for some AI processing in my NVR server.
Ports on the Back/Front
Lenovo sold these in all kinds of configurations, but they all have a pantload of USB 3.1 Gen 1 ports on the back and front.
Most of them seem to have 2 or more DisplayPort ports. No HDMI. You might miss this if you’re not paying attention, and you’ll have to make sure that you have a DisplayPort compatible monitor (or a converter) in order to do the initial setup.
They use a standard Lenove square power port. This is the same as what you’d find on a Lenovo laptop. They use power bricks that come in 60W and 90W variants. You’ll probably be fine with the 60W versions for most purposes.
There is but a single 1GB ethernet port.
Mine must have come from some kind of lab or engineering environment. They are festooned with DB9 serial ports, which I assume were used to connect to test equipment or other stuff that pre-dated USB. I don’t think I’ll ever use them.
Limitations
Without a doubt, the biggest limitation of these systems, if you are going to use them as Proxmox hosts, is that they only have a single 1GB Ethernet adapters. There’s no upgrade potential here that doesn’t involve soldering and 3D printing.
This means that Ceph, and therefore HA clustering in Proxmox, is probably a no-go. However, I am planning on seeing how they perform with 2.5Gbs or 5Gbs USB NICs forming a isolated network for the cluster. It seems that these adapters are getting more stable now.
In general, however, beyond adding memory, a SATA drive and possibly putting in a larger SSD in the NVME slot, there’s not a lot of room for upgrading or enhancing these systems. There’s just no room inside them.
If you really, really, really feel like you need the ability to add a PCI card to do something specific, then you might consider the M920Q or the M720Q. These have a PCI slot, although you’ll need an additional riser card to be able to use it. Note that you’ll probably have to spend about $100-$150 more to get one of these tricked out with the riser card.
Pricing
This is where these little units really shine. The price.
The outfit I bought my units from was selling them with a standard configuration of 8GB RAM and a 256GB M.2 SSD. The first two ones I ended up with had DB9 serial connectors, but no WiFi.
The basic model with a 6th gen i5 was $100, while the i7 (not sure of the generation) was close to $200. I did end up with one 7th gen i5, and that was $110, the other two were 6th gen i5 processors. I increased the memory in all of them to 16GB, because I strongly suspected that 8GB wasn’t going to cut it for Proxmox servers. When I bought the first two, I simply bought an extra 16GB DIMM and them moved one of the 8GB DIMMs to the other system. For the third one, I just paid to swap out the 8GB DIMM for a 16GB one.
This is going to make upgrading them to 32GB a bit more expensive, because I’ll have to by 4 16GB DIMMs and hope I can trade in the two 8GB DIMMS.
With the memory upgrade, I paid about $115 CAD each for the first two, and then about $145 CAD for the third. So, about $375 CAD together. They came with a six month warranty.
Value Compared to Raspberry Pi’s
I checked, and a RPi 5 with 4GB RAM goes for about $105 CAD. The performance of the RPi is significantly lower than that of the Core i5-6500T, especially when it comes to multi-core performance, where the RPi scores about 60% of that of the i5-6500T.
It’s almost certain that the M910Q draws more power than the RPi 5, especially when idle. So if you do have an application that needs fairly low single-core processing power which is idle for most of the time, an RPi might be a more appropriate solution. Also, if you do have a need for the GPIO capabilities of the RPi, then it’s clearly the way to go.
Performance
Performance issues are a significant difference between running a corporate data centre and a homelab.
In the corporate world, you can reasonbly assume that all of your various servers are going to be running under a consistent and considerable load all day. With hundreds of users and services exposed to the Web, you can be pretty sure that just about everything is doing something at any given time. Especially between 9am and 5pm. This means that you have to provision and configure your data centre to meet that fairly predicatible load across a number of services active at the same time, and then also to handle peaks that happen from time to time.
But homelabs aren’t like that. You probably have more virtual servers than users, to start with. Some of your services are likely to be 99% idle most of the time.
That’s what it’s like with my homelab. I have a server that streams whole-home audio 24/7, but it only uses 2% of 1 core, and about 60MB of RAM. I have a couple of servicers that wake up once every 5 minutes and check my two ISP connection speeds, log the results and send me a notification if either one runs really slow. I have a service that scans my network for active devices every few minutes.
All of the other servers support “on demand” services. JellyFin is mostly active when someone is watching a video. Immich when someone is uploading, downloading or viewing pictures. Vaultwarden when someone is synching passwords. The backup servers do all of their work in the middle of the night, around 3:00am. You get the idea.
This has a very different impact on how your servers perform…
CPU
One of the biggest surprises for me was just how little CPU the various Proxmox containers actually consume. I have about 28 VM’s and LXC’s running right now and the Proxmox dashboard says I’m using 4% of my CPU. These containers include HomeAssistant, JellyFin, SnapCast, NetAlertX, Open Media Vault, Immich, an *arr suite, NGINX and two Technitium DNS servers. A couple of containers are running Docker.
Once in a while I can peg the CPU on one of the servers. If I upload a ton of images into Immich, it’ll run hard for a while as it does its facial recognition and processing. Open Media Vault can get pretty heavy at times, too.
The key thing here is that any given virtual service, running full tilt, is only going to be able to occupy 33% of my homelab’s CPU, because it only has access to the CPU on its own host. On the other hand, it’s probably a good idea to spread your potentially CPU intensive virtual servers across your Proxmox nodes. Maybe even consider which ones are likely to be running at the same time, and keep them on different nodes.
Memory
Overall, the cluster seems to be running with about 30% of its memory in use. This can vary quite a bit if any of the services gets busy. Most of my servers are deployed as LXC’s which are much more dynamic in the way that they consume and release memory than traditional VM’s. I think that this has helped to keep the memory requirements fairly low.
Once again, virtual servers cannot access resources not on their host node. Looking to keep memory intensive applications spread across all the nodes is probably a good idea.
Power Consumption
Eventually I got around to installing a UPS for my HomeLab and it has a display that shows how much power it’s drawing. With all of the essential components to stay “up” connected to the UPS, it’s pulling about 80 watts. This is 3 M910Q’s, the HP T740 hosting the firewall, the external drive bay, the switch and the two modems.
80 watts. I’m impressed.
The UPS predicts it can last for a couple of hours with that load, and it’s not a big UPS.
Application Performance
In terms of user experience, there are no performance issues. These servers are 100% capable of meeting every demand placed on them in response to user activity.
One of the things I did when setting up Immich for my wife was to use Google TakeOut to download about 60GB of photos from her Google account. Then I uploaded all of them into Immich. I found that it took about 15 minutes for Immich to fully digest about 1000 photos, which included its facial recognition. This also seemed to line up with the maximum number of files that the upload selection window could handle, which is more of a UI issue than anything else. So it did take some hours of going back and uploading the next batch of 1000 every 15 minutes or so. During those 15 minutes, the Immich server was running at about 90% CPU use, so I was too chicken to try to upload another batch of 1000 before it was done.
That was the only time I’ve noticed any impact of the server power on user experience.
After Installing Frigate
I have recently installed a Frigate NVR virtual server processing two cameras outside my house. I’m going to be adding a video doorbell to the load on this server. I added a Coral TPU to the node it’s running on to assist with some of the object detection and recognition that it does. Additionally, I installed Frigate on the only node that I had that has an internal SATA drive, and that’s an HDD, not an SSD. I assume that the HDD was idle and not consuming much of any power prior to configuring Frigate to use it as storage for its recordings.
This was the one application that I was a little concerned about with servers this low powered. However, it turns out not to be a problem.
I now see my entire cluster running at about 20% CPU, with the node hosting Frigate running at about 50% most of the time. Memory usage on both the cluster and the Frigate node is averaging about 50%.
More than anything else, my UPS is now reporting around 100W consumption most of the time. That’s an increase of around 20W, which I assume can be attributed to the increased CPU usage and the HDD drive constantly spinning now.
I’m not noticing any peformance degredation in any of my services. I do however occasionally hear some fan noise coming from that node, that I never heard before. Otherwise, these servers are virtually silent.
Conclusion
It’s been about 9 months since I bought these servers, and I’ve been constantly adding more and more services to my homelab throughout that time. At no point in time have I encountered any application where they weren’t up to the task. These servers are now doing real work all day, and have replaced a bunch of services that I used to have outsourced in the cloud.
That being said, I don’t think that these units are going to be a good fit for hosting my own AI services, which is something I think I’ll probably be looking to do at some point in the future. But even then I would probably keep my existing cluster and add on something specifically for AI processing.
The one thing that they simply won’t work for, due to the single 1Gb ethernet port, is as a firewall. You need two ethernet adaptors for that. So, for a firewall I implemented an HP T740. It’s very similar to the M910Q’s, but a little bit bigger, has an AMD processor and comes with a PCI slot with a riser card. This means that I was able to add a 2 port ethernet card to it.
If you are just starting out with self-hosting, I think these are an amazing place to begin. You can get a single server for less than $200, even with today’s RAM prices, and it will do whatever you need. Add a second or third, and you have a real data centre with all the possiblities of redundancy that you get along with that.
For myself, I’m really pleased at how these servers have worked out. I had the goal of building out my homelab over time and within our monthly discretionaly budget. The low cost of these servers has meant that I have been able to do this and I don’t feel that I’ve sacrificed anything with this approach.
