Introduction
For a number of years now, we’ve been using our Google Home/Nest devices to stream music around the entire house. It’s good when it works, but we’ve found that the music will intermittently just stop playing for no apparent reason. This is guaranteed to happen several times a day. I’ve seen that others have reported the same problem.
We play a station from the SomaFM streaming service called “Groove Salad” pretty much all day long. It’s ambient electronic music which is a good background to day-to-day living for us. Just as you would expect, we don’t like every single song that they play, but some we like a lot, and most just fade into the background.
Google does a pretty good job of synchronizing the various devices, so if you do find yourself in a spot where you can hear two of them, it doesn’t sound like a weird echo. I’ve even created a custom command to start the music in the group that we’ved defined for the whole-house music.
That turns out to be worthwhile, because it stops so often.
Additionally, there was a time in early 2024 when our audio chromecast device stopped working for a while. It turns out that the security certificate that they set up for in on Google’s servers expired after 10 years. It took a few days for them to sort that out, but the incident showed how dependent we were on Google’s infrastructure and ongoing support for the devices we were using. It’s not like Google has never suddenly cut support for a product before, either.
I wanted some way to stream the music with the same high quality synchronization without using Google. I also didn’t want to trade Google for a lock-in on some other proprietary solution like Sonos. I was hoping to find something that was open source, and would work with a variety of hardware.
It turns out that there is a software option out there called “SnapCast” that will do exactly this.
Part One of a Series
I started out writing this as a single article, but it quickly became a monster that Jekyll said would take over half an hour to read. I found myself reluctant to break things down into more sections or to add more information because it was so long already.
I realize that breaking it up into parts doesn’t make it any shorter, but it does make it a little less daunting to read.
In this part you’ll find an introduction to SnapCast, and then instructions for setting up and testing a SnapCast server of your own. In Part II, we’ll look at setting up Raspberry Pi Zero’s to act as SnapCast clients, and then in the last part we’ll look at setting up Mopidy to stream music and how to connect it to SnapCast.
Let’s get started…
Snapcast
I cannot do better than the description from the Snapcast GitHub page:
Snapcast is a multiroom client-server audio player, where all clients are time synchronized with the server to play perfectly synced audio. It’s not a standalone player, but an extension that turns your existing audio player into a Sonos-like multiroom solution.
Audio is captured by the server and routed to the connected clients. Several players can feed audio to the server in parallel and clients can be grouped to play the same audio stream.
There’s also a diagram which shows how Snapcast works:
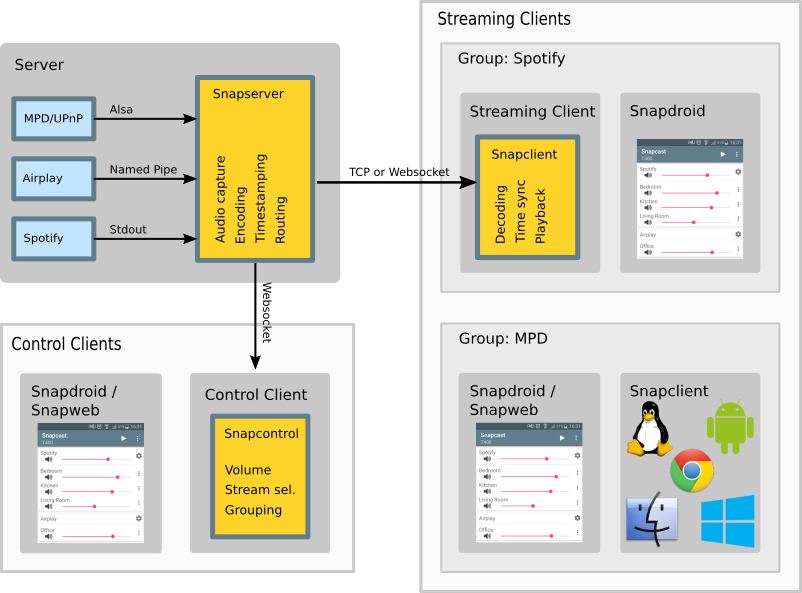
To sum it up: You set up a server with some sort of music playing software, then install the Snapcast server software and configure it such that it takes its input from the output of the music playing software. Then you set up Snapcast clients, and configure them to connect to the Snapcast server. After that, you can stream the music from the music player software on the server to all of the Snapclast clients and they will be synchronized.
In terms of audio quality, I find it to be excellent. I think the concept of “whole-home audio”, by definition, isn’t expected to be audiophile quality. It’s designed to be background noise. But I’ve found this setup to go far beyond that basic requirement.
Snapcast Server
As this article is part of a series about setting up a Homelab using Proxmox, this is the approach I will be describing.
The requirements for the Snapcast server are fairly light, so a standard LXC container running Debian is more than sufficient. I’m running it with 1 CPU and 512MB of RAM and it’s usage is averaging about 1.5% of CPU and about 128MB of RAM. That’s on a Lenovo M910Q with an i5-6500T processor, which is not particularly high powered.
It’s perfectly possible that you could run this a Raspberry Pi of some sort, or anything else you have lying around. The instructions would be largely the same, as long as you’re running Linux.
Snapcast Clients
The Snapcast client software will run on Linux, Windows, Android, IOS, and MacOS - pretty much any computing device you might have.
The big caveat is that to be of any use, the device needs to be able to play sound in a way that you can hear it. This is also going to mean that the device will need to have some way to convert the digital stream into audio output. This conversion is handled by something called a “DAC”, or “Digital to Analog Converter”. Some devices have them built in, but may also benefit from using a dedicated DAC device of some sort. The output from a DAC will be in a form that is compatible with headphones or an amplifier of some sort.
Since it runs Linux, a RaspberryPi is an excellent, low-cost, Snapcast client, and this is what I’m going to talk about in this article. Specifically, I’m going to use RaspberryPi Zeros.
You can also re-purpose an old android phone or an old iPhone to be a SnapCast client. It should probably have a headphone jack, though, as using Bluetooth to communicate with the speakers will have its own lag. It does seem possible, however, to compensate for that in the setup of the SnapCast client. I’m not sure how consistent the lag from Bluetooth is, though, so you’d need to experiment to see if it works.
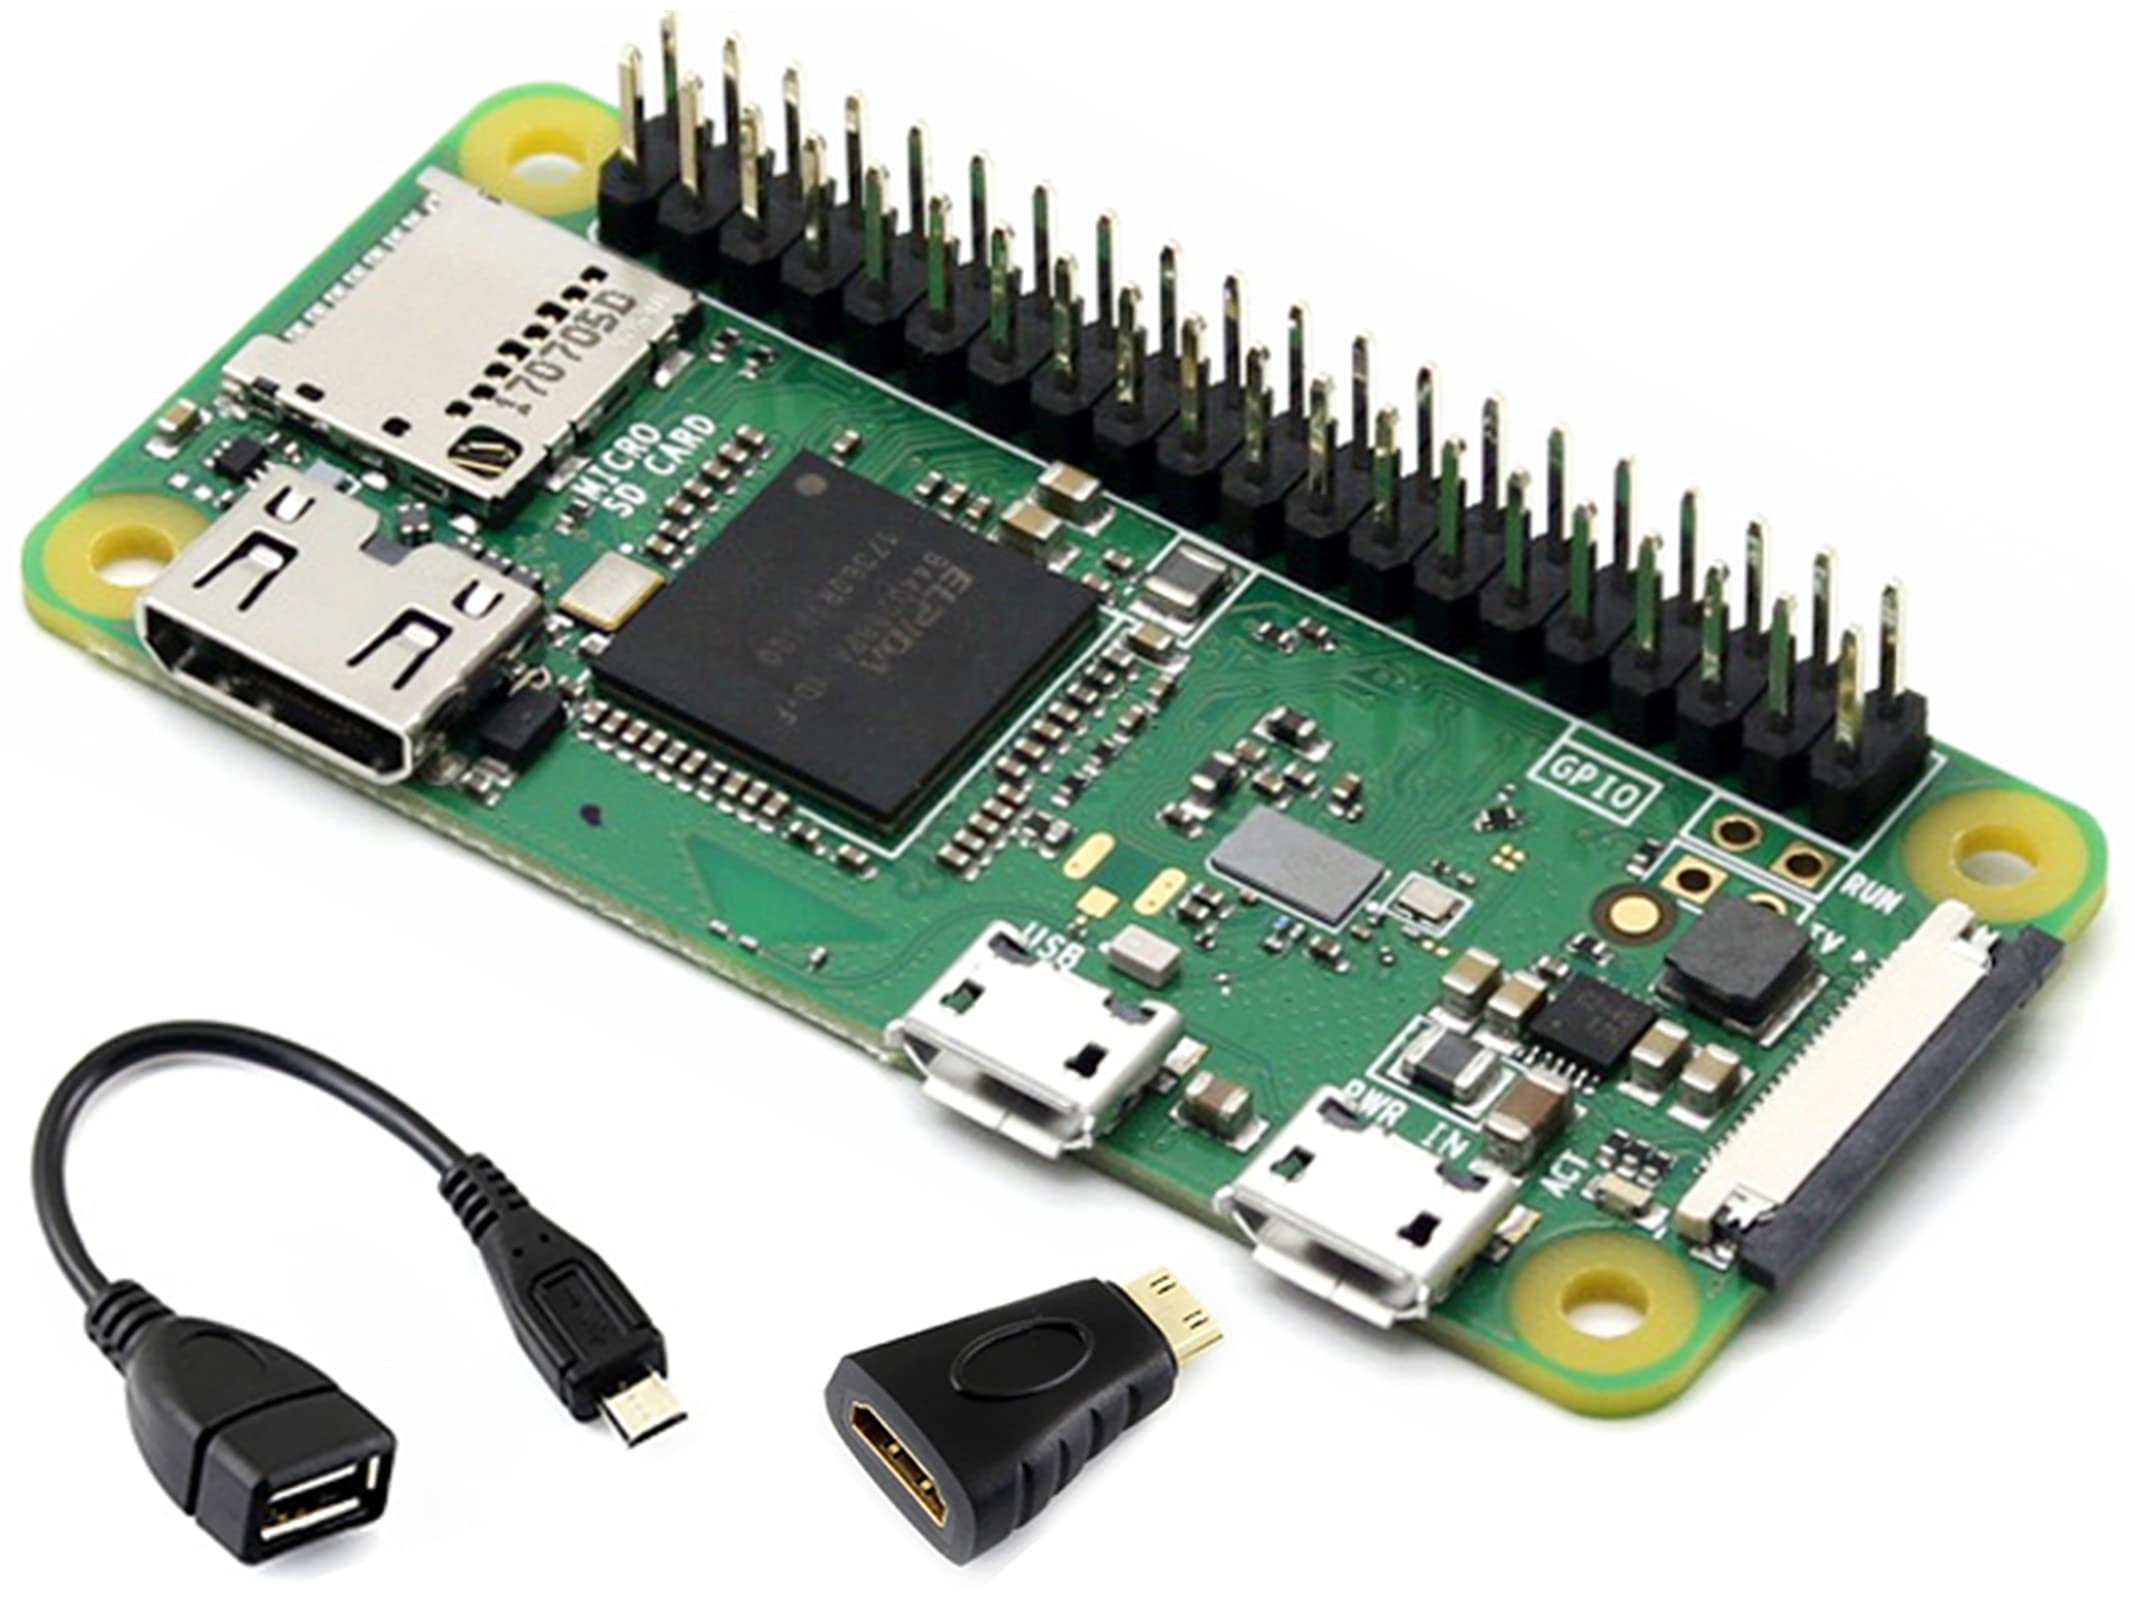
RaspberryPi Zero
The RaspberryPi Zero (Pi0) is tiny, super cheap (around $20), has built-in WiFi and is easy to get. They don’t, however, have any built-in audio output. In order to use them for this application, you’ll need to use a external DAC. I recommend getting one that works with the header pins on the Pi0.
They look like this:
Apparently HiFiBerry makes a great DAC designed to work with the Pi0. Unfortunately, I wasn’t able to find any place to buy them, my usual sources have had them listed as “Out of Stock” for months, and even the HiFiBerry website doesn’t list them as available. However, there was another brand “Pimoroni” that also make a Pi0 DAC. So I went with that.
You can see the listing for the Pimoroni Audio DAC SHIM here on PiShop.ca. When I checked to add the link, I see that it is currently sold out. Even on the Pimoroni site, it’s listed as sold out. I’m not sure if this is going to be a long-term issue.
This is what it looks like:
![]()
You just shove it down on the GPIO header and it works. No soldering. It’s a great design.
If you cannot get one of these, then you’ll have to source out another DAC board. There are others, but they are generally a bit more expensive, and a bit bigger, too. HiFiBerry makes a variety of them that also do not require soldering. They seem to be in stock, too. My impression is that if you use a HiFiBerry DAC, the setup instructions will be the same as for the Pimoroni SHIM.
Update: I received notification from PiShop.ca that the HiFiBerry DAC is now in stock. Too late for me, but it’s a option you might want to consider.
Mopidy
You can use any music playing software that makes sense to you. Snapcast is capable of taking its input from a variety of pipelines, so as long as your music playing software is capable of feeding data into one of those, you’re good to go.
The concensus for homelabs seems to be “Modpidy”. Mopidy can take its source from a number of different places, and there are a variety of plugins that you can install to expand this list. This includes services like Spotify, Tidal, JellyFin, TuneIn and YouTube. It also has an extension for SomaFM, which is what I was looking for. Additionally, it can play local files natively.
The terminology in situations like this gets a little bit confusing. We are going to talk about Mopidy installed as a service on the server, but it acts as a client to the external streaming services.
Additionally, Mopidy has a number of API’s available, including a web services API. This means that create home-brewed control scripts or programs to automate aspects of Mopidy. This also means that a number of web clients have been built and are available to install. You’re going to need one of these if you want to control your Mopidy server in an ad-hoc fashion.
Installation and Configuration
I spun up a Debian 13 LXC in Proxmox to be both my SnapCast and Mopidy host. I didn’t see any reason to split these out into two containers because I view them as two sides of the same coin, and having them run in the same container makes things a bit easier.
As my Proxmox cluster is sitting in the basement and none of the hosts have any audio equipment attached, I couldn’t see any point in installing Mopidy first, as it would be difficult to test it. So I chose to install SnapServer first and test it with some white noise.
A Quick Note About IP Addresses and Hostnames
In my homelab I have OPNSense providing the DHCP service for the whole network, and I have a Technitium DNS server. My usual process is to create any new servers or devices as DHCP clients. Then I check the “leases” page in OPNSense, find the device and set it as a static address. Then I go into the DNS server and add an entry for it with that address. This gives me centralized control over the addressing and naming without having to reconfigure the individual servers and devices.
I’m not going to mention this at all in the rest of these instructions. You’ll have to take some steps to ensure that you have all of the devices configured the way that you want them in this respect using whatever process you have adopted.
SnapCast Server
I just created a new LXC with Debian 13 and logged into it on the console. If you use apt to install snapserver, you’ll get version 0.31, which is a bit old.
At the time of writing this article, the next version of SnapCast has been released, version 0.35.0. My instructions are going to continue to use version 0.34.0, which is about 6 months older. Once again, you should be able to use the newer version without any other changes to the process. I’d be careful to make sure that both the SnapCast server and the clients are all using the same version.
Download the package from the project on GitHub:
wget https://github.com/snapcast/snapcast/releases/download/v0.34.0/snapserver_0.34.0-1_amd64_trixie.deb
and then use dkpg to install it:
# dpkg -i snapserver_0.34.0-1_amd64_trixie.deb
Selecting previously unselected package snapserver.
(Reading database ... 20235 files and directories currently installed.)
Preparing to unpack snapserver_0.34.0-1_amd64_trixie.deb ...
Unpacking snapserver (0.34.0-1) ...
Setting up snapserver (0.34.0-1) ...
Installing new version of config file /etc/default/snapserver ...
Installing new version of config file /etc/init.d/snapserver ...
Installing new version of config file /etc/snapserver.conf ...
Processing triggers for man-db (2.13.1-1) ...
This handles the setup as a service. You can check it right away:
# systemctl status snapserver -n40
* snapserver.service - Snapcast server
     Loaded: loaded (/usr/lib/systemd/system/snapserver.service; enabled; preset: enabled)
     Active: active (running) since Mon 2026-04-06 17:28:09 UTC; 26s ago
 Invocation: 6c949040b6dc401485092210bfce4ce5
       Docs: man:snapserver(1)
   Main PID: 1386 (snapserver)
      Tasks: 3 (limit: 18886)
     Memory: 2.2M (peak: 2.5M)
        CPU: 83ms
     CGroup: /system.slice/snapserver.service
             `-1386 /usr/bin/snapserver --logging.sink=system --server.datadir=/var/lib/snapserver

Apr 06 17:28:09 testsnap systemd[1]: Started snapserver.service - Snapcast server.
Apr 06 17:28:09 testsnap snapserver[1386]: (Snapserver) Version 0.34.0, revision 0ac55084
Apr 06 17:28:09 testsnap snapserver[1386]: (Snapserver) Stream plugin directory: '"/usr/share/snapserver/plug-ins"', sandbox directory: '"/usr/share/snapserver/>
Apr 06 17:28:09 testsnap snapserver[1386]: (Snapserver) Adding source: pipe:///tmp/snapfifo?name=default
Apr 06 17:28:09 testsnap snapserver[1386]: (Avahi) Adding service 'Snapcast'
Apr 06 17:28:09 testsnap snapserver[1386]: (Snapserver) Using HTTP host name: testsnap
Apr 06 17:28:09 testsnap snapserver[1386]: (PcmStream) PcmStream: default, sampleFormat: 48000:16:2
Apr 06 17:28:09 testsnap snapserver[1386]: (PipeStream) PipeStream mode: create
Apr 06 17:28:09 testsnap snapserver[1386]: (Server) Stream: {"fragment":"","host":"","path":"/tmp/snapfifo","query":{"chunk_ms":"20","codec":"flac","name":"defa>
Apr 06 17:28:09 testsnap snapserver[1386]: (FlacEnc) Init - compression level: 2
Apr 06 17:28:09 testsnap snapserver[1386]: (ControlServer) Creating TCP control acceptor for address: ::, port: 1705
Apr 06 17:28:09 testsnap snapserver[1386]: (ControlServer) Creating HTTP acceptor for address: ::, port: 1780
Apr 06 17:28:09 testsnap snapserver[1386]: (StreamServer) Creating TCP stream acceptor for address: ::, port: 1704
Apr 06 17:28:09 testsnap snapserver[1386]: (Snapserver) Number of threads: 2, hw threads: 1
Apr 06 17:28:09 testsnap snapserver[1386]: (AsioStream) Error reading message: End of file, length: 0, ec: asio.misc:2
Apr 06 17:28:10 testsnap snapserver[1386]: (Avahi) Service 'Snapcast' successfully established.
It’s even enabled! However, it has failed to start. Let’s see why. Look at this line of the output:
Apr 06 17:28:09 testsnap snapserver[1386]: (Snapserver) Adding source: pipe:///tmp/snapfifo?name=default
See how it says “…/tmp/snapfifo…”? That’s going to cause problems.
There’s a new security feature in Debian that locks down fifo files in “sticky” directories like /tmp in order to make spoofing attempts harder. You can disable this by turning off the fs.protected_fifos kernel parameter, but this is probably not a good idea. Instead, move the Snapcast input fifo to somewhere else.
To do this, you’ll need to edit the /etc/snapserver.conf file. It’s big, and has lots of stuff in it, but the section you want to look at is called “[stream]”:
# Stream settings #############################################################
#
[stream]
# address to listen on, can be specified multiple times
# use "0.0.0.0" to bind to any IPv4 address or :: to bind to any IPv6 address
# or "127.0.0.1" or "::1" to bind to localhost IPv4 or IPv6, respectively
# use the address of a specific network interface to just listen to and accept
# connections from that interface
#bind_to_address = ::
# which port the server should listen to
#port = 1704
# source URI of the PCM input stream, can be configured multiple times
# The following notation is used in this paragraph:
# <angle brackets>: the whole expression must be replaced with your specific setting
# [square brackets]: the whole expression is optional and can be left out
# [key=value]: if you leave this option out, "value" will be the default for "key"
#
# Format: TYPE://host/path?name=<name>[&codec=<codec>][&sampleformat=<sampleformat>][&chunk_ms=<chunk ms>][&controlscript=<control script filename>[&controlscriptparams=<control script command line arguments>]]
# parameters have the form "key=value", they are concatenated with an "&" character
# parameter "name" is mandatory for all sources, while codec, sampleformat and chunk_ms are optional
# and will override the default codec, sampleformat or chunk_ms settings
# Available types are:
# pipe: pipe:///<path/to/pipe>?name=<name>[&mode=create], mode can be "create" or "read"
# librespot: librespot:///<path/to/librespot>?name=<name>[&username=<my username>&password=<my password>][&devicename=Snapcast][&bitrate=320][&wd_timeout=7800][&volume=100][&onevent=""][&nomalize=false][&autoplay=false][¶ms=<generic librepsot process arguments>]
# note that you need to have the librespot binary on your machine
# sampleformat will be set to "44100:16:2"
# file: file:///<path/to/PCM/file>?name=<name>
# process: process:///<path/to/process>?name=<name>[&wd_timeout=0][&log_stderr=false][¶ms=<process arguments>]
# airplay: airplay:///<path/to/airplay>?name=<name>[&port=5000]
# note that you need to have the airplay binary on your machine
# sampleformat will be set to "44100:16:2"
# tcp server: tcp://<listen IP, e.g. 127.0.0.1>:<port>?name=<name>[&mode=server]
# tcp client: tcp://<server IP, e.g. 127.0.0.1>:<port>?name=<name>&mode=client
# alsa: alsa:///?name=<name>&device=<alsa device>[&send_silence=false][&idle_threshold=100][&silence_threshold_percent=0.0]
# meta: meta:///<name of source#1>/<name of source#2>/.../<name of source#N>?name=<name>
source = pipe:///tmp/snapfifo?name=default
There’s more in the “[stream]” section, but I stopped at the line we need to change, “source”.
Change it to this:
source = pipe:///var/local/snapserver/snapfifo?name=default
You’ll have to create /var/local/snapserver directory, and set the ownership:
# mkdir /var/local/snapserver
# chown snapserver /var/local/snapserver
# chgrp snapserver /var/local/snapserver
# systemctl start snapserver
# systemctl status snapserver -n40
* snapserver.service - Snapcast server
     Loaded: loaded (/usr/lib/systemd/system/snapserver.service; enabled; preset: enabled)
     Active: active (running) since Mon 2026-04-06 17:36:01 UTC; 40s ago
 Invocation: 022347aa459a41d0b8edb82e4c5eeaf5
       Docs: man:snapserver(1)
   Main PID: 1446 (snapserver)
      Tasks: 3 (limit: 18886)
     Memory: 2.4M (peak: 2.4M)
        CPU: 115ms
     CGroup: /system.slice/snapserver.service
             `-1446 /usr/bin/snapserver --logging.sink=system --server.datadir=/var/lib/snapserver

Apr 06 17:36:01 testsnap systemd[1]: Started snapserver.service - Snapcast server.
Apr 06 17:36:01 testsnap snapserver[1446]: (Snapserver) Version 0.34.0, revision 0ac55084
Apr 06 17:36:01 testsnap snapserver[1446]: (Snapserver) Stream plugin directory: '"/usr/share/snapserver/plug-ins"', sandbox directory: '"/usr/share/snapserver/>
Apr 06 17:36:01 testsnap snapserver[1446]: (Snapserver) Adding source: pipe:///var/local/snapserver/snapfifo?name=default
Apr 06 17:36:01 testsnap snapserver[1446]: (Avahi) Adding service 'Snapcast'
Apr 06 17:36:01 testsnap snapserver[1446]: (Snapserver) Using HTTP host name: testsnap
Apr 06 17:36:01 testsnap snapserver[1446]: (PcmStream) PcmStream: default, sampleFormat: 48000:16:2
Apr 06 17:36:01 testsnap snapserver[1446]: (PipeStream) PipeStream mode: create
Apr 06 17:36:01 testsnap snapserver[1446]: (Server) Stream: {"fragment":"","host":"","path":"/var/local/snapserver/snapfifo","query":{"chunk_ms":"20","codec":"f>
Apr 06 17:36:01 testsnap snapserver[1446]: (FlacEnc) Init - compression level: 2
Apr 06 17:36:01 testsnap snapserver[1446]: (ControlServer) Creating TCP control acceptor for address: ::, port: 1705
Apr 06 17:36:01 testsnap snapserver[1446]: (ControlServer) Creating HTTP acceptor for address: ::, port: 1780
Apr 06 17:36:01 testsnap snapserver[1446]: (StreamServer) Creating TCP stream acceptor for address: ::, port: 1704
Apr 06 17:36:01 testsnap snapserver[1446]: (Snapserver) Number of threads: 2, hw threads: 1
Apr 06 17:36:01 testsnap snapserver[1446]: (AsioStream) Error reading message: End of file, length: 0, ec: asio.misc:2
Apr 06 17:36:02 testsnap snapserver[1446]: (Avahi) Service 'Snapcast' successfully established.
Some online discussions about this have suggested /var/run/snapserver, but I have found that /var/run is cleaned up automatically during system boot and /var/run/snapserver gets deleted. You can automate the creation in the service startup, but /var/local/snapserver seems just fine to me.
Testing
In order to test your SnapCast server, you’ll need some clients. The easiest one comes with the server, and it’s available in a web page.
Snapweb
Open up a browser and go to port 1780 on whatever the address or hostname of your SnapCast server is. You should get a mostly black page with “Snapcast” and a hamburger menu at the top left, and a “Play” button on the top right. Go ahead and click on that “Play” button and you should get this:
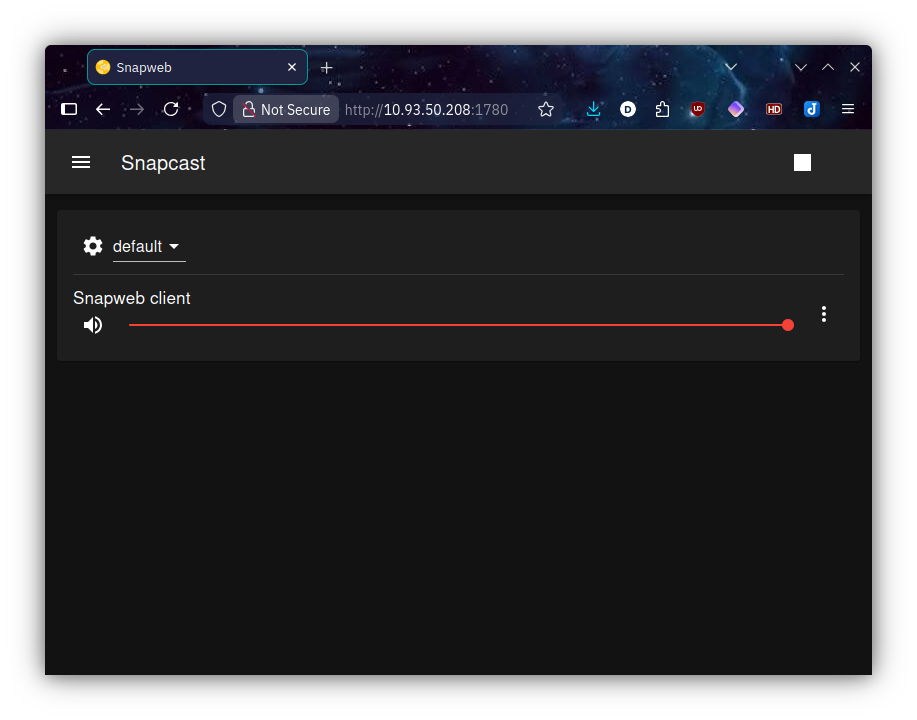
At this point, you would be hearing something if there was anything streaming. Let’s pump some white noise into that fifo file back on the server:
# cat /dev/urandom > /var/local/snapserver/snapfifo
Now you should hear something. If you do, then you have now confirmed that the server setup is correct, and if you have problems going forward, it’s probably not going to be the server, but your client setup.
Conclusion
This wraps up Part I.
At this point, you should have a basic understanding about how SnapCast works, and, if you’ve followed along, you’ll have a working SnapCast server. It’s not a lot of use yet, but we’ll get closer to that in Part II of this series.
Part II continues with the Raspberry Pi SnapCast clients.