Introduction
Domain Name Servers (DNS Servers) are one of the cornerstones of both the Internet, and your own self-hosted infrastructure. In this article we are going to look at what DNS servers do, how they work and integrate with each other, and how to host your own private DNS server for your homelab.
The Absolute Basics - Addresses and Names
When you strip away everything else, every device connected to a TCP/IP network - which is just about everything we deal with here - is uniquely identified with an IP address. There are two versions of IP addresses in use now: IPv4 and IPv6. We aren’t going to talk about IPv6 in this article because it’s a subject all by itself. So, from now on when I refer to IP address, I’m talking about IPv4 addresses.
IPv4 addresses are 32 bits long and divided into 4 octets of 8 bits. So, 4 bytes. They look like 192.168.1.1. Each byte, obviously, can have a value between 0 and 255.
The problem with IP addresses is that are clumsy and hard to remember. They are also absolutely attached to a particular machine - this becomes an important limitation later on.
Finally they don’t have a hierachical structure that maps nicely to the real world relationships behind how the Internet is organized.
To overcome these issues, we use names to refer to devices on the Internet instead, and everybody is walking around with a whole bunch of these device names in their heads. Furthermore, the names are structured in a hierachical manner that lines up nicely with the way that the Interet is actually organized. This structure also makes them easier to remember.
Internet names are divided up into sections separated by . characters. They go from most specific on the left, to least specific on the right. Let’s look at a typical sort of name: server.dmz.organization.com, and see how it is organized.
At the far left is the specific machine, server. It is located inside the domain .dmz.organization.com. Next along is .dmz which is a domain, but it is a subdomain of .organization.com.
If we keep going to the right, we get to .organization, which is a subdomain of .com. And, of course, we have .com which is what is referred to as a “top level domain”. You can think of this as three domains: .dmz.organization.com, .organization.com and .com. Of course, both .dmz.organization.com, and .organization.com are both subdomains of the domains to the right.
Each domain has absolute control over its own contents. This means that whatever body owns/controls the .com domain is the only body allowed to add or remove anything to/from it. In order for .organization.com to exist, the owner of .com had to add it.
In this example, the subdomain .dmz.organization.com looks like it’s simply an administrative division inside of the .organization.com domain. It’s highly likely that the owner of .organization.com created it for the use of .organization.com, and not as a separately administered subdomain. This is quite normal, and any owner of a domain can freely add whatever subdomains to their domain that they want, for whatever purposes.
Domain Name Servers
What we need in order to route traffic to server.dmz.organization.com is a way to turn that name into an IP address. This is where name servers, or DNS Servers (the “DNS” refers to “Domain Name System”), come into play.
In a nutshell, the domain that “owns” a name is responsible for providing the translation for that name into an IP address. In fact, a name on the Internet (or any IP network for that matter) simply doesn’t exist unless it’s discoverable in its domain’s DNS server.
This means that for every domain on any IP network, there has to be a DNS server that can give the IP address for every name in that domain.
Now, if you type http://server.dmz.organization.com into your browser then how does your browser know where the DNS server for .dmz.organization.com is? How does it query it?
The answer is very simple. Each parent domain has to have a an entry in its DNS server that tells everyone where the DNS servers for every single subdomain it holds is.
This means that your browser has to go and query the .com domain to find out the location of the DNS server for .organization.com. Then it has to query that DNS server for the address for server.dmz.organization.com. It might be that .dmz.organization.com has its own DNS server, in which case the query have to continue at that server.
At least that’s the naive view of how it works. In reality, your browser makes a single request to its own local name server and the rest of the work is done by that. Your browser isn’t aware of how the name is resolved, just that it happens.
When the DNS servers talk to each other, the process iterates over and over. Your local DNS server will answer the request if it has the information, otherwise it passes the request on to its upstream DNS server, which then goes through the same process. Eventually, some name server will query .com for the DNS server of organization.com and it will give the answer. At that point the process rolls itself back up, each name server passing back the answer until it eventually gets back to your browser.
[Caveat: This is a good way to conceptialize how DNS servers communicate, meaning that it provides a working model that explains the behaviours that you see and the things that you need to do in order to properly configure a DNS server. Under the hood, this may not match up with how modern DNS servers actually go about doing what they do.]
There was a critical component in this description: “DNS server will answer the request if it has the information”. How can it have the answer if it isn’t the DNS server for the domain specified?
The truth is that going through this entire process for every single request would be an incredibly wasteful approach. In reality, DNS servers cache the results that they’ve looked up for a period of time. DNS entries, for the most part, don’t change very often so it’s safe to store them for a while. In fact, every DNS entry includes a “Time to Live” (TTL) value. This is the number of seconds for which the answer can be assumed to be valid. DNS caches will respond immediately with values that haven’t yet reached their TTL.
This means that a DNS server can return two types of values:
- Authoritative
-
This is when the DNS server that responded to the request is the designated DNS server for the domain that was queried.
- Non-Authoritiative
-
This is when the DNS server that responded to the request is NOT the desginated DNS server for the domain that was queried.
I’m only defining this because we’ll need to understand this a little when we talk about setting up a DNS server. In real life, you rarely care whether or not an answer was authoritative. In those cases that you do, it’s because something went wrong.
Two Uses for DNS Servers
From the section above you can see that DNS servers have two direct uses.
- To act as an agent to look up names from around the Internet.
- To act as the authoritative definition of the contents of a domain.
When you are setting up a homelab, you’re going to want your DNS server to act as both.
What Information is in a DNS Server?
The contents of a DNS server are organized into “zones”. Just about every DNS server you’ll encounter will contain multiple zones. Back in the old days, before we had GUI’s to manage the DNS servers, we used to configure them by creating “Zone Files” which were just text files in a particular format that the DNS server could parse. Dinosaurs like me still refer to the contents of a zone as a “Zone File” even though they aren’t really used any more. Saying, “Put it in the zone file”, is just a susinct way of refering to the process of configuring a zone in a DNS server.
All records in a zone file have at least these three elements:
- Type
- Name
- Value
Generally, DNS lookups are done by specifying the type and and the name. It is possible, even common, to do searches for just a name, and accept any type of records that are returned. It’s also possible to do searches for just type, for instance if you are looking for MX records to find the email servers for a domain.
What kind of entries might you find in a zone file?
- SOA - Start of Authority
-
This entry specifies the authoritive information about the zone. The name of the record is the name of the zone, but you’ll usually see it listed as
@. The value is structured, and amongst other things will tell you the name of the primary nameserver for the domain. - A - Address
-
This is your bread and butter entry. The entry has a name, and the value is an IP address.
- CNAME - Redirection
-
The most common use you’ll find for these is when you want to use multiple names for the same address, but you don’t want to have to update multiple entries if that address changes. A CNAME entry has a name of its own, and then returns the name of another entry that it shares an address with. An important point here is that if a DNS lookup encounters a CNAME, then it will continue on but now doing a lookup for the value in the CNAME record.
- TXT - Text
-
TXT entries are generic informational entries that don’t have any defined purpose in the DNS system. Lot’s of proprietary systems use them to store publicly visible information that they need for their processes.
- MX - Mail Exchange
-
These entries tell the internet where the email servers for your domain are located. These can be either IP addresses or names that can be looked up via DNS searches.
- NS - Name Server
-
Like
SOAthese have a name of@, and they contain the names of authoritative DNS servers for the domain. There can (should) be more than one for each domain. - PTR - Pointer
-
PTRrecords are a bit likeCNAMErecords, but they won’t cause DNS lookups to carry on looking up the new value. You are going to see these used in “reverse lookups” more often than not. A reverse lookup uses DNS to locate the name of an entry from its IP address. Most DNS server software will facilitate the creation of reverse lookup zones for this purpose.
You may encounter other types (there are lots more), but for a homelab these are the ones you’re most likely to care about.
Managing Your Own DNS Server
Unless you want to remember a bunch of IP addresses - which means you’re never going to be able to expose your services to the non-technical people in your family - you’re going to need your own name server. At a minimum, you need to be able to assign names to the servers in your network.
You have choices. If you are running on OPNSense firewall, you can use one of the services it hosts to run your DNS. Or you can spin up a container in Proxmox and run one of the popular DNS servers.
Lots of people seem to come into DNS through PiHole or AdGuard without even realizing that are running a DNS server.
Personally, I prefer Technitium’s DNS server. It’s easy to install and configure, supports all the ad blocking you could ever want and has a bunch of advanced features that you’ll probably want to use sooner or later. The GUI interface is awesome and intuitive and the whole thing just works without any hitches.
That’s what I’m going to talk about here.
Installing Technitium
I installed Technitium from the Promox Community Scripts, and I think that’s the probably the easiest way to get it up and running.
The Script page is here. If you go there, you’ll see that the script creates an LXC guest, and defaults to using a single CPU core with 512MB of RAM. It’s fairly light-weight, as you would expect.
In the “INSTALL” section, there’s a bash command that will download the script and run it for you. You copy that command (there’s a little copy icon right at the end of the command), and then paste it into the shell of your Promox node. It will then walk you through a series of questions that will determine how the LXC is configured.
The first question asked by the scripts is whether you want to just use the “Default” or “Advanced” installation (at least those are the first two options). I always pick the “Advanced” because there are a couple of networking options that I want to customize, and I don’t remember seeing them the very first time I ever installed anything using “Default”. I also pick the “Verbose” output so that I can at least see that progress is still happening as the install runs, and I’m not sitting there staring at an unchanging screen wondering if it has got stuck or not. Other than that, I usually just accept all of the default values as they come up.
When it’s done, it will tell you the address and port to log into the DNS Server’s administrative GUI. Plug that into your browser and, after you’ve logged in, you’ll see a screen that looks like this:
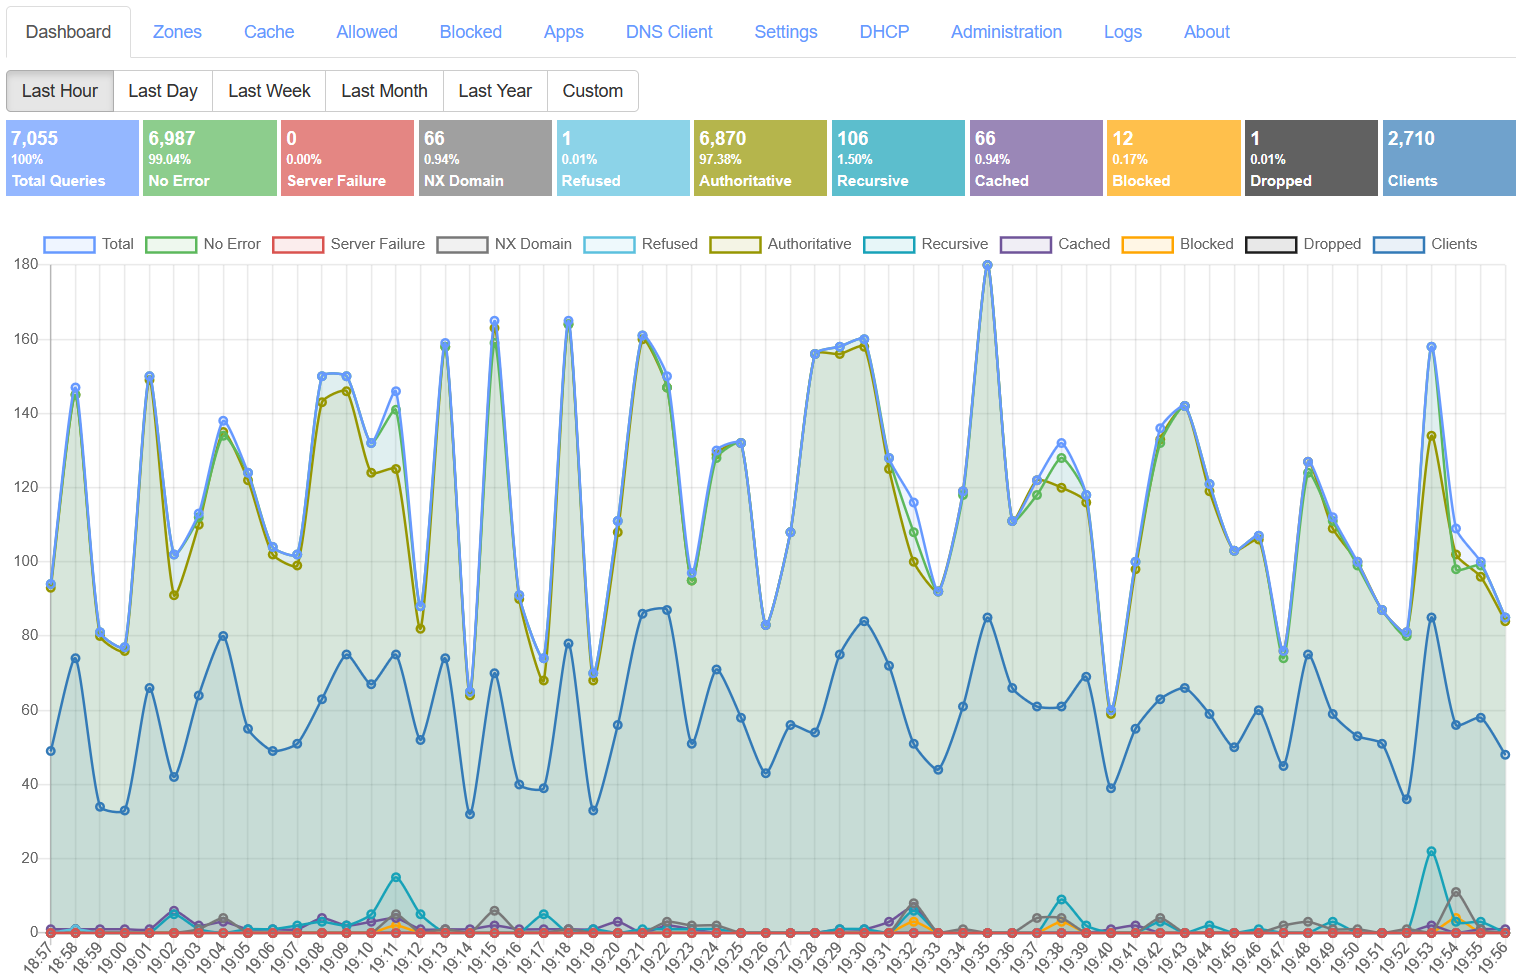
The “Menu” is actually just the tabs across the top of the page.
Upstream Lookups
In order to use your DNS server, you’ll need to make it the primary DNS server for your network. Obviously, systems on your network will need to query this DNS server if they are going to be able to lookup names on your network.
But once you do this, then all of the searches from your network are going to go through this DNS server. Even the ones for names in other domains out there in the Internet. So before you can do this, you’ll need to tell Technitium how you want it forward your requests for lookups outside your domain.
To set this up, go to Settings –> Proxy & Forwarders and scroll down to the second section. You’ll see something like this:
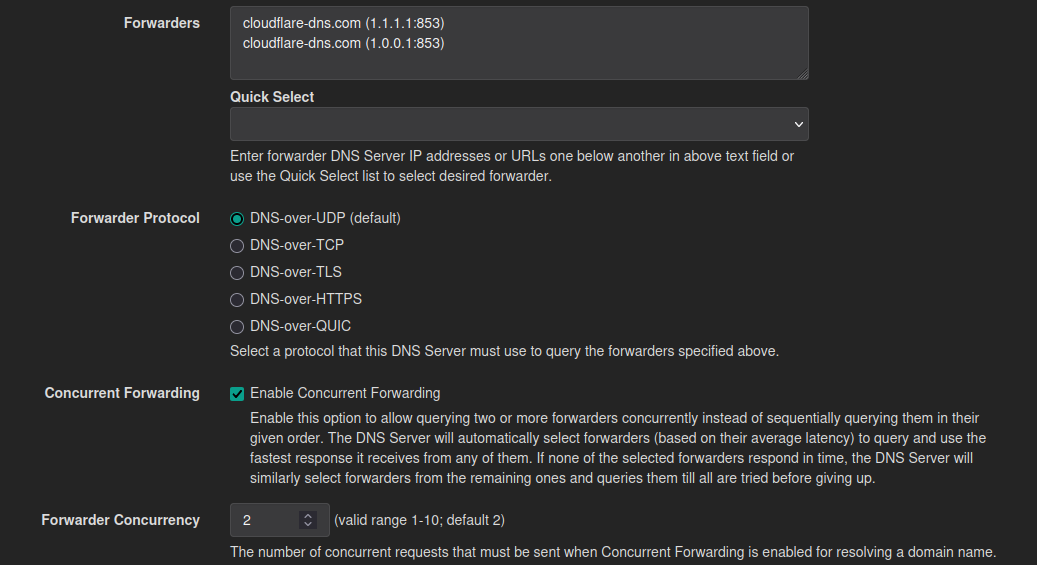
Technitium has a reasonable selection of commonly used public DNS servers that you can quickly select. You can, of course, put in the addresses or names of any other DNS servers that you would like to use, including the ones from your ISP - if you really want to do that. You should pick at least 2 from at least two different providers.
The “Save” button is at the bottom of the page. Now you can move on to creating a zone.
Creating a Zone
Before we get into this, I strongly recommend that you keep your domain flat with a single zone. Unless you’re running some kind of complex organization with mulitple sub-units that need to independently assign names without worrying about collisions with names in other sub-units, you’ll just be making your life more complicated than you need to if you start adding subdomains and zones.
So stick to one zone, and come up with a naming scheme that avoids collisions in that one zone.
From the main Dashboard screen pick the “Zones” tab, and then at the top left you’ll see a button called “Add Zone”. Click it, and you’ll get a screen that looks like this:
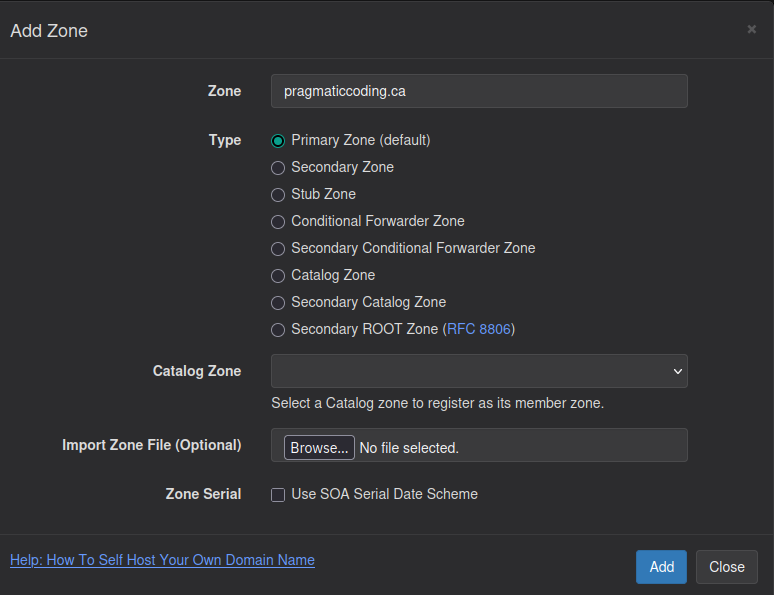
For internal purposes, you don’t have to have a properly registered domain to set up a DNS server. You can call this zone anything you want, but be aware that if you replicate some properly registered domain name then you won’t be able to access that external domain from inside your network. That being said, having an actual registered domain with an public, external DNS server is a good idea.
For now, just pick “Primary Zone”. If you do have a registered domain that you also want to use for internal purposes (I would recommend this), then you’ll eventually want to change it to “Conditional Forwarder Zone” (see the section below).
That’s all you need to do. The “Catalog Zone” area is for configuring a failover if you have more than 1 Technitium DNS server in your network. It’s a good idea to do this, but beyond the scope of this discussion.
One last point. If you click on the link: “Help: How To Self Host Your Own Domain Name” it will take you to an article about how to host a public DNS server for your registered domain. That is not what we are doing here, so that article is not relevant.
Adding Entries
Once you’ve clicked “Add” on the previous screen, you’ll end up with a page that looks like this:
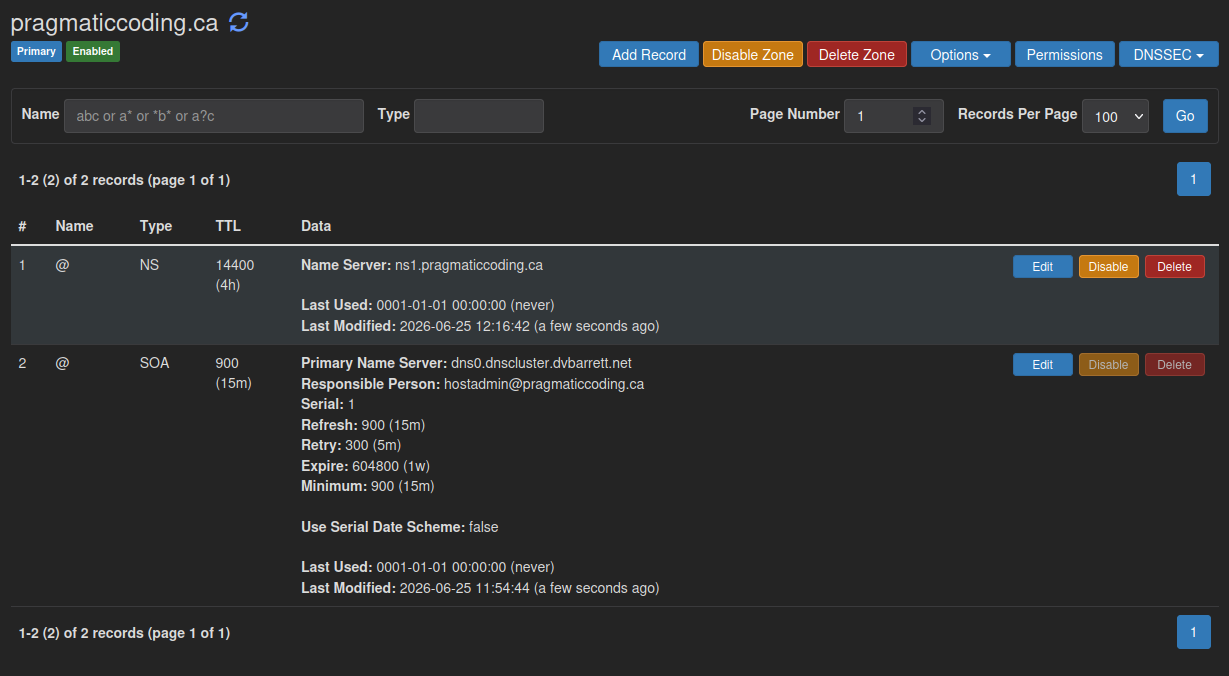
For free, you get an SOA record and an NS record that points to your Technitium server. For internal purposes, neither of these two records is particularly important. The default values in the SOA will work just fine, and you’ll probably be publishing this server via its IP address with either DHCP, or the static info you set up in all of your devices. So the NS record will never be used in real life.
Now you can add your first address. Click on “Add Record”:
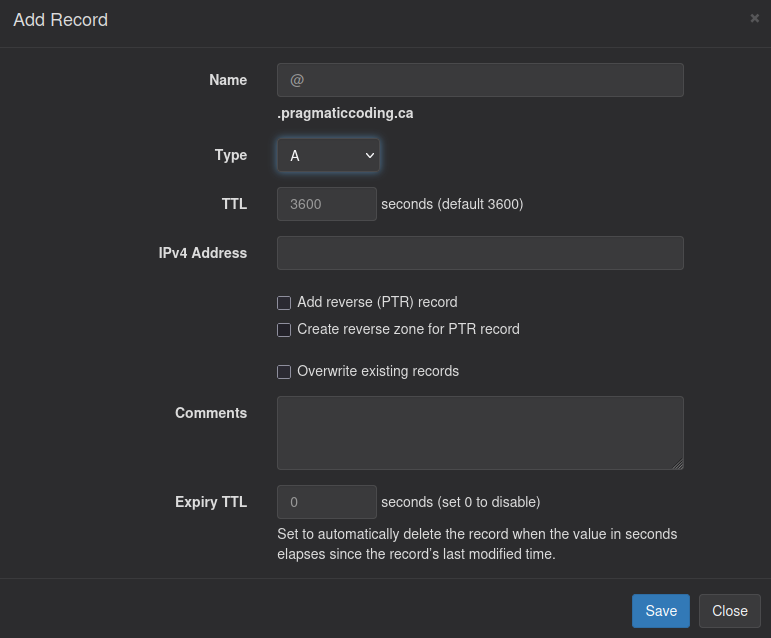
Make sure that “Type” says “A”. Fill in the name that you want to add…
Ok, naming stuff is hard. It’s probably the single hardest aspect of programming, and it’s only slightly less hard with network administration. Things to keep in mind:
- Names need to be memorable
-
This is the point of using names. Trust me, you don’t want to be surfing over to your DNS server to see what you called something every time you want to open it in a browser.
- Names need to be specific
-
It’s probably not obvious now, but you are going to find that you have servers and you have services. While each service is hosted by a server, they are not the same thing. And sometimes you’ll have several services hosted by the same server. When you start out naming things in your network, you are probably going to be defining servers, not services. So name your servers as servers.
- Names need to follow a scheme
-
This because you will forget the names. But, if you follow a scheme, then you can probably figure out the name you want by re-applying the scheme. A bit of a pain, but still easier than looking it up in the Technitium GUI.
- Names need to be a short as possible
-
Address bars are small, and typing stuff into a phone browser is always painful.
- Names need to be consistent
-
Compose your names the same way each time. If you have 3 Proxmox backup servers then name them
pb1,pb2andpb3, orpb0,pb1andpb2(if you are a programmer). Or name themfirstpb,secondpbandthirdpbif you hate yourself. Then if you decide to add more name servers, use the exact same convention. Don’t call themns_1,ns_2andns_3if you usedpb1,pb2andpb3. And don’t call themns1,ns2andns3if you usedpb0,pb1andpb2. You get the idea. - Names can be hard to change
-
Just try and change a name after you’ve used it on 4 people’s phone apps, referenced it for an API call on 3 different servers, and imbedded it into your smart TV. Eventually you’ll have to do this, and then you’ll wish you listened to me. Try to get your naming scheme figured out at the beginning, so you’re not changing names over and over.
You’ll have to trust me. These things are important. Also, remember that you can use CNAME entries if you want shortcut names for particular servers or services. You can also use them to help transition through changes to your naming scheme.
Moving on with this screen: I wouldn’t mess with the TTL unless you are planning to change the address as part of a setup process or something. In that case, set it really low, like 30, so that your workstation won’t cache the lookups and cause grief. Once you do settle in on a final address, change the TTL back to 3600.
The “Add reverse (PTR) record”, and the “Create reverse zone for PTR record”, are potentially useful. IFF the address is unique to the name, then just click these two boxes on. This will cause Technitium to create a reverse lookup entry (and potentially the zone to put it in) which will let you find the name from the IP address.
When you need this, you need this. And it costs almost nothing.
If you’ve got 5 names that all point to the same address, then you’ll only want to check off these two boxes when you create what you would consider to be the “primary” name for that address.
I find it useful to put something in comments. At least explain what the name is in plain English. Is it a server or a service? Also, if it’s a service and it has a particular port that you need to use to access it, I’d put it in the comments. It saves having to look through you browser history, or checking the GitHub pages for the project to find how to access the service.
That’s click “Save”. Rinse and repeat for all of the other names you want to create in your network.
Conditional Forwarding
This is a bit advanced in concept, but easy in practice.
There are lots of good reasons for registering your domain name, and using a publicly accessible DNS server for that domain. For instance, you’ve set up your email so that you can have your own email addresses in that domain. Something like fred@myfamily.org. In order to be able to receive email for that domain, other mail servers need to be able to find the MX records for myfamily.org. And that means you’ll be using some DNS service for you domain out there in the Internet somewhere, something like CloudFlare.
But now you’ve just set up an authoritative DNS server for myfamily.org inside your home network. Nobody outside your network can see it or use it, which is good. But anybody inside your network will never see entries that are in that CloudFlare DNS server. And that can be a problem.
What you want is for your local, private DNS server to answer any lookup for myfamily.org from its own records if it can, and if that lookup fails, then to forward the request out to the Internet and let the CloudFlare DNS server answer it.
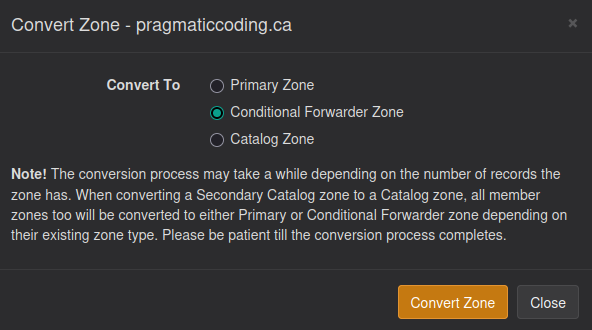
This is called “Conditional Forwarding”, and it’s pretty powerful and easy to set up. All you have to do is to change the type of your zone from “Primary” to “Conditional Forwarding”.
Go into your zone, and at the top of the screen will be a button called “Options” with triangle, click it and you’ll get a drop-down meun. Select “Convert Zone” and you’ll get a screen like this:
 ]
]
Make sure that “Conditional Forwarder Zone” is selected and click on “Convert Zone”. All done.
Ad Blocking
If you’re not coming from the PiHole/Adguard world, you may wonder how a DNS server can block ads.
Nobody embeds actual IP addresses in anything, not even for ads. If you look at the source for any web page that has ads, you’ll see URL’s for the ad content buried in the source. Things like https:\\clickme.spammersrus.org\adcontent8873923. You browser has to perform a lookup to find the address for clickme.spammersrus.org, in order to then connect to that server and download the ad content.
But what if your DNS server refused to return a result for clickme.spammersrus.org?
That’s exactly how DNS ad blocking works. The DNS server has a list of servers or domains that it knows are used for ad content, and it simply won’t resolve them. For anyone. This means that the ad content is completely blocked from you network. Not just browsers, but apps on any phone on your WiFi. No more ads at the bottom of your Sudoku app. No more ads baked into any servers that you host. None.
And since everybody hates ads, there are lots of people and organizations out there who compile and update lists of all of the sites known to serve up ad content. And you can tell Technitium which lists you want to use.
Setting up ad blocking in Technitium is really easy. In the “Settings” tab there is a sub-tab called “Blocking”. It’s all there.
The first check boxes turn it on.
Then next allows you to disable it temporarily, and allow you to specify some address that you’ll exempt from the blocking. Maybe you’ve gotten one of those “Please disable your ad blocker” pop-ups that blocks the content and you really want to see that content? Not for me, but this is how you would temporarily turn off the ad blocking.
“Blocking Type”, tells Technitium how to respond when it blocks an address. I just stick with the NXDOMAIN response, which seems to work well.
Then we get to the the lists and list management. There are quite a few lists pre-loaded into Technitium, but if you want to you can links to whatever lists you can find. You’ll also notice that these won’t just block ads, but will also block content of various types. For instance, you can get lists with gambling sites, adult content, or malicious content.
The best recommendations are to start off with a limited amount of blocking and see how it works. Some lists are much more aggressive than others, and will include sites that might block content that you actually want to let through. If you are finding that this is happening, then shift to a less aggressive list. If too much is still getting through, then add more lists or switch to more aggressive lists.
One other thing: You can also use an upstream public DNS that also does some of this filtering and blocking as well. I’ve used some of these with my Android phone, and they do work quite well. But Technitium does a good job in this regard, so I don’t use them for my network.
Encrypted Lookups
Obviously, all of your traffic goes out through your ISP to the Internet, and this includes your DNS lookups. It’s highly likely that your ISP is analyzing your DNS lookups in order to monetize them through ad revenue. At least this is the accepted belief.
Technitium makes it trivial to encrypt your DNS queries via DNS-over-TLS, so just do it. The one caveat is that not all upstream DNS servers support DNS-over-TLS. However, CloudFlare, Google and Quad9 all support it, so this shouldn’t be an issue.
Also, remember that there’s no point encrypting DNS queries to your ISP’s DNS servers since they can always see what’s going on at the DNS server end.
To turn it on, go back to this screen:
And click on “DNS-over-TLS”. Make sure that the forwarders that you have selected support this protocol.
Conclusion
Although DNS servers are the backbone of so much of the Internet, and they can do some really, really complicated stuff, setting up your own DNS server for you homelab is fairly easy.
Realistically speaking, this should probably be the first server that you set up on your homelab. For one, it’s very straight-forward and just works. This makes it a good learning experience and will introduce you to a lot of homelab concepts. On top of that, you’re going to want to start using names right away, so you’ll need a DNS server to do that.