Introduction
Hex Maps, or hex boards are a popular platform for tabletop games, especially wargames and Role Playing Games. They are uniquely useful because hexagons fit nicely into a grid and there are 6 directions from each hexagon (or just, “hex”), compared to just 4 with a grid made up of squares.
But for programming, they can be a little confusing, and some of the operations which are easy on a square grid, and easy from a visual perspective on a hexmap, are just that little more complicated to program. For instance, even when painting a grid you need to offset each column of hexes a little bit vertically from the columns beside it. Hexes run in a straight line up and down, but zig-zag when you go across a row.
Fortunately though, the process of getting a hexmap on the screen with JavaFX is relatively simple, and the Reactive nature of JavaFX allows you to divorce the mechanics of the game-play from the visual presentation of the hexmap.
This project is a rough skeleton of an application that puts a hexmap on the screen, and then allows you to modify the hexagons by manipulating data associated with each hexagon.
The Application
This application isn’t really designed to “do” anything. It simply paints the hexmap on the screen from data, provides a “DetailView” to allow the background colour and terrain features of each hex to be modified and then has a small animation that moves a cybertank around on the hexmap to show how game mechanics would interface with the map.
That’s just about enough functionality to give you a good idea of how the whole application hangs together, how different elements of the GUI connect to each other, and how game logic and mechanics can interact with the hexmap from it’s own environment.
In truth, if you wanted to writer your own game, you could do worse than clone this project, strip out all of the parts that don’t fit with your own application and start from what’s left. It’s a pretty solid foundation.
Some of the visual concepts were lifted from the HexTML website, especially the terrain features which had been neatly packaged up into a “Sprite”.
The tank silhouette was created by Stephan Beal, from a set that he made publicly available.
The Map
The temptation here is to treat the map as a graphics drawing exercise and figure out how to draw a bunch of lines on a Canvas that will give the hex grid. Or maybe to draw a lot of hexagonal polygons onto the Canvas.
Yes, you need need to get hexagons on the screen. But rather than treat it as a drawing exercise, treat it as a layout exercise.
In this application, the map is actually made up of a number of hexagonal Regions, each of which is a StackPane. Then CSS is used to add a SVG path to form the hexagonal shape of the StackPane. The map itself is just a Pane, and each of the StackPanes is given an X and Y translation that will put it in the correct spot.
The CSS looks like this:
.hex-tile {
  -fx-shape: "M 300,150 225,280 75,280 0,150 75,20 225,20 z";
  -fx-border-color: -border-colour;
  -fx-border-width: 1px;
}
It doesn’t matter how big the hexagon described in the SVG shape in the CSS actually is, the scaling is going to be set in the program that instantiates and configures the StackPane. Just as long as the hexagon has the correct proportions so that it can be tiled up into columns and rows without having any gaps, then it’s good.
As you can see from the screen snap above, each column slightly overlaps the columns to the left and the right. Use a little bit of geometry and you’ll be able to figure out that each column is 3/4 of the width of a hexagon apart from the next. Then each column is offset vertically by 1/2 the hexagon height from the ones on either side. Creating a grid of hexagons isn’t really that hard, as the absolute position of each hexagon can be calculated mathematically given the column and row location of the hexagon, and their width and height.
Taking this approach means that you’ll have a grid of hexagonal StackPanes with minimal effort. In this project, actually populating the map only takes about 8 lines of code!
With that conquered, the bulk of the application deals with connecting what goes on inside those StackPanes with the game mechanics.
The Application Approach
As usual, Model-View-Controller plus Interactor (MVC-I) seems to be the best way to construct this application.
In this case, though, there are several layers of MVC-I. The application as a whole has an MVC-I structure, and each hex has its own MVC-I structure. Lastly, the DetailView has an MVC-I structure as well.
There are two parts about this which are a little tricky:
Connecting the DetailView and the HexTiles
It would have been really nice to be able to directly connect the elements of the DetailView directly to the elements in the TileModel. The problem is that the entire TileModel needs to be swapped out when a new Tile is clicked on. So this means that Bindings that connect the TileModel to the DetailView need to be severed when another Tile is clicked, but the Binding between the TileModel and the hex elements needs to remain intact. This turned out to be problematic.
Instead, it was easier to think of the DetailView as working like a CellView in a TableView or a ListView. There needs to be a mechanism to move the actual data in and out of the construct.
The approach taken was to create a DetailModel which is dedicated to the DetailView and who’s properties are bound bidirectionally to the value properties of the Nodes in the DetailView. Then the DetailInteractor is given the job of copying data to and fro between the TileModels and the DetailModel at the appropriate times.
Implementing Game Mechanics
All of the game mechanics reside inside the HexMapInteractor. HexMapInteractor has access to the HexMapModel which, in turn, has a list of all of the TileModels. This means that HexMapInteractor can manipulate all of the hexes by making changes to their models.
Here’s the most important point: All of the game mechanics - like keeping track of the score, determining how far apart two units are on the map, who’s turn it is, determining the computer moves - all of those things are outside of the MVC of the GUI. Sure, the score may be displayed on the screen, but it’s the HexMapInteractor’s job to update the HexMapModel to reflect the score at the appropriate time.
What this means is that the code that you write that actually runs the game, while it can access data from the Model and have elements that are triggered from the GUI, is completely separate from the GUI itself.
Have your own idea about how to store the locations of the cybertanks? Go for it. That’s totally up to you. But when the time comes to update the map and move one of the cybertanks, you have to pick a tile and update its model to indicate who’s in it, then clear it out of the model of the tile where it used to be.
Application Notes
I decided to implement the background colours and terrain features as two separate elements, just because it was easy. This means you could have hills on a water background, which wouldn’t make any sense. But there you go.
Let’s look at how these are implemented:
Terrain Features
The terrain features are the little, grey images that can be put into each hex to indicate whether it has trees, or cactus or hills, or whatever. These are in an image known as a “Sprite”. A Sprite is just an image holding a number of smaller images arranged into a row, column or grid. They are generally used for animation, which is done by manipulating a ViewPort onto the image that shows one of the smaller images at a time. Cycling through the smaller images can end up looking like stop-action animation and show a character walking or running, or any other action. The idea is the same no matter what visual framework you are using. It turns out to be easy in JavaFX.
In this case, we’re just using the Sprite as an easy way to save the terrain feature images in a single package that we can access via an index.
Here’s the complete code for the TerrainSprite:
public class TerrainSprite extends ImageView {

    private final ObjectProperty<Integer> imageIndex = new SimpleObjectProperty<>(0);

    public TerrainSprite() {
        initialize();
    }

    private void initialize() {
        Image image = new Image(Objects.requireNonNull(TerrainSprite.class.getResource("/images/sprites-terrains.png")).toExternalForm());
        setImage(image);
        double cellSize = image.getWidth();
        setPreserveRatio(true);
        setOpacity(0.8);
        setViewport(new Rectangle2D(0, 0, cellSize, cellSize));
        imageIndex.addListener(observable -> setViewport(new Rectangle2D(0, cellSize * imageIndex.get(), cellSize, cellSize)));
    }

    public ObjectProperty<Integer> imageIndexProperty() {
        return imageIndex;
    }
}
It boils down to an ImageView with an added ImageIndex Property that will be bound to a property in the TileModel. The InvalidationListener will reset the ViewPort on the ImageView when the index changes. The image itself is just a giant vertical strip of square component images.
This is a nice, easy way to translate a simple Integer into an image, and encapsulate the whole thing an independent class.
Terrain Colours
Generally, there are three ways to maintain the background colour of Region in JavaFX. CSS, inline styling, or using the BackgroundFill class programmatically. In this case, where the colour is going to be changed by the user, CSS styling would probably mean programatically changing the StyleClass, or using PseudoClasses to handle the background. Either of these solutions would become clumsy for a demonstration program. In-line styling could work, but really doesn’t have any advantages over simply writing some code to change the background colour by using BackgroundFill.
This is done via an Enum that has both a label and a colour field. Arguably, this is a breach of the separation between data/model and the View, as the Model should only hold the information that would allow the View to determine how to represent it on the screen. By putting the colour in the Enum, this shifts the determination of the colour out of the View and into the Model.
However, for demonstration purposes, this is a shortcut method that keeps the code as simple as possible.
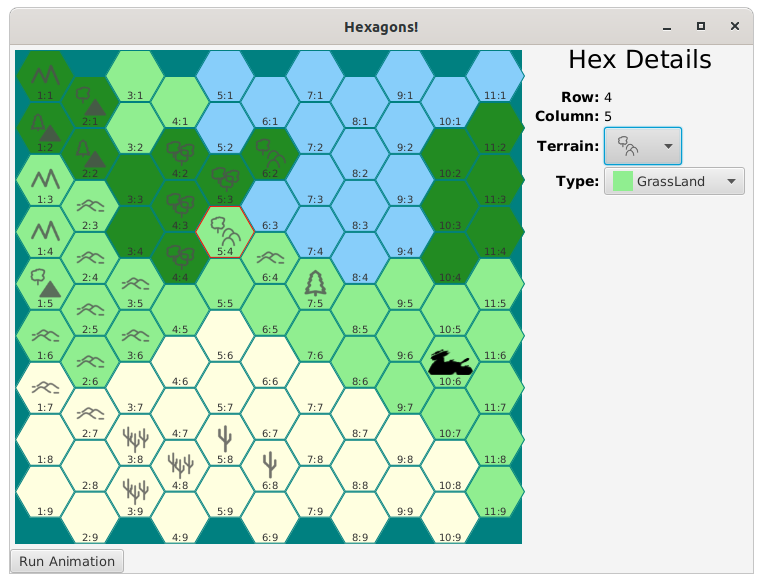
Hex Tile Structure
As previous mentioned, each hex is just a StackPane with a hexagonal shape. It could be any layout class that makes sense to you, a VBOX, a Pane, a BorderPane… anything.
Each hex has three components inside it. A co-ordinate Label, a TerrainSprite, and an occupying unit ImageView. In game terms, this last element is generally referred to as a “counter”, but calling it that in program code would instantly lead to confusion, as “counter” is generally used as an alternative to “index”. So “Occupier” or “OccupyingCounter” became the term, even though it sounds clumsy. Naming things is hard!
Since it’s a StackPane, they are just “stacked” on top of each other in the middle. The coordinate Label is forced down to the bottom of the StackPane, so that it’s always visible, even when there’s a TerrainSprite or Occupier in the hex.
To be honest, it would probably be best to put all of the possible Occupier images into a Sprite, just like TerrainSprite. That would also make it easier to swap out different sets of counters for different game scenarios. However, just to show a different way of doing it, an Enum was used, in much the same way that the background colours were set.
The ComboBoxes
The two ComboBoxes in the DetailView are interesting because they have custom CellViews set up to allow a graphical view of the data.
The colour selection ComboBox has a CellView that has a rectangle with the colour pulled from the TerrainType enum, along with the label from the same enum. Another part that’s not immediately obvious from the JavaDocs is the call to ComboBox.setButtonCell() to display the selected item at the top in the same format.
The terrain element is stored in the TileModel as a simple Integer, and the TerrainComboBox returns just an Integer. It has a custom CellView to turn the integer into an ImageView using TerrainSprite.
Finally, the DetailView has an EventFilter set up on it to capture any ActionEvents that are triggered from inside of it. Both of the ComboBoxes will trigger an ActionEvent when a selection is made, but the there’s no point in having two different EventHandlers, one for each ComboBox, since it’s not significant if both values are applied to the active hex each time.
Scalability
If you look closely at the code, you’ll see that every element on the hexmap itself has it’s size bound (directly or indirectly) to the HexMapModel HexWidth property. If you change the value in this property while the application is running, the size of the map, the hexes and the contents of the hexes will change.
Pulling it All Together
It’s important that all of the components work together, yet remain separate and loosely coupled. To do this, virtually all of the coupling is done through the models. The HexMapModel has a reference to all of the TileModels, as they are held in a List, and it has a reference to the currently “active” tile, held in a Property.
When a hex is clicked, there’s an EventHandler that invokes a Runnable that is passed to the hex from the TileController. That Runnable invokes the accept() method in a Consumer that was passed to it from the HexMapBuilder, which got it from the HexMapController.
That Consumer invokes a method in the HexMapInteractor that updates all of the TileModels, ensuring that the hex that was just clicked is the only one with it’s Selected property set to true. This consumer will also invoke set the HexMapModel ActiveTile property to be the model of the hex that was just clicked.
The DetailController is passed a reference to the HexMapModel ActiveTile property, to which it adds an InvalidationListener. Whenever this listener runs, it updates the DetailModel with the values from the newly activated hex.
In this way all of the hexes are MVC-I constructs that are completely unaware of any of the other elements of the GUI, including all of the other hexes. They each only have coupling through their TileModel and the ClickHandler, both of which are declared as constructor parameters.
In the same way, the DetailView is an MVC-I structure which is unaware of any of the other elements of the GUI. It has a single dependency, which is the ActiveTile property in the HexMapModel, which is also passed to it in its constructor.
This still has a little bit of extra coupling, since the DetailInteractor needs to be aware of the structure of the TileModel in order to move data to and from it. This could be removed by instantiating the DetailModel as an element of the HexMapModel, and passing it to the DetailController along with a Runnable. Then a method in the HexMapInteractor, which can see both the DetailModel and the TileModel of the active hex, could do the data transfers. The cost of this is that the plumbing gets quite a bit more complicated.
Game Mechanics
In order to show how the game mechanics would integrate with the GUI while remaining separate from the GUI, there are two examples provided.
Loading the HexTiles
If you look at how the HexMap is originally created, the HexMapViewBuilder is given the HexMapModel, which has an ObservableList of TileModels in it. The HexMapViewBuilder then loops through this list, creating each hex MVC-I and positioning its View on the screen according to it’s Location. There’s no code anywhere in the HexMapViewBuilder which has nested loops that run through rows and columns.
As a matter of fact, in order to set the dimensions of the containing Pane, HexMapViewBuilder has to stream through the List of TileModels to find the maximum values of row and column in all of the Locations.
Where do the TileModels come from?
The actual layout of the tiles is part of the game mechanics. So there’s code in HexMapInteractor that creates the List of TileModels. In this application, we do just have a pair of nested row and column loops. In an actual game application, however, you’d probably have a configuration file or a database call that would supply a set of tiles with locations and terrain information.
Additionally, in an actual game, your configuration information would probably contain lots of other information about each tile. This might be movement costs, restrictions about which kinds of units can occupy them, attack and defense modifiers – lot’s of information that is important to the game mechanics, but not information that would not be put into the TileModel, as it has no relationship to the display of the hex on the screen.
Just to make the point about the HexMapInteractor actually initializing the data for the load of the screen, there’s an extra step that puts a purple cybertank in one of the TileModels.
Animating a Cybertank
The application needed to reflect how the GUI would interact with the game mechanics when it was running. So there’s a Button on the screen which launches some activity. In this case, moving a cybertank around the board.
The idea here is that there is some amount of game logic that figures out what the cybertank is going to do. That logic runs, and generates some output that needs to be reflected in the GUI. Both of those aspects of the game mechanics are reflected in this application, although it’s extremely simplified to make it easy to follow.
The heart of the process is in the HexMapController, which uses a Task to do the path determination on a background Thread, and then an Event to accept that path and execute it in a JavaFX Animation. Here’s the HexMapController code:
private void animateTank() {
    Task<List<Location>> tankTask = new Task<>() {
        @Override
        protected List<Location> call() {
            return interactor.calculateTankPath();
        }
    };
    tankTask.setOnSucceeded(evt -> interactor.animateTank(tankTask.getValue()));
    Thread tankThread = new Thread(tankTask);
    tankThread.start();
}
And here’s the method in HexMapInteractor that “calculates” the cybertank path. You can see that it’s just a hard-coded list of Locations:
public List<Location> calculateTankPath() {
       return List.of(new Location(5, 10),
               new Location(5, 9),
               new Location(5, 8),
               new Location(6, 7),
               new Location(7, 7),
               new Location(8, 6),
               new Location(9, 6),
               new Location(10, 6)
       );
   }
And now the method that performs the Animation:
private void moveTank(Location newLoc) {
        for (TileModel tileModel : model.getTileModels()) {
            tileModel.setOccupier(CounterType.NONE);
        }
        model.getTileModels().stream()
                .filter(tileModel -> ((tileModel.getLocation().equals(newLoc))))
                .findAny()
                .ifPresent(tileModel -> tileModel.setOccupier(CounterType.CT3));
    }
To make sure that this is clear: That list of Locations for the cybertank path is game mechanics data. It’s organized in a manner that facilitates the running of the game. In an actual game application, there will be all kinds of data that stores information about the location of all of the units in the game, hex details, status of all of the units, the score. Any number of things.
When it comes to showing the information on the GUI there needs to be some process that looks at that game data and translates it into the data models for the GUI.
Conclusion
A quick count of the 21 classes in the project comes up to about 600 lines of code, which seems like a modest amount considering how complete it looks when running. It certainly seems to show that building a hex map based game isn’t really a big challenge from a visual point of view, and not something that should stop you from trying it.