Introduction
It’s 2024, and people are starting to get the idea that you really need to use a build engine like Maven or Gradle with your Java projects. It will handle your dependencies, and do all the organization work that you need with your project.
Fiddling around downloading SDK’s or JDK’s and JavaFX jars and libraries and their JavaDocs is not something you should be spending any time at all on. It’s an absolute waste of time. Time that you could be using to write code. These are things that Gradle and Maven can do for you, and with virtually no effort at all on your part.
However, I still regularly see people having issues with this error:
Error: JavaFX runtime components are missing, and are required to run this application
What this error says is that the Java runtime needs some VM options set to tell it which JavaFX components to load. What this error means is that you’re still not using a build system that will take care of this minutia for you!
Let’s look at how to get started using a build engine with a good IDE to get a project up and running with minimal effort.
Why Intellij IDEA?
Because it just works. It works without fuss or needing a lot of additional setup. Plus it works best with Kotlin, since Kotlin comes from Intellij too.
I started out, more than a decade ago, using NetBeans and then we moved to Eclipse. Eclipse was okay, but back then it was still fairly glitchy and primitive. My team wasted way too much time dealing with Eclipse problems. After a few years, a new hire suggested that we try Intellij IDEA, so we did, and never looked back. Back when I had corporate overlords, the company paid for the “Pro” version license, but now I just use the “Community Edition” since I have to pay my own bills. There’s very little missing in CE. The “duplicate code” finding feature was nice in Pro, especially if you’re struggling to stick to DRY, and it was also nice to have the colours pop up in the CSS editor. But there’s nothing I cannot do without.
Yes, I’d rather use a open-source IDE if I could, and I’m a little disappointed in myself for sticking with a proprietary IDE. But nothing works as well as Intellij IDEA for me. A year or so ago, I looked into getting Eclipse to run Gradle for a project I was working on, and I was instantly transported back to when I was using Eclipse as a daily drive; spending way too much time setting up the tools and not enough time programming.
I had one experience with VSCode, and that was editing this website. My editor of choice, Atom, was abandoned and it looked like VSCode was the best option to replace it. I found it to be nothing less than an annoying nightmare, and my production of new material dropped off to practically zero for months. Then I found Pulsar, a fork of Atom that was new and actively maintained and VSCode is out of my life. If you are using VSCode because you think it’s awesome, or because your school or company says you have to, then you have my pity. If you are using VSCode because you don’t know any better, then go and download Intellij IDEA CE today.
Why Gradle?
I started out with ANT, which does its job but is very mysterious. When it became time to move on the choice was Maven or Gradle. To me, Maven seemed a bit much like ANT in spirit, it’s run with a configuration file (the “POM” file) that’s something like XML. Gradle seemed to me to be the up and coming next generation of build systems, so why bother learning and using the older stuff like Maven? So Gradle it was.
Gradle has its haters, and at least some of the gripes about it are legitimate, in my opinion. What I like about it is that it’s configured via something that feels like code. I’m a programmer, and I like working with code. I don’t like working with XML or YAML or other file formats. So Gradle works for me.
And I never learned much about Maven, since I really never use it. I can read a POM file and get the gist of what it’s doing, and see what libraries it loads, but that’s about it.
Functionally, you can probably do a few more things in Gradle than you can in Maven, but I’m sure that the Maven fans will say that’s rubbish.
Gradle and Intellij IDEA Together
This article is about using Gradle and Intellij together because that’s what I know, and that’s what I use, and that’s what I can tell you about. I think it can work for just about anybody. Both tools are free, and they work together really well.
One of the nice things about Gradle is that it does just about EVERYTHING for you. It will download a JDK for you, whatever version you want. It will download JavaFX for you, any version you want. It will download your libraries for you from Maven Central. It will run your tests. It will configure and run your application for you. It will build your jar files for you. It will even upload your library to Maven Central if you want.
You literally just tell it, “I want this, and I want that, and I want this version of this other thing”, and it sets it all up for you.
And Intellij knows about Gradle and works with Gradle. It shares configuration information with Gradle and gives you options based on your Gradle setup.
Let’s get started by using the Intellij “New Project Wizard”…
Using the Wizard
Intellij has a pretty good wizard for starting a new project that will set up a Gradle project for you with a “Hello World” application. It has some issues, but we’ll look at those and how to fix them. The entire process shouldn’t take more than a few seconds to complete.
You can start up a project in a few seconds, and then test run it to make sure it works, and then you’re good to go. Let’s see how to do this:
From the Menu
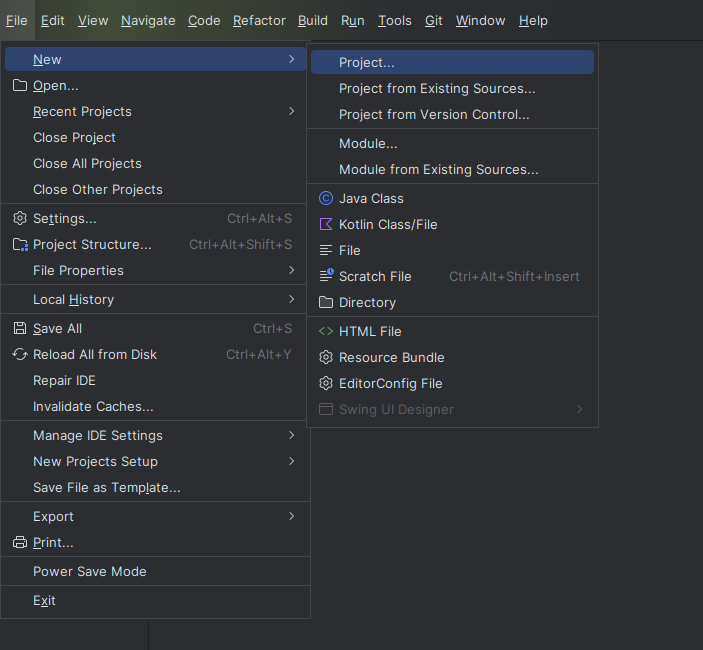
We’re going to start off with the “File” menu in Intellij Idea, select “New” and then “Project…”:
This will bring up the wizard dialogue box, that we’ll use to create the project:
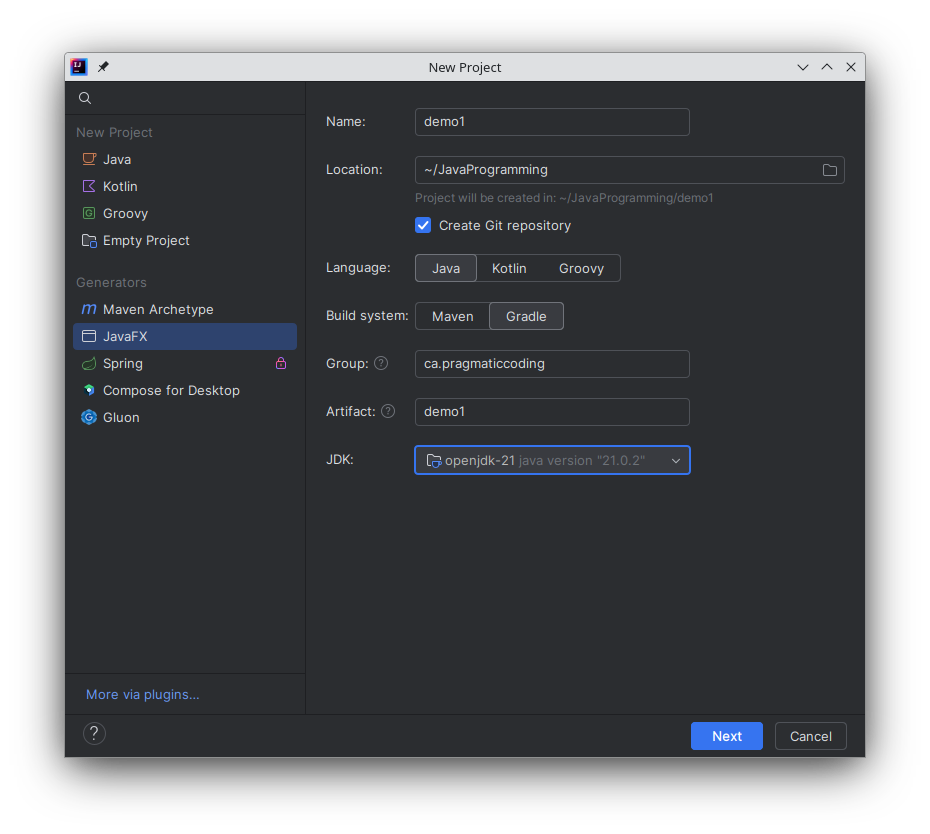
The main things here:
-
Project Type
We’re going to be building a simple JavaFX application, so that’s what has been selected here. If you’re not doing JavaFX, then pick something else, but this article is particularly focused on JavaFX, so that’s what we’ll select. -
Name
Pick a name for your project. You can start with upper or lowercase, it doesn’t matter. -
Location
Generally I like to have all of my projects branching off some directory that makes sense. Not that what you specify here is the parent directory. Intellij will create a new directory for your project as indicated. -
Application Language
Your choice. I usually pick Kotlin, but you’ll probably want Java. Nobody will pick Groovy. -
Build System
Click on “Gradle”. -
Group
This is the starting point for all the packages in your project. Something like “com.example”. This will be put together with “artifact” to create the base package for the application. In this case, it will be “ca.pragmaticcoding.demo1”. -
Select your JDK
My screenshot utility won’t let me capture open combo boxes, unfortunately. Pick the JDK you want to write your application in.
When you click “Next”, for a JavaFX project you’ll get this screen:
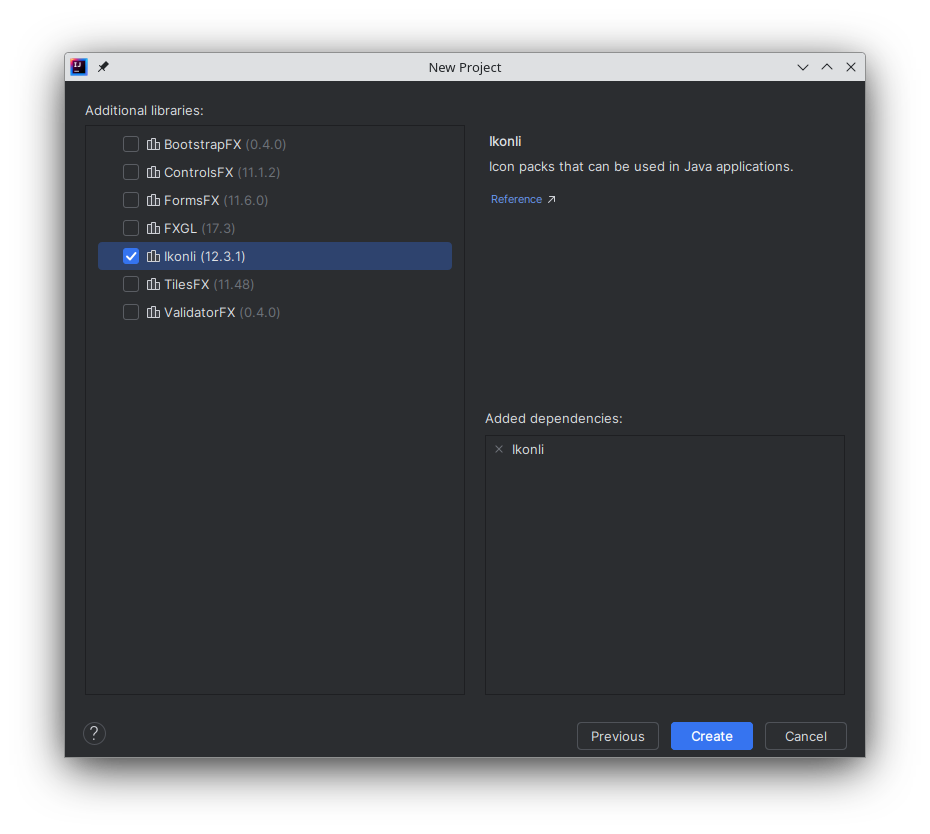
These are a bunch of libraries that are commonly used with JavaFX. I’ve picked Ikonli so that we can see what it will do.
Then click on “Create” and you’ll get the dialogue about where to open your new project:

Working With the New Project
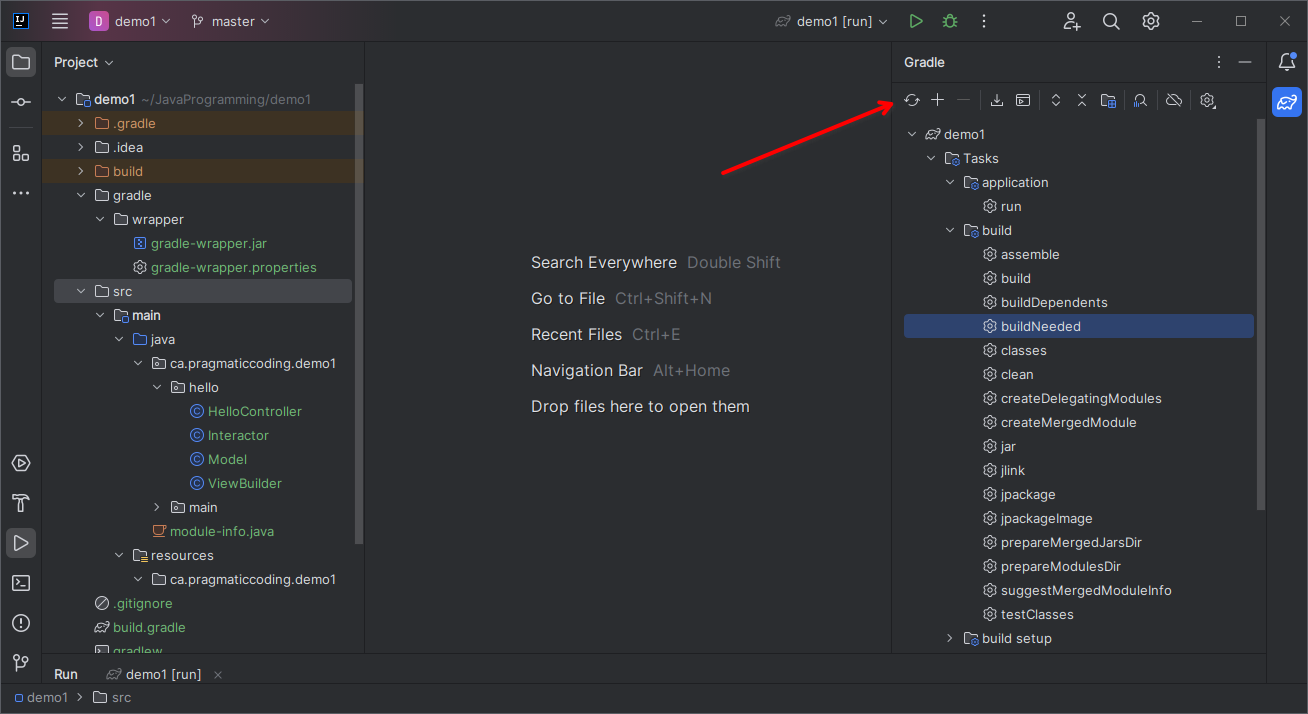
Whatever you pick, you’ll end up with a project screen that looks like this:
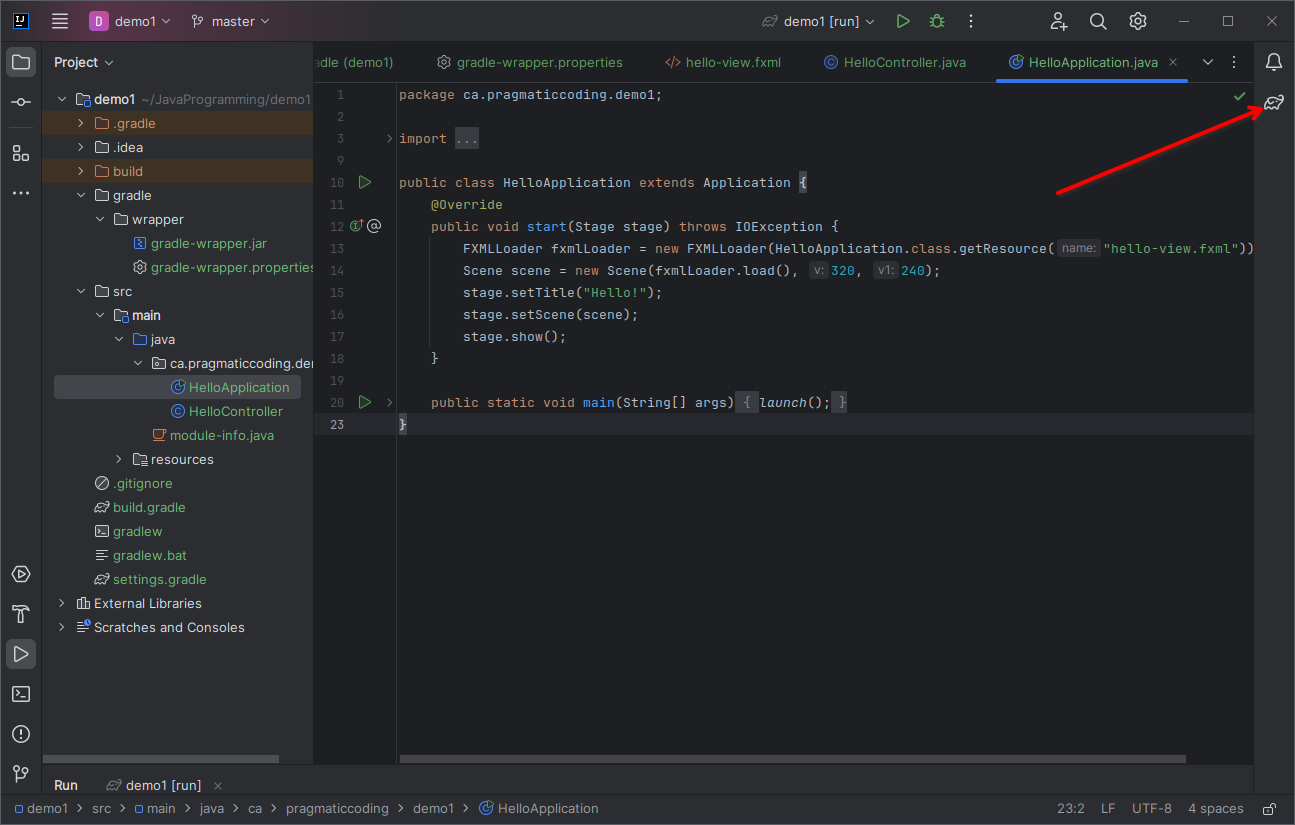
The red arrow is pointing to the most important thing on the screen right now, the Gradle menu icon. Go ahead and click on it:
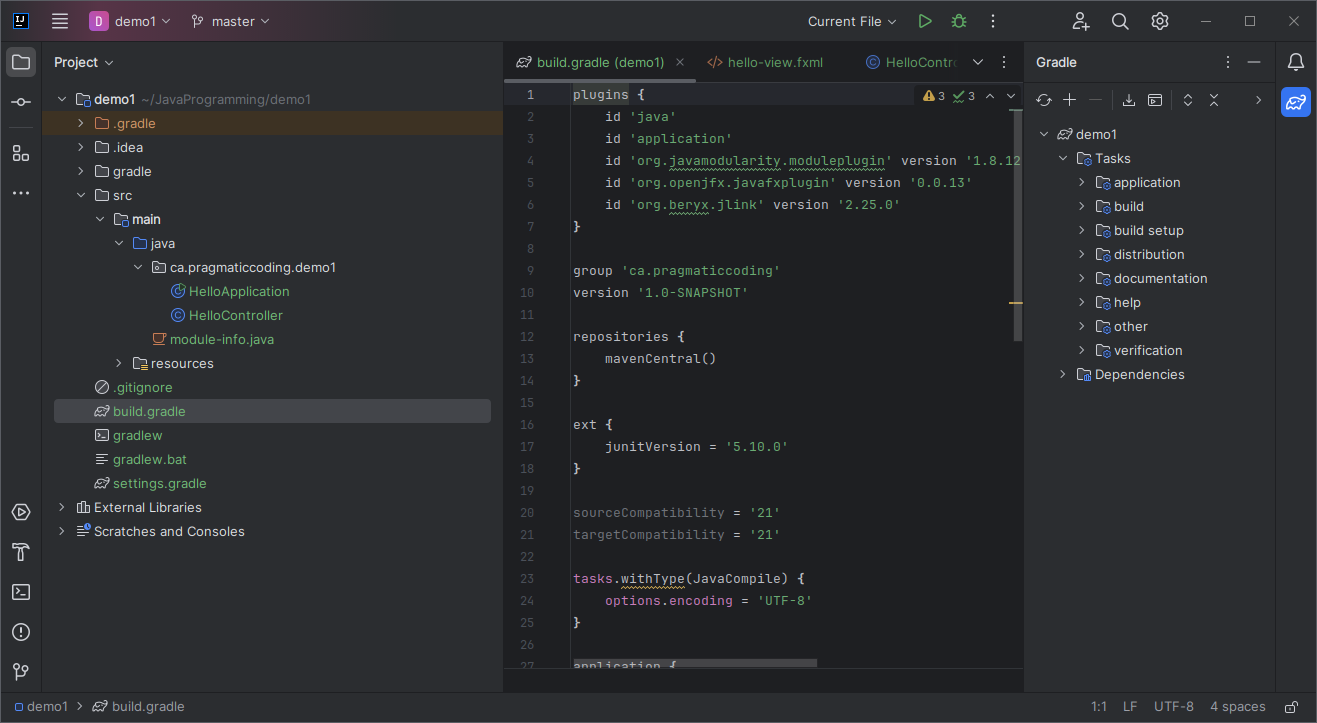
This is the Gradle menu. I’ve expanded the “Tasks” submenu, so that you can see the options. Click on “build” to see the options in the “Build” submenu:

You can go ahead and double click on “build” to run the first build on this project. You should get something like this:
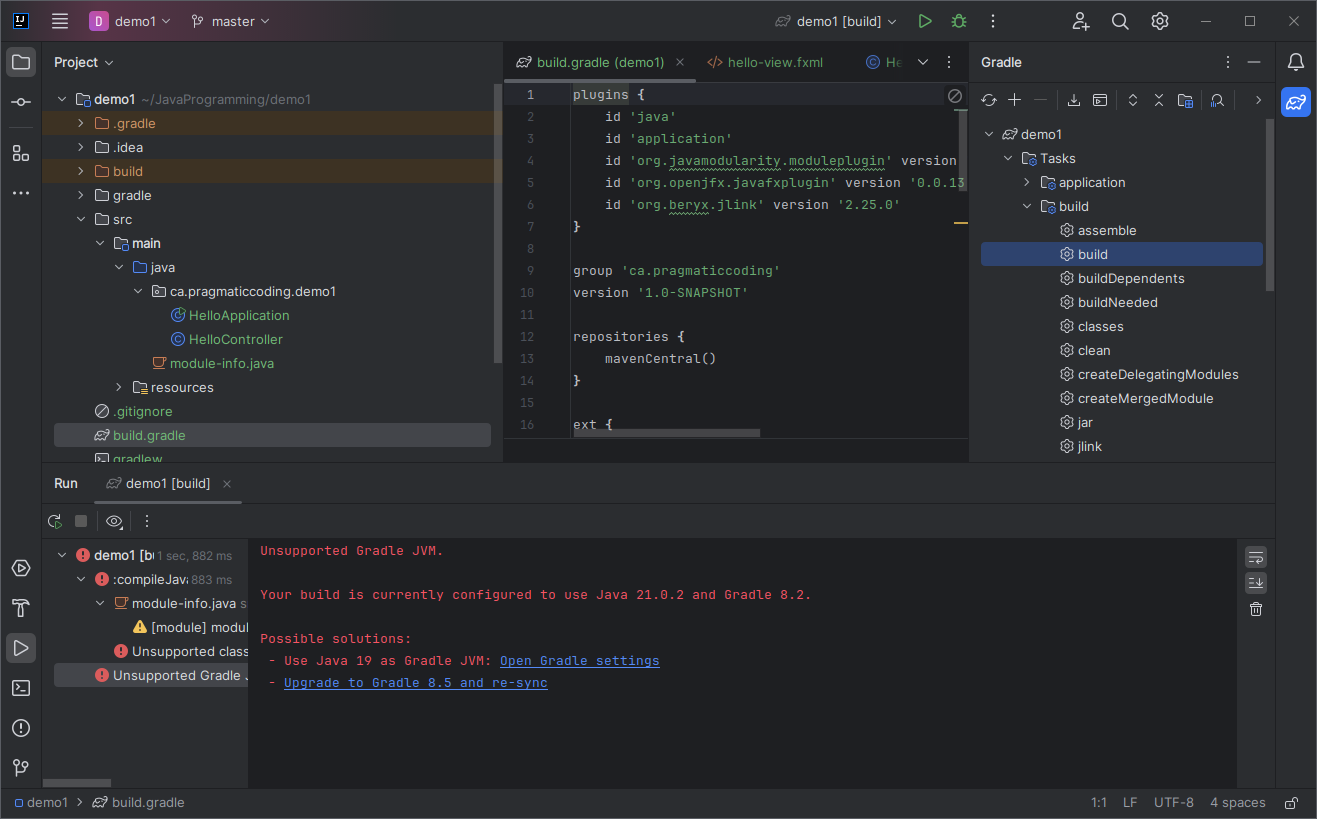
Uh oh! There’s a lot of red, but no build. What’s happening?
Unsupported Gradle JVM
Your build is currently cnfigured to use Java 21.0.2 and Gradle 8.2
This message just means that Gradle 8.2 doesn’t support Java 21. We can either upgrade Gradle, or change to Java 19 or earlier. Let’s change to Gradle 8.5, which does support Java 21.
To do this, we need to edit /gradle/wrapper/gradle-wrapper.properties. From this:
distributionBase=GRADLE_USER_HOME
distributionPath=wrapper/dists
distributionUrl=https\://services.gradle.org/distributions/gradle-8.2-bin.zip
zipStoreBase=GRADLE_USER_HOME
zipStorePath=wrapper/dists
To this:
distributionBase=GRADLE_USER_HOME
distributionPath=wrapper/dists
distributionUrl=https\://services.gradle.org/distributions/gradle-8.5-bin.zip
zipStoreBase=GRADLE_USER_HOME
zipStorePath=wrapper/dists
It’s just a one character change, from gradle-8.2-bin.zip to Gradle-8.5-bin.zip.
One valid gripe against Gradle is that it’s still an evolving tool, and that new versions often “break” older usages. Moving from Gradle 8.2 to 8.5 involves such changes, and there are things that you might see in examples with Gradle 8.2 that won’t run in Gradle 8.5. But for our straight-forward usage here, it’s not going to cause a problem.
Once you change gradle-wrapper.properties your going to see this symbol on your screen:
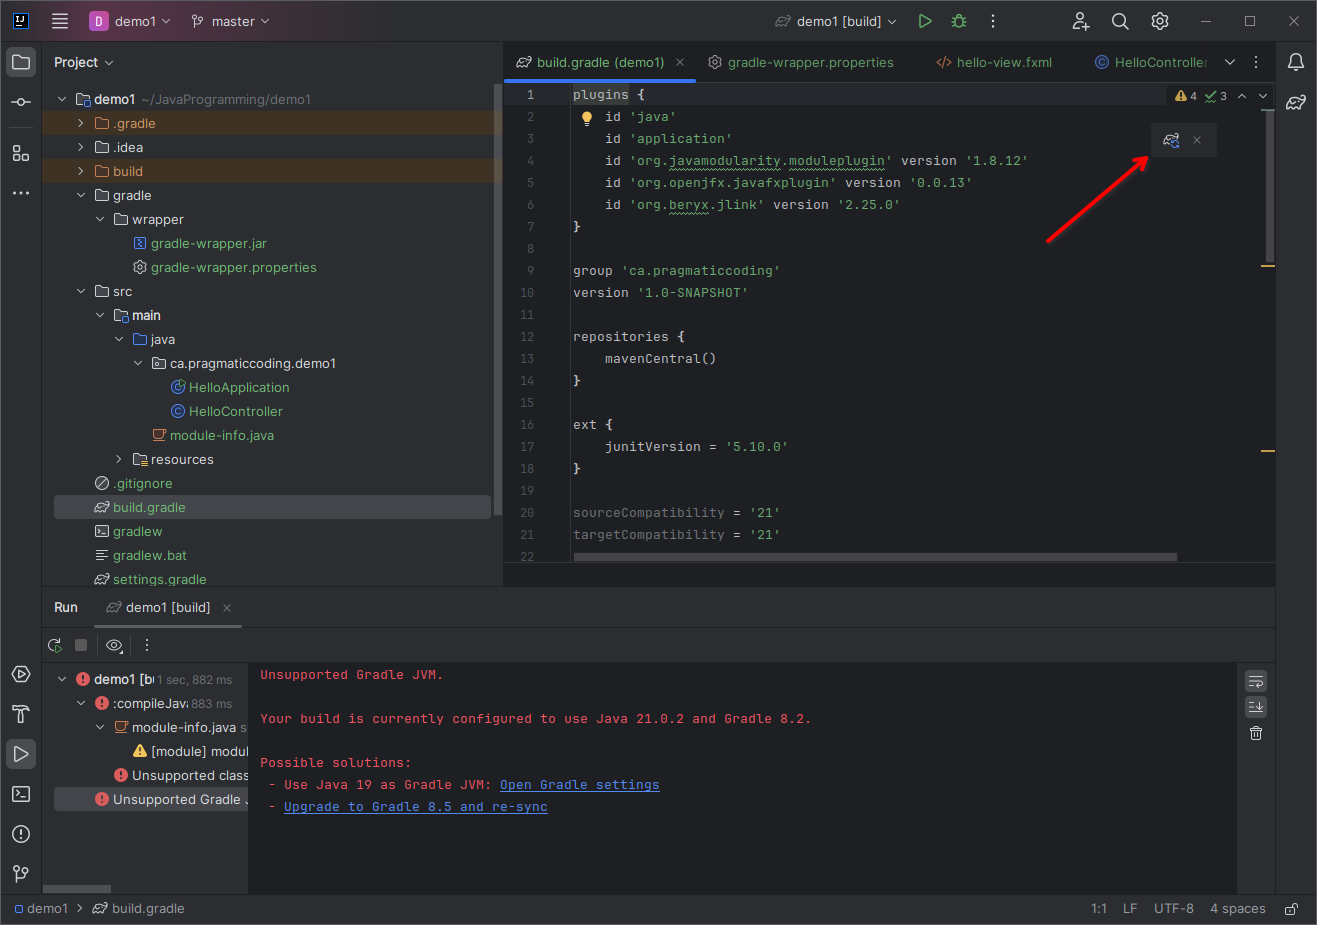
That’s the Gradle elephant logo with a “refresh” circle on it. This means that something has changed in your Gradle setup which requires a rebuild of the Gradle environment. In this case, it’s because we changed the properties file. You should click on that symbol to trigger the rebuild. Then you’ll get this:
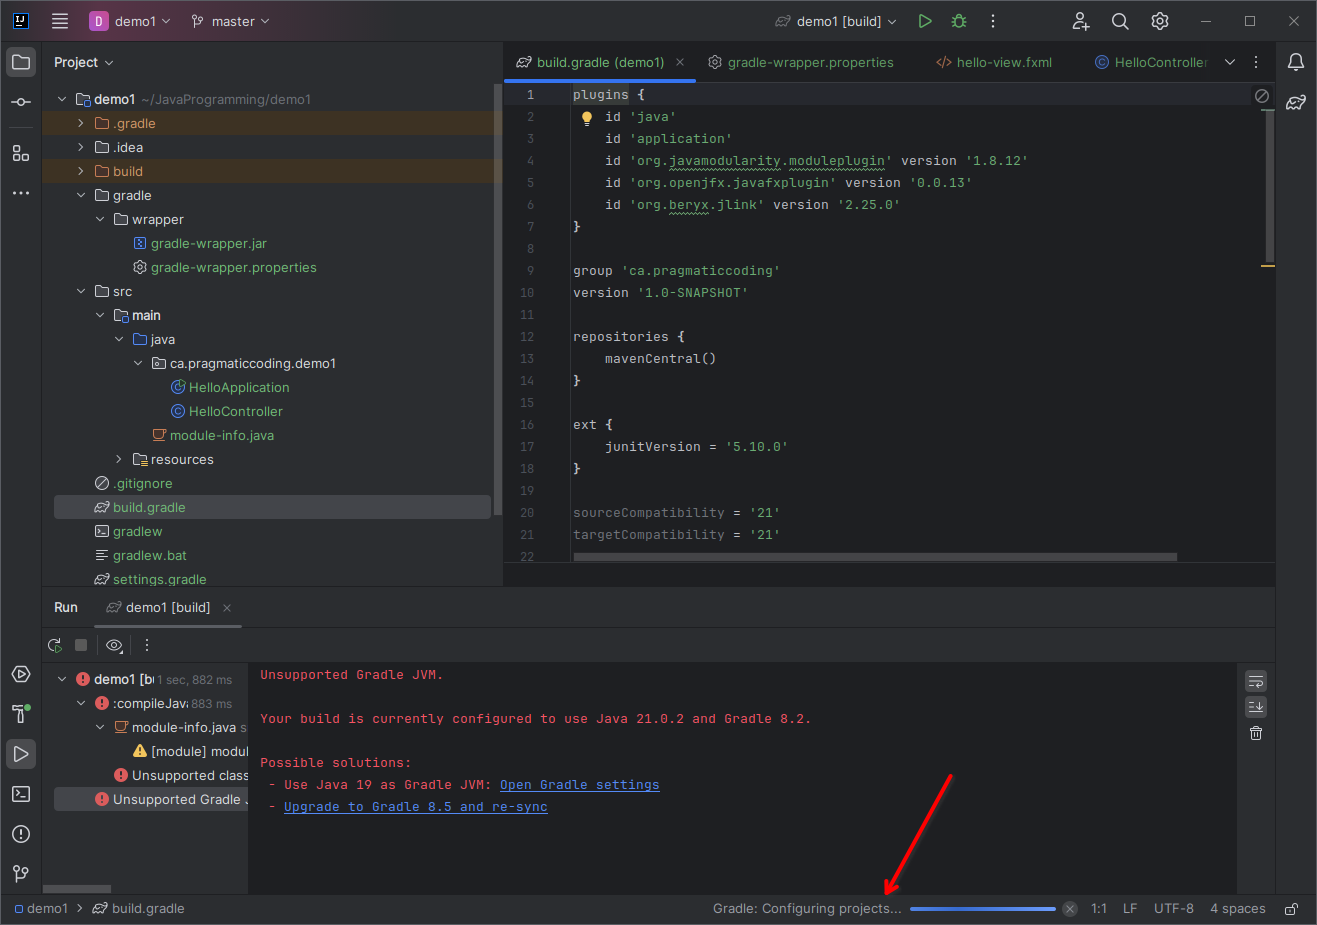
With the progress bar indicating what’s going on. In this case, it needs to download the new Gradle version from the repository, and then load some stuff. You’ll need to wait for it to complete.
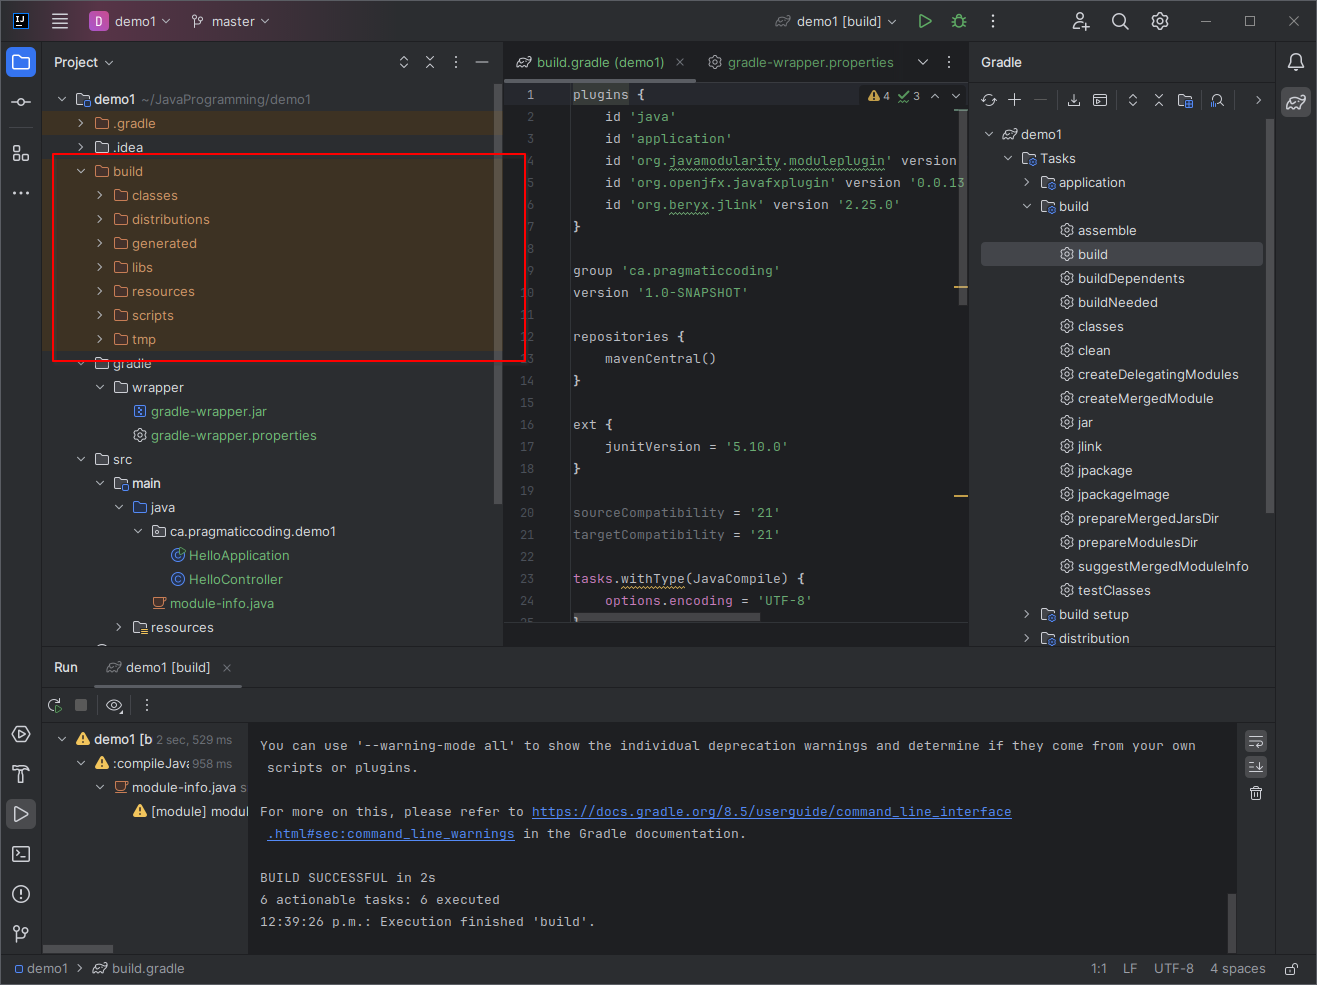
Now we can try the build again. This time it will work, and we’ll get a /build directory in our project that will hold all the classes and other things generated during the build.
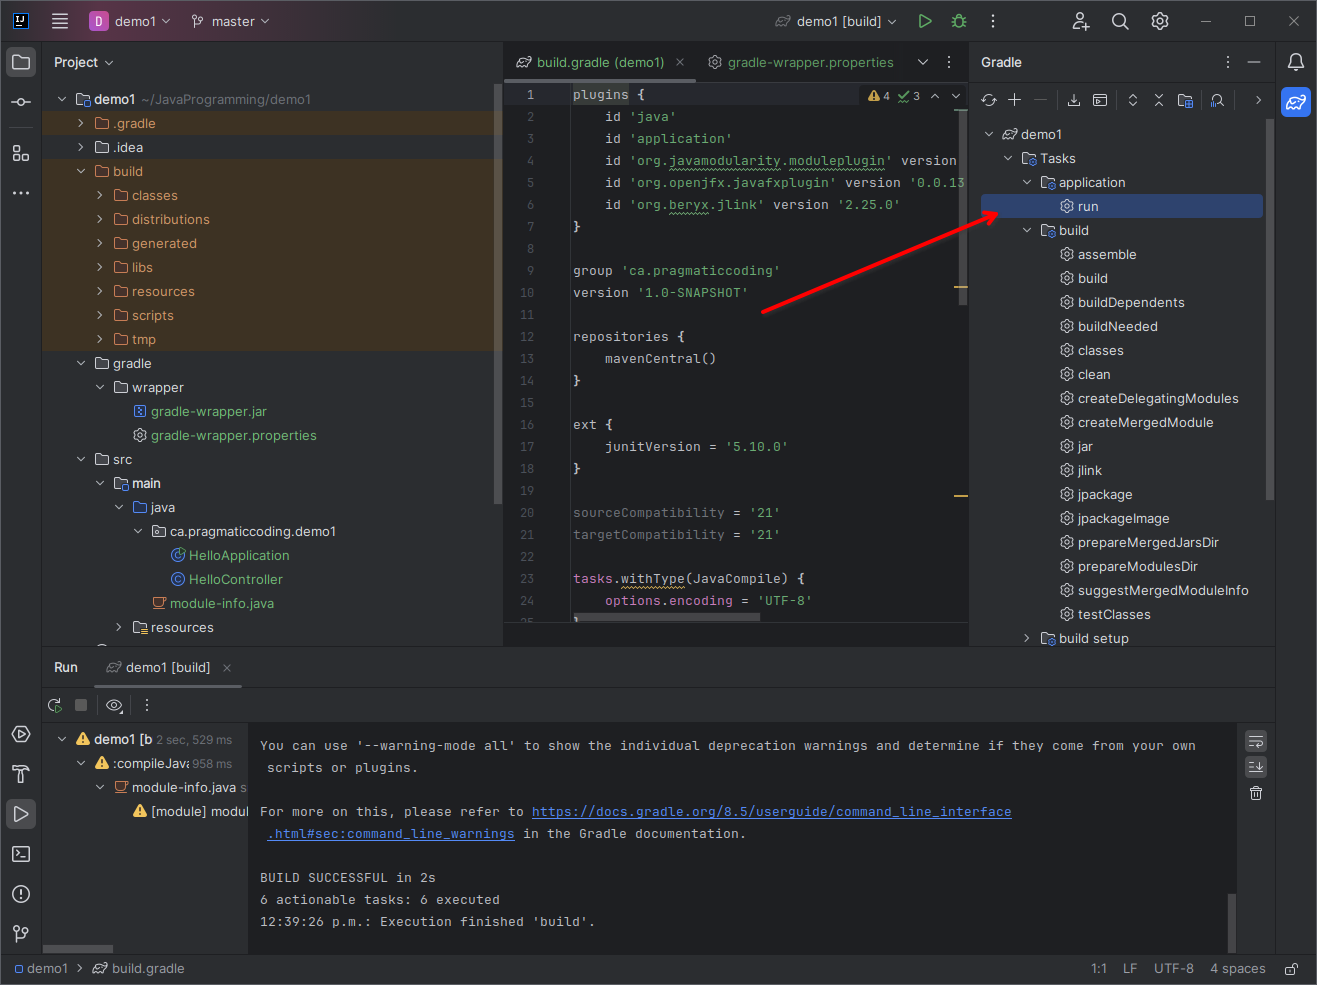
At this point, everything in good to go and we can try to run the program. The “run” option is on the “application” submenu in the Gradle “Tasks” menu.
And when we double-click that, we get the application:
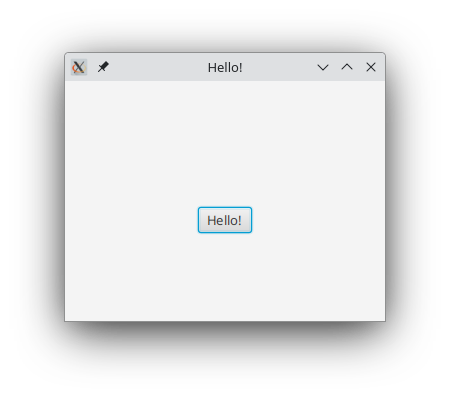
And we’re there! We have a running application.
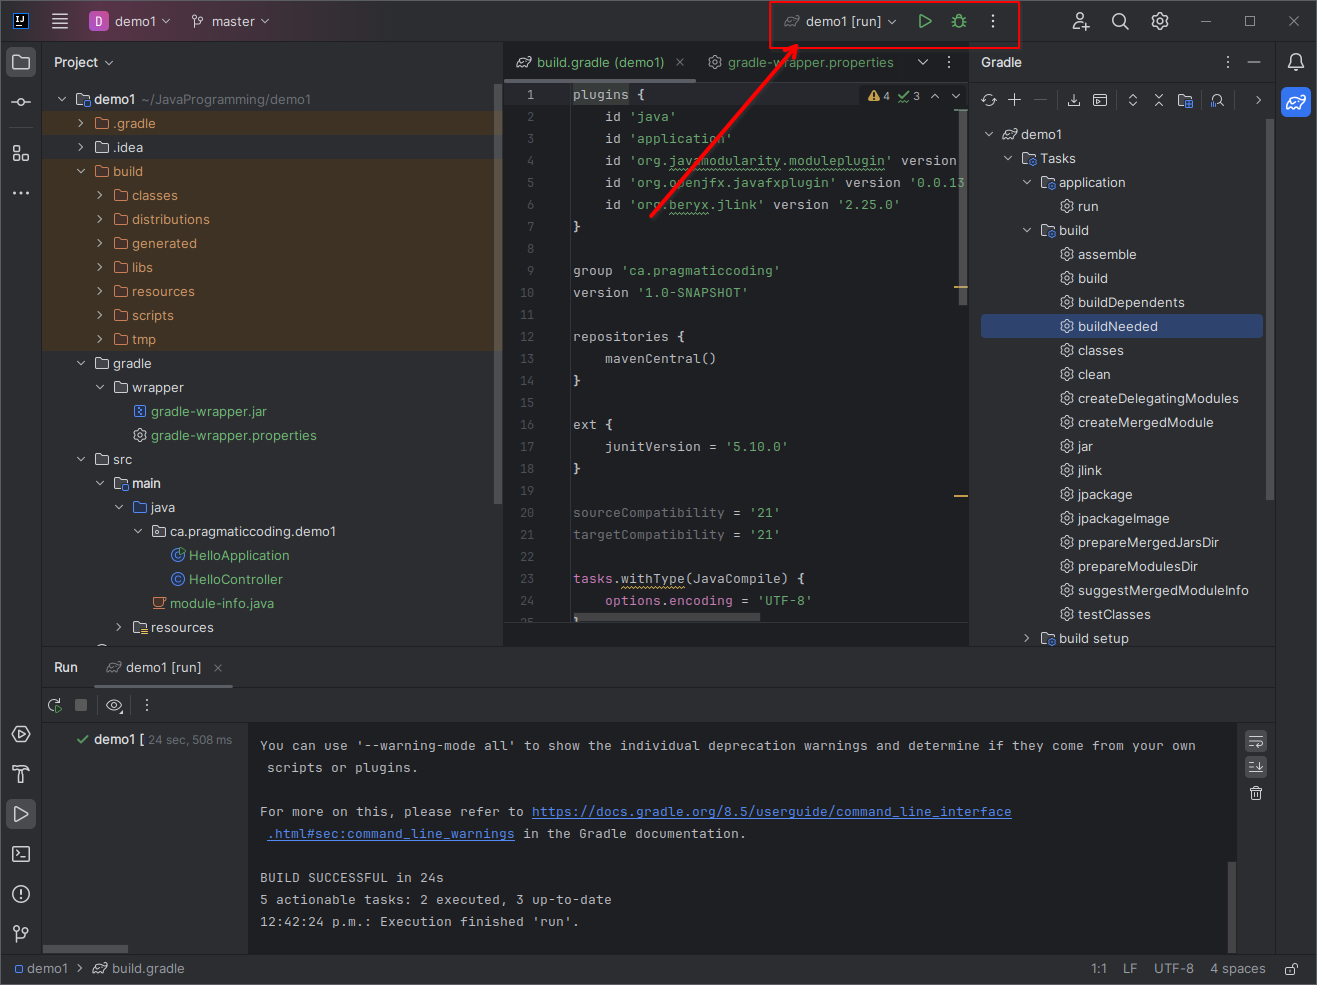
One last thing to note is that the integration between Intellij and Gradle works quite well, and the “Run” section on the main menu at the top of the screen always have the latest Gradle task that you ran. So you can close up the Gradle menu now, and just use the “Play” button to run the application from the Gradle “Tasks/application/run” option.
Turning it into a Proper JavaFX Application
The biggest issue with this wizard is that it creates an FXML based application. We’ll need to get rid of that rubbish.
Removing the FXML
The code looks like this:
public class HelloApplication extends Application {
    @Override
    public void start(Stage stage) throws IOException {
        FXMLLoader fxmlLoader = new FXMLLoader(HelloApplication.class.getResource("hello-view.fxml"));
        Scene scene = new Scene(fxmlLoader.load(), 320, 240);
        stage.setTitle("Hello!");
        stage.setScene(scene);
        stage.show();
    }

    public static void main(String[] args) {
        launch();
    }
}
and FXML Controller:
public class HelloController {
    @FXML
    private Label welcomeText;

    @FXML
    protected void onHelloButtonClick() {
        welcomeText.setText("Welcome to JavaFX Application!");
    }
}
And, of course, there’s an FXML file, but it has nothing of interest in it, and we can just delete it, along with HelloController.
Here’s code that does exactly the same as the FXML version:
public class HelloApplication extends Application {
    public static void main(String[] args) {
        launch();
    }

    @Override
    public void start(Stage stage) {
        stage.setTitle("Hello!");
        stage.setScene(new Scene(createContent(), 320, 240));
        stage.show();
    }

    private Region createContent() {
        VBox results = new VBox(20);
        Label label = new Label();
        Button button = new Button("Hello!");
        button.setOnAction(evt -> label.setText("Welcome to JavaFX Application!"));
        results.getChildren().addAll(label, button);
        results.setAlignment(Pos.CENTER);
        return results;
    }
}
That’s fine, if all you want is something as simple as a “Hello World” application. But if you want to do much more, you’ll need to add a framework…
Using a Framework
You can use any framework you like, but for me MVCI (Model-View-Controller-Interactor) works best. It’s incredibly simple to set up and it’s nonintrusive even when the application barely calls for a framework.
With MVCI we have first, a Controller:
package ca.pragmaticcoding.demo1.hello;

public class HelloController {

    private final ViewBuilder viewBuilder;
    private final Interactor interactor;

    public HelloController() {
        Model model = new Model();
        interactor = new Interactor(model);
        viewBuilder = new ViewBuilder(model);
        interactor.initializeMessage();
    }

    public Region getView() {
        return viewBuilder.build();
    }
}
And then a Model which is strictly the “Presentation Data”. You can see this is just a POJO with a JavaFX Property as its field:
package ca.pragmaticcoding.demo1.hello;

class Model {

    private final StringProperty message = new SimpleStringProperty("");

    public String getMessage() {
        return message.get();
    }

    public void setMessage(String message) {
        this.message.set(message);
    }

    public StringProperty messageProperty() {
        return message;
    }
}
And an Interactor, which holds the application logic:
package ca.pragmaticcoding.demo1.hello;

class Interactor {
    private final Model model;

    Interactor(Model model) {
        this.model = model;
    }

    void initializeMessage() {
        switch (new Random().nextInt(3)) {
            case 0: {
                model.setMessage("Hello From JavaFX");
            }
            case 1: {
                model.setMessage("This is a message");
            }
            case 2: {
                model.setMessage("Wow!  This works!");
            }
        }
    }
}
Yes, this is pretty lame “application logic”, but it is enough for you to get the idea. The message that will be displayed is dependent on some kind of logic, even if it is just a random number.
And a ViewBuilder, which, as its name implies, builds the View:
package ca.pragmaticcoding.demo1.hello;

class ViewBuilder implements Builder<Region> {
    private final Model model;

    ViewBuilder(Model model) {
        this.model = model;
    }

    @Override
    public Region build() {
        VBox results = new VBox(20);
        Label label = new Label();
        label.textProperty().bind(model.messageProperty());
        label.setVisible(false);
        Button button = new Button("Hello!");
        button.setOnAction(evt -> label.setVisible(true));
        results.getChildren().addAll(label, button);
        results.setAlignment(Pos.CENTER);
        return results;
    }
}
You’ll notice that build() here is very much the same as createContent() from the original example. The only change is that the Label's Text Property is now bound to the Model Property and the Button now just makes the Label visible.
Finally, we have a new version of our Application, which has been renamed to DemoApplication.
Why rename it?
Generally speaking, when you create a framework it is to perform a purpose. If you have an application with a whole mess of functions (or functional areas), then you’ll have a framework for each one. In this case, the framework is just saying “Hello” in some way. So that is the “Hello” framework.
My practice is to put all 4 components of a framework into their own package. Then all of the classes are package-private except for the Controller, which is public. The only public methods in the package are the Controller’s constructor, and the getView() method. All the other methods are package-private at most. This is going to include the constructors, and the methods in the Interactor that are called by the Controller.
I made a point of leaving in the package line in all of the code samples above, even though I’ve stripped out the imports. You can see that they are all in ca.pragmaticcoding.demo1.hello.
The DemoApplication stays in ca.pragmaticcoding.demo1:
package ca.pragmaticcoding.demo1;

public class DemoApplication extends Application {
    public static void main(String[] args) {
        launch();
    }

    @Override
    public void start(Stage stage) {
        stage.setTitle("Hello!");
        stage.setScene(new Scene(new HelloController().getView(), 320, 240));
        stage.show();
    }
}
There’s not much in it now, which is the way it should be.
Now, let’s run it…
Oops! There’s an error:
Error: Could not find or load main class ca.pragmaticcoding.demo1.HelloApplication in module ca.pragmaticcoding.demo1
FAILURE: Build failed with an exception.
It looks like it’s still looking for HelloApplication. Where is that configured?
It’s in a file called build.gradle. We’ll have a closer look at that in a bit, but for now we just need to change this section:
application {
    mainModule = 'ca.pragmaticcoding.demo1'
    mainClass = 'ca.pragmaticcoding.demo1.HelloApplication'
}
to:
application {
    mainModule = 'ca.pragmaticcoding.demo1'
    mainClass = 'ca.pragmaticcoding.demo1.DemoApplication'
}
Now we can try running it…
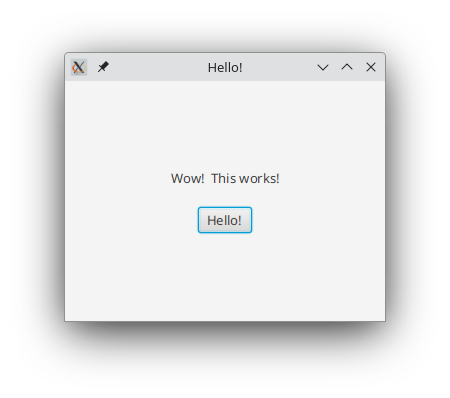
This is after clicking the Button.
One Last Change
Very often, an application will have some sort of a window wrapper around it. Then the other frameworks will occupy a Region in that main window. Often it’s the whole window. But sometimes you’ll have a main menu for the application or a status bar at the bottom. That kind of thing.
You want to put that stuff in its own package for organization, along with the Application subclass.
So let’s do that, we’ll create a new package: ca.pragmaticcoding.demo1.main and we’ll put DemoApplication in it. Then we’ll change build.gradle to point to it:
application {
    mainModule = 'ca.pragmaticcoding.demo1'
    mainClass = 'ca.pragmaticcoding.demo1.main.DemoApplication'
}
Now we’ll run it.
More problems. This time Intellij brings up a file with errors, module-info.java:
module ca.pragmaticcoding.demo1 {
    requires javafx.controls;
    requires javafx.fxml;

    requires org.kordamp.ikonli.javafx;

    opens ca.pragmaticcoding.demo1 to javafx.fxml;
    exports ca.pragmaticcoding.demo1;
    exports ca.pragmaticcoding.demo1.main;
    opens ca.pragmaticcoding.demo1.main to javafx.fxml;
}
And the error messages are:
/home/dave/JavaProgramming/demo1/src/main/java/module-info.java:8: error: package is empty or does not exist: ca.pragmaticcoding.demo1 exports ca.pragmaticcoding.demo1;
/home/dave/JavaProgramming/demo1/src/main/java/module-info.java:7: warning: package is empty or does not exist: ca.pragmaticcoding.demo1 opens ca.pragmaticcoding.demo1 to javafx.fxml;
It also complains about our module demo1 ending in a digit, but not as an actual error.
What is module-info.java? Basically it’s a file that tells Java how to control access between various modules used in your application, including libraries. It’s worth a whole article in itself, but for now we’ll just concentrate on making it work.
What’s surprising about this is that module-info.java even knows about ca.pragmaticcoding.demo1.main. This means that Intellij must have updated it for us automatically when we moved DemoApplication into it. It doesn’t do this for Kotlin code, so this is new to me.
The big problem is that ca.pragmaticcoding.demo1 doesn’t have any classes in it any more, now that we’ve moved DemoApplication out of it. This causes issue with module-info.java, and we’ll need to clean it out. Also, there’s still some junk left behind from when the application used FXML, so we can clear it out, too:
module ca.pragmaticcoding.demo1 {
    requires javafx.controls;
    requires org.kordamp.ikonli.javafx;

    exports ca.pragmaticcoding.demo1.main;
}
Now it runs, but it still complains about the trailing “1” in “demo1”. We can leave that for another day.
Understanding the build.gradle File
At this point, we’ve achieved any possible goals you might have for getting a quick start with Intellij, Gradle and JavaFX. We have a working application that compiles and runs, is organized into packages nicely and has the beginning of an MVCI framework implemented.
Going forward, you might need to add some libraries or change a few things about your project. You’re going to need to know just a little bit about that build.gradle file.
Introducing build.gradle
First, let’s take a look at the entire file:
plugins {
    id 'java'
    id 'application'
    id 'org.javamodularity.moduleplugin' version '1.8.12'
    id 'org.openjfx.javafxplugin' version '0.0.13'
    id 'org.beryx.jlink' version '2.25.0'
}

group 'ca.pragmaticcoding'
version '1.0-SNAPSHOT'

repositories {
    mavenCentral()
}

ext {
    junitVersion = '5.10.0'
}

sourceCompatibility = '21'
targetCompatibility = '21'

tasks.withType(JavaCompile) {
    options.encoding = 'UTF-8'
}

application {
    mainModule = 'ca.pragmaticcoding.demo1'
    mainClass = 'ca.pragmaticcoding.demo1.main.DemoApplication'
}

javafx {
    version = '21'
    modules = ['javafx.controls', 'javafx.fxml']
}

dependencies {
    implementation('org.kordamp.ikonli:ikonli-javafx:12.3.1')
    testImplementation("org.junit.jupiter:junit-jupiter-api:${junitVersion}")
    testRuntimeOnly("org.junit.jupiter:junit-jupiter-engine:${junitVersion}")
}

test {
    useJUnitPlatform()
}

jlink {
    imageZip = project.file("${buildDir}/distributions/app-${javafx.platform.classifier}.zip")
    options = ['--strip-debug', '--compress', '2', '--no-header-files', '--no-man-pages']
    launcher {
        name = 'app'
    }
}

jlinkZip {
    group = 'distribution'
}
This is written in a DSL (Domain Specific Language) based on Groovy. Groovy is a superset of Java, so technically all Java code is actually Groovy code as well. So, you could just write Java here, but I’ve never seen it done.
Most people seem to be able to cope with build.gradle without really knowing anything about Groovy. You can too.
The best way to view this file is like a custom class file, but without the constructor. All the parts that look like sections are methods, and the others are like field declarations. That may not be technically correct, but it should help you cope with build.gradle.
Plugins
The first section defines the “plugins”.
plugins {
    id 'java'
    id 'application'
    id 'org.javamodularity.moduleplugin' version '1.8.12'
    id 'org.openjfx.javafxplugin' version '0.0.13'
    id 'org.beryx.jlink' version '2.25.0'
}
What’s a “plug-in”? Basically it’s a module that gets included into your Gradle system to perform some function. You can see how this section is organized. We have 5 plug-ins here:
- java
This is the basic java compiler component. - application
Java code can be a library or something else, but if you need to be able to run as an application, this plug-in supplies that functionality. - moduleplugin
This is the plug-in that handles the new modularized project stuff. - javafxplugin
This is the plug-in that loads in the JavaFX library. - jlink
You probably won’t need this unless you are looking to create a jar file, and this plug-in handles a lot of that.
Really, the most important part about this is that JavaFX isn’t just a dependency, it’s configured and handled for you through a plug-in. This is why you don’t need those VM parameters to run a JavaFX application from Gradle.
What you need to know about plug-ins is that each one (potentially) will bring along its own tasks and configuration methods, many of which you can access and customize in your build.gradle file. This is also where the menu items in the Gradle menu come from. Now you can see that the “run” option in the “application” sub-menu is a task of the “application” plug-in.
General Configuration
Let’s look at the next few sections:
group 'ca.pragmaticcoding'
version '1.0-SNAPSHOT'

repositories {
    mavenCentral()
}

ext {
    junitVersion = '5.10.0'
}

sourceCompatibility = '21'
targetCompatibility = '21'
The first two items group and version are going to control jar creation naming. The repository section tells Gradle where to go to find libraries listed in the dependencies section. You can add more repositories here if you need to. Even your own local repositories.
The ext section is interesting because this is where you can just create variables for your own use.
The next two items tell the compiler what versions of Java you want to have your application compile to.
The application Section
We’ve already looked at this a bit:
application {
    mainModule = 'ca.pragmaticcoding.demo1'
    mainClass = 'ca.pragmaticcoding.demo1.main.DemoApplication'
}
As you know, our application is modular, and this tells the application plug-in what the “main” module in our application is. Then it tells it where to find the main() method.
The javafx Section
Here’s where you specify which JavaFX version you want to use, and the different packages that you want - the equivalent to the VM options when you’re running directly from the IDE.
javafx {
    version = '21'
    modules = ['javafx.controls', 'javafx.fxml']
}
Dependencies
This is the piece that you are most likely to play around with:
dependencies {
    implementation('org.kordamp.ikonli:ikonli-javafx:12.3.1')
    testImplementation("org.junit.jupiter:junit-jupiter-api:${junitVersion}")
    testRuntimeOnly("org.junit.jupiter:junit-jupiter-engine:${junitVersion}")
}
Gradle has the idea of “run configurations”. These are the contexts under which your code is going to run, and each context could require different libraries. There’s a lot to this subject, but if you are just running and testing an application you’re probably going to be dealing with implementation and testImplementation.
Generally, if you need a library to run and use your application, you’ll specify implementation. This will also have it available for testing purposes, too. If you just need it for testing, like a mocking library, you’ll need to use testImplementation or maybe testRuntimeOnly. The documentation for virtually any of these libraries will tell you which context to use.
You might remember that I specified “Ikonli” as an extra library to add to the project, way, way back in the wizard. This is how that shows up in the project.
If you are adding a library from Maven Central, their website will give you the correct syntax for a variety of build systems, Gradle and Maven included. You can just copy and paste from there:
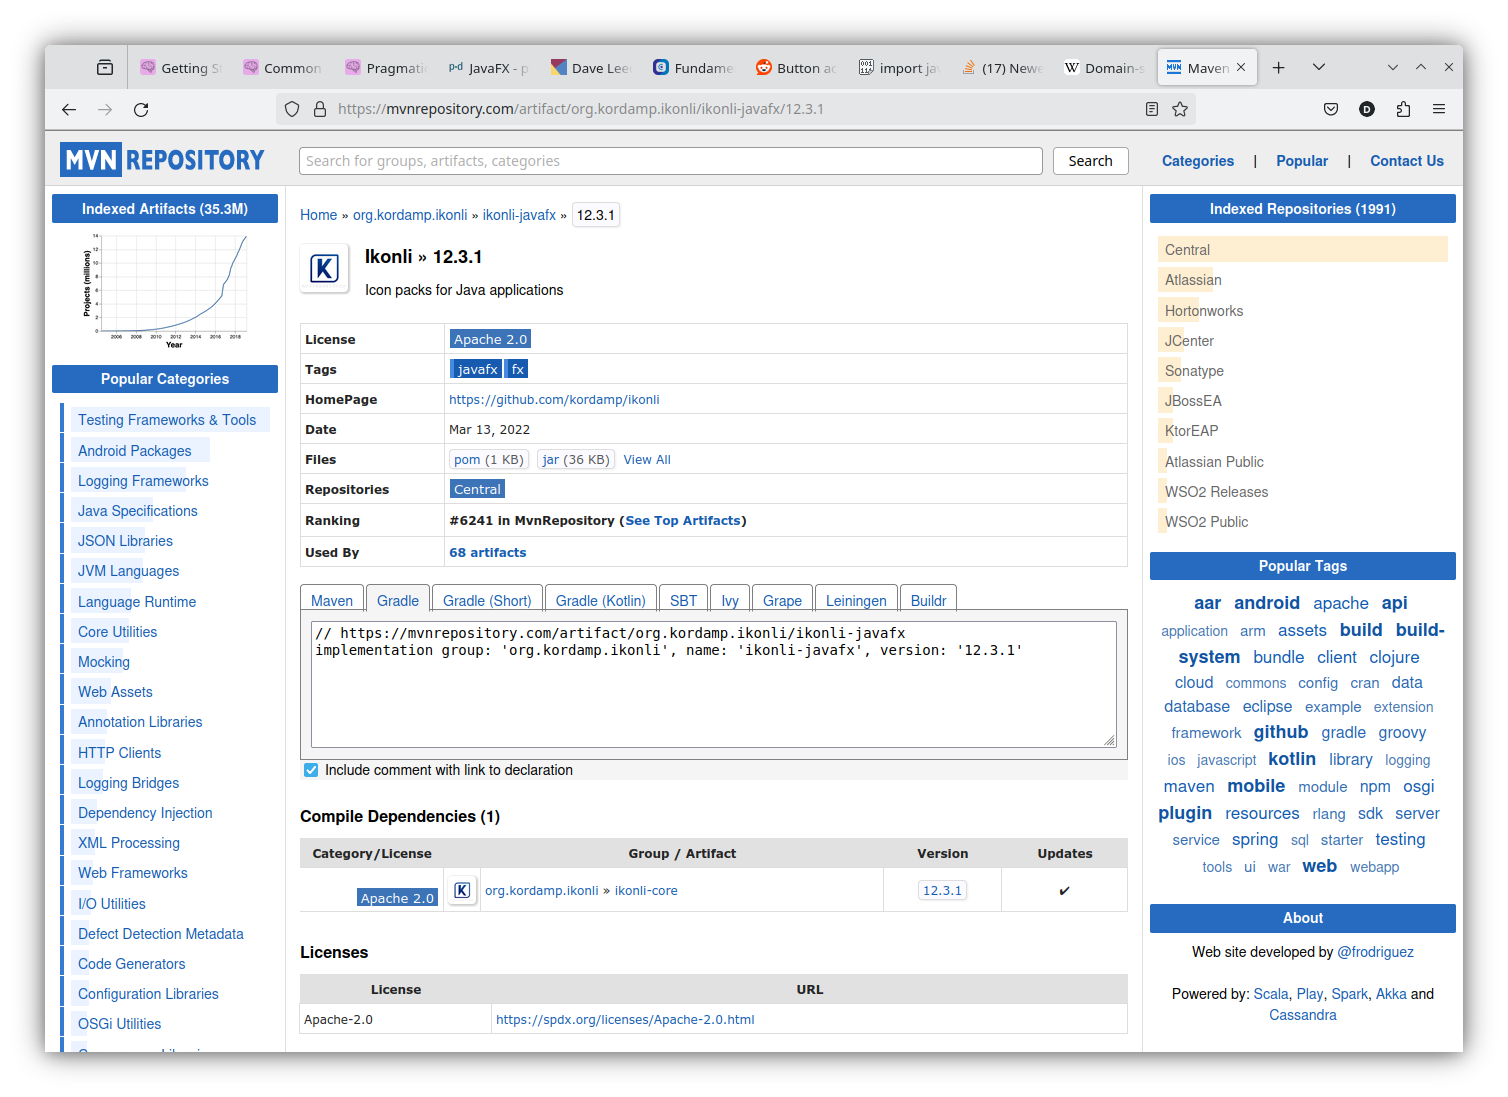
Nothing could be easier.
Last Gradle Tips
Here’s a few more pointers about Gradle to help you get started…
The Settings File
There’s one last Gradle setup file that you should be aware of, and that’s a file in the root of your project called settings.gradle:
rootProject.name = "demo1"
Simple projects will just have the one line, like this. More complex projects which have “sub-projects” will have a bit more in here. However, if you do want to change the name of your project, you’ll have to remember to change it here.
Adding A Test Environment
Intellij is aware of Gradle when adding new directories. If you go to your /src directory, bring up the menu and select New -> Directory you’ll get a dialogue box with some help:
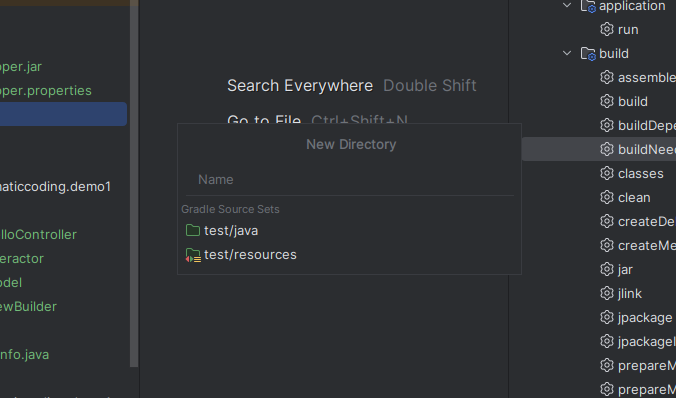
You can see that it has options for the correct placement of the java source and the resources for the “test” configuration. It’s also aware if you are configured for a different language, like Kotlin or Groovy.
You can select both the java and the resources options and it will create both at once for you.
Rebuilds and Indexing
When you open up a Gradle based project, it usually has to do some preliminary setup stuff to get going. Before it’s done this, Intellij probably won’t recognize your code as Java and do any syntax highlighting or recognize included libraries. This means you may have to wait a few moments before you can begin working. You should see some activity listed in the status bar at the bottom of the screen.
If it doesn’t, you can manually kick it off, even if you don’t have the Gradle elephant logo floating on the screen. Open the Gradle menu and click on the “Reload All Gradle Projects” icon:
This will usually sort out any issues with your Gradle setup.
Using Clean
Gradle is pretty good about keeping track of which tasks and subtasks have already been completed, and which need to be rerun. For instance, if you run “application -> run” for the first time, it will do a whole bunch of steps, but if you run it again right away it will know that it doesn’t need to recompile and it will just skip most of the steps and go straight to running the application.
There are some circumstances where it can get lost, or maybe you’ve gummed it up by messing around behind the scenes. In that case, you can run “build -> clean” and it will erase everything in the /build directory, essentially wiping out any previously completed steps. Then the next time you run any kind of build, it will start over from scratch.
For the most part, you only need “build -> clean” when something goes wrong. You’ll drive yourself crazy waiting if you clean and build every time. You don’t need to do that.
Gradle DSL Language
As far as I can tell, Groovy is becoming a dead language. It hasn’t caught on.
For Gradle, the Kotlin based DSL is now the intended standard. However, the Intellij wizard (at least at the time I wrote this tutorial) still generates a Groovy DSL build.gradle file. It’s easy enough to change it over, but you probably won’t need to do that for simple projects.
It’s getting better, but much of the older documentation for some plug-ins still use Groovy examples. So using the Kotlin DSL can be a little challenging as you have to translate all of the example code. More and more of the documentation is now including both Kotlin and Groovy example code.
In the long-term, the Kotlin DSL will be the way to go.
Bootstraping a Gradle Project
Technically, all you need is a build.gradle and a setup.gradle file in a directory and Intellij can start up a project for you. Additionally, you might want to have a gradle.properties file in the Gradle wrapper directory if you want to control which version of Gradle you want to use. If you have source code and resources, put it in /src/main/... in the appropriate directories.
All you have to do is right click on the build.gradle file in your file manager, select “Open with…” and pick Intellij IDEA and it will bootstrap the project and get it going.
Apparently, there’s an Intellij Gradle plug-in that adds some more functionality to this process, but I haven’t found any need for it so far.
Conclusion
The process listed here gets you past that first, critical, hurdle in starting a JavaFX project. Going from nothing to seeing “Hello World” on the screen. Now you can do some real coding.
There’s a lot of screenshots and reading here, but the process is ridiculously simple in practice, once you’ve done it a few times. You can go from nothing to a project with a framework in less than 5 minutes with some experience. The most important thing to remember is to get it running before you change any application code. After that, you can be sure that if it stops working it’s because you broke it.
Gradle is crazy powerful, and super complex when you get into it. And eventually, you’ll need to get into it. However, you can go a long way with just basic information.
If you want to know more, the documentation is here.
There’s also documentation for the Java Plugin and the Application Plugin.