What You’ll Learn
- How to define a business rule
- How to link a business rule to the Model with a Binding
- How to control a Button with Binding
- How to keep the business rules out of the View
Next Problem - Empty Fields
We still have a functional problem with our application. It’s possible to save a customer without specifying an account number or a name. We’ll need to prevent this.
Empty Fields is a Business Rule
Here’s a very important concept: Validation rules about data and when things can be saved are business rules. They cannot be defined in the View, they need to be defined in the Interactor.
How do these rules get to the View, then?
Through the Model!
This means that we’re going to need to create something in the model that says, “It’s OK to save”:
public class CustomerModel {

    private final StringProperty accountNumber = new SimpleStringProperty("");
    private final StringProperty customerName = new SimpleStringProperty("");
    private final BooleanProperty okToSave = new SimpleBooleanProperty(false);
}
I’ve left out all of the getter and setter stuff, because I’m sure you understand how that all works. We have a new BooleanProperty called okToSave.
How does CustomerModel.okToSave get set?
Through the Interactor. We’re going to bind okToSave to the other fields through custom Binding that makes sure that all of the fields have valid values:
public CustomerInteractor(CustomerModel model) {
    this.model = model;
    model.okToSaveProperty().bind(Bindings.createBooleanBinding(this::isDataValid, model.accountNumberProperty(), model.customerNameProperty()));
}

private boolean isDataValid() {
    return !model.getAccountNumber().isEmpty() && !model.getCustomerName().isEmpty();
}
Let’s take a look at isDataValid() first. It’s straight-forward method that just looks at all of the fields in CustomerModel that must have a value in them before the data can be saved. If any one of them is empty, then it will return false.
In the constructor of the Interactor we’re going to bind CustomerModel.okToSave to the other fields through a BooleanBinding. We’re using the Bindings library, which has huge number of static methods to create different kinds of Bindings for us. Here we’re using Bindings.createBooleanBinding().
Bindings.createBooleanBinding() takes at least two parameters, and can take many more. The first parameter is always a Supplier<Boolean>, and here we’re using a method reference to isDataValid(). The remaining parameters are the Properties that will trigger the Binding to recalculate whenever they change. In this case, it’s CustomerModel.accountNumber and CustomerModel.customerName.
This means that whenever either of those Properties change, the Binding will be recalculated and CustomerModel.okToSave will always be synchronized to them. In other words, okToSave will always have the correct value.
This is how we inject a business rule into the Model without putting the code in the Model. Now it’s available for the View to use.
Is This the Best Approach?
There is a school of thought that the Interactor should never treat the elements of the Model as ObservabaleValues - which we are clearly doing here. Instead you should treat your Observable fields in the Model as generic containers for values.
There are some who believe that it should be possible to have an Interactor without any javafx.* imports at all. Here, we have:
import javafx.beans.binding.Bindings;
because we have that call to Bindings.createBooleanBinding().
How can you create the binding without having the code to do so in the Interactor?
The only way you can do this is to move the binding creation into the Model itself. You can do this, but, if you want to keep the business logic in the Interactor, you’ll have to leave isDataValid() in the Interactor.
This would be fine, except that you’ll now have a reference to the Interactor in the Model. Something that we didn’t need before.
I feel that this would be a mistake. As it stands, the Model is the central dependency that all of the other components share, but it has zero dependencies of its own. All of the dependencies are to the Model, and none of them are from the Model. I wouldn’t change this just to remove the JavaFX nature of the Model from the Interactor.
Alternatively, you could move the binding code into the Controller. The Controller already knows about methods in the Interactor, so it could call Interactor.isDataValid() without creating onerous new dependencies between the Controller and the Interactor. Additionally, if I was to implement a ChangeListener on some field in the Model, I’d probably implement it in the Controller. Setting up a binding is just a small step from that.
I feel that there’s a benefit to having both the binding code and the business logic that supports it in the same class. Why spread it around and make it harder to keep track of? Additionally, I feel that the Interactor isn’t really supposed to be agnostic towards the GUI environment. This is a JavaFX construct, and it can be acknowledged inside the Interactor without any real practical implications.
Adding the Validation to the View
We are going to control the ability to save by disabling the “Save” Button when the data is not valid. We are going to do this with a Binding.
There’s a complication, though. We are already manually setting and unsetting Button.disable() as part of our Button action. So we’re going to need to deal with that:
private Node createButtons() {
    Button saveButton = new Button("Save");
    saveButton.disableProperty().bind(model.okToSaveProperty().not());
    saveButton.setOnAction(evt -> {
        saveButton.disableProperty().unbind();
        saveButton.setDisable(true);
        saveHandler.accept(() -> saveButton.disableProperty().bind(model.okToSaveProperty().not()));
    });
    HBox results = new HBox(10, saveButton);
    results.setAlignment(Pos.CENTER_RIGHT);
    return results;
}
Now we are creating the Button and then immediately binding it’s disable Property to CustomerModel.okToSave with the not() modifier. That’s pretty simple.
But we cannot directly set a Property that’s bound. We’ll get a runtime error if we do that. So in the Button onAction EventHandler we have to first unbind the Property, then set it to true. In the Runnable that we pass to saveHandler, we re-establish the binding instead of setting it to false.
Now it Works
That’s it, and it was pretty painless, too.
You can see how we’ve established the business rule in the Interactor, connected it to the View via the Model, and the View uses it without having any knowledge about how it works.
Now, let’s look at it in action:
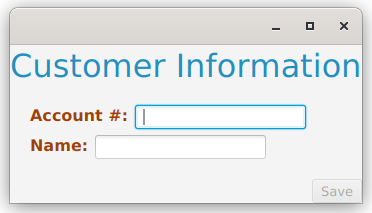
The “Save” Button is disabled. Then with just account number filled out:
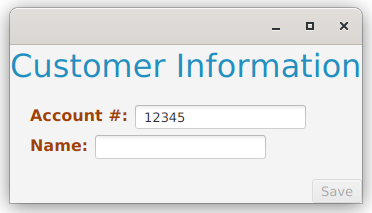
It’s still disabled. And then with both fields completed:
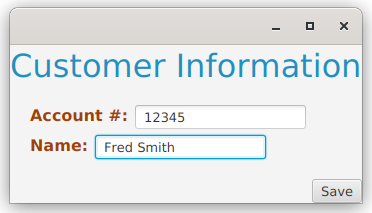
Now it’s enabled and save can happen. We’re done!