What You’ll Learn
- How to build a layered structure for the back-end of the application.
- How to simulate a database for development/testing
- The purpose of a Data Access Object
- The purpose of a Broker
- How Domain Objects and the GUI Model interact
- What you can and should test
The Back-End of the Framework
Overall you can view MVCI with this diagram:
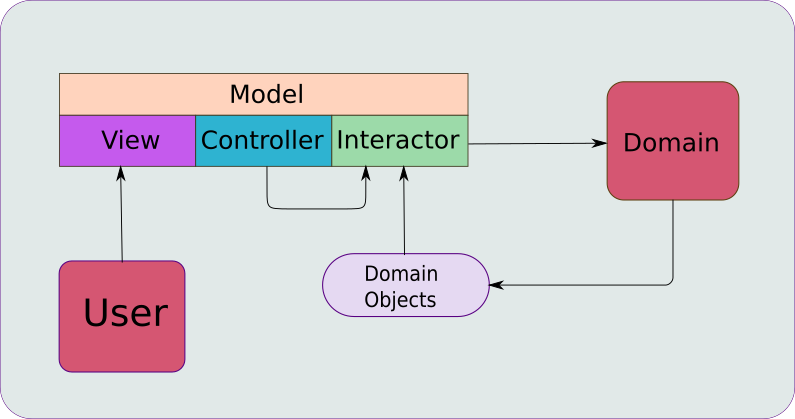
What we are going to concentrate on here is the Interactor, Domain and Domain Objects. Let’s break this down a little bit more, and look at how it fits in with the whole application:
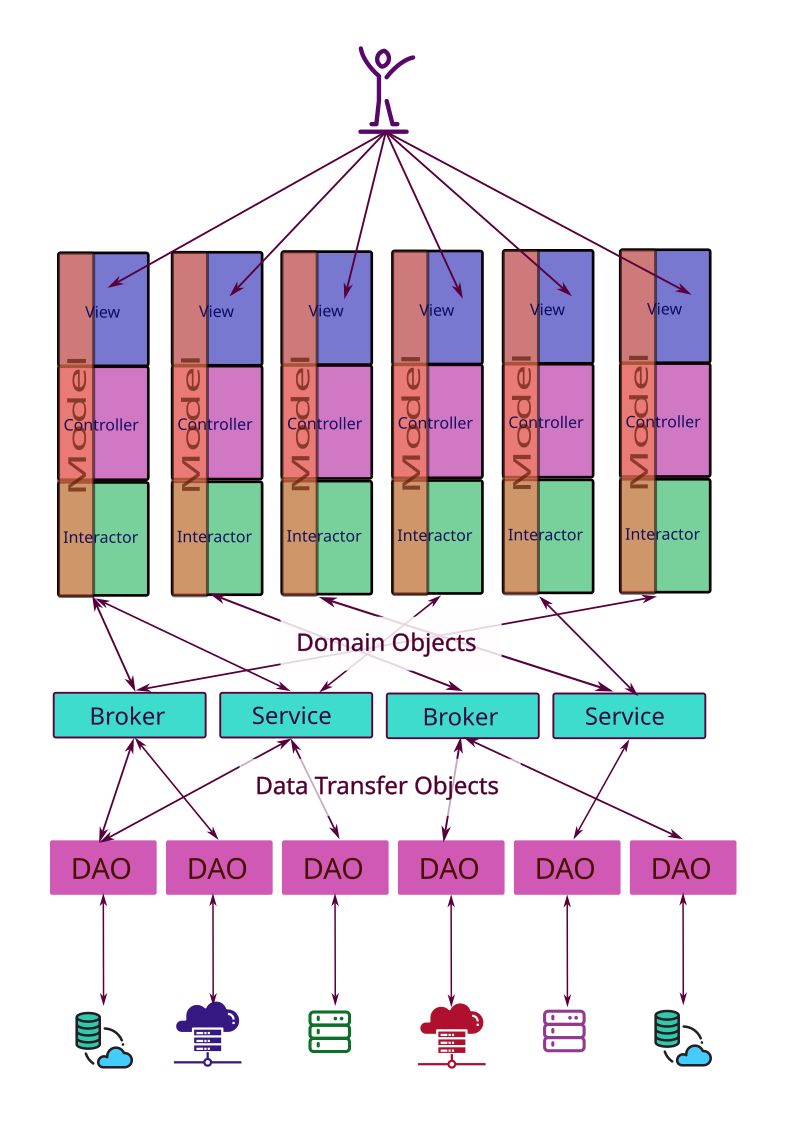
A typical application will have some quantity of MVCI frameworks, typically one for each type of function in the application. For instance, you might have one for Customer CRUD operations, one for Inventory management, another for Order management, and so on. Each of these has its own business logic that is unique to its function, and this business logic goes into its Interactor.
Underneath all of this is a layer of business logic that is NOT unique to a specific function or MVCI framework, and that is (or potentially could be) shared with other functions and MVCI frameworks in the application. This includes things like retrieving data and saving data in databases or external applications.
How you integrate these components with MVCI is what we are going to look at in this article.
Jump down to the very bottom of the diagram. All those icons represent different kinds of external systems that we might need to access. This could be a database server, some kind of web service, a local file system or some kind of a proprietary system with an API or a library that we can use. We need to isolate these from our MVCI framework as much as possible.
The lowest level of our application is the “Data Access Objects”. These are the classes that implement the API or library that allows them to talk to an external system. They understand the data formats that they need to use to transfer information to and from theses systems. They are also the ONLY elements in our system that even know about the existence of these external systems.
The next level up is the “Broker” and “Service” level. These are classes that know about the Data Access Objects and how to talk to them. They transfer data to and from the DAO level using “Data Transfer Objects” or “DTO’s”. DTO’s are pure data. They can be any format you like, but they are disconnected from the format that comes from the external application.
This structure is all about isolation.
You do NOT want to have to rewrite a Broker because the data format from the external application changed! The DAO handles that, and then it continues to send data on to the Broker/Service level without changing the structure of the DTO’s it uses to communicate to them.
The Brokers and Services can perform any number of functions, and they may need to call multiple DAO’s in order to complete their tasks. They pass data up to the Interactors via “Domain Objects”.
Domain Objects are true business objects, not just data. As such, they can do anything you want and contain internal logic that can be called from any other business logic. For instance Customer might be a Domain Object and it might internally have fields for first name, last name and title. It might have a method called getSalutation() which combines the title with the last name and a string, like, “Dear Mr. Smith”. Things like that.
Finally, the Interactor knows about Domain Objects and it knows how to get data from them and the methods that it can call and how to use them. It also knows about the Brokers and Services and what methods they have that it can call and how they will react. This allows it to implement the business logic that is specific to the MVCI framework that it belongs to. It then uses these Domain Objects to create and update the data elements in the Model, which then automatically updates the View.
That’s what we are looking at here, although we are going to simulate everything and keep it very simple…
The Database
At first I thought about using something like Redis as a database, but then decided that we didn’t need the added complexity that it would bring about. After all, this is a tutorial about JavaFX, not database programming. Then I thought that I’d store the records as JSON, but discarded this as a useless distraction. So our “database” is going to be this:
Map<Integer, Map<String,String>>
Many modern databases are designed as Key/Value pairs, with the database record being the value. This is really the same thing, but all in Java. In the outer Map, the keys are the record id’s, and the inner Map holds the individual fields - the key being the field name and the value being the field value.
This is nice because it’s all Java. We don’t need to worry about JSON libraries and yet the database storage is distinctly different from how we generally store objects in Java, so that we’ll need a translator class. In that respect, it mimics what you’d expect to see in the real world.
But a database is more than just a single Map. There are indexes and queries and multiple tables and data relationships that all need to be handled. So our database simulator will eventually need to do those things too. To start with, though, we’re going to generate internal record id’s that we’ll use as record keys.
Here’s the start for our database class:
public class CustomerDatabase {

    private Map<Integer, Map<String, String>> data = new HashMap<>();
    private Integer nextKey = 0;

    public int saveCustomer(Map<String, String> customerRecord) {
        customerRecord.put("_id", (++nextKey).toString());
        data.put(nextKey, customerRecord);
        return nextKey;
    }

    Map<Integer, Map<String,String>> getData() {
        return data;
    }
}
This is pretty straight-forward. We have one public method, which takes a “record” and saves it in the database, assigning it a unique key. The key is just a counter that starts at zero.
There’s not a lot here, but it is testable, so we should test it.
Testing
One of the big issues with building JavaFX applications is that the way that the FXAT works makes it very difficult to test with standard automated code-based testing tools. People have pulled their hair out trying to figure out ways around this, but it is just about impossible. That’s because the FXAT treats every Event as a job, and there is no continuity between jobs. Testing tools tend to work on the basis of, “Run this code, check the result”. But if the “Run this code” part launches something on the FXAT, then you get into trouble.
This means that you are out of luck when it comes to automated testing of your layouts, unless you use some “Robot” based testing tool like Selenium to do the testing.
However, the nice thing about using a structure like MVCI is that virtually everything from the Interactor down to the DAO’s can run without the FXAT getting involved. And that means that we can write automated tests for it. For this project I’m using JUnit 5.
Explaining JUnit is way beyond the scope of this course. If you understand it, that’s great. If you don’t understand how it works, at least you can see that the tests can be done, and what they test for.
The main take-away here is that you understand that a properly organized JavaFX application can - and should - have automated testing for its business logic.
This is the bottom layer of our application structure. It’s vital that we know that it works as intended, so that we can put it out of our minds when we our investigating issues with the higher layers of our application. Here’s a test class:
class CustomerDatabaseTest {

    @Test
    void saveCustomerIdIncrementTest() {
        CustomerDatabase dataBase = new CustomerDatabase();
        assertEquals(1,dataBase.saveCustomer(new HashMap<String, String>()), "Id is incremented");
    }

    @Test
    void saveCustomerIdIncrementTwiceTest() {
        CustomerDatabase dataBase = new CustomerDatabase();
        dataBase.saveCustomer(new HashMap<String, String>());
        assertEquals(2,dataBase.saveCustomer(new HashMap<String, String>()), "Id is incremented");
    }

    @Test
    void saveCustomerIdInsertionTest() {
        CustomerDatabase dataBase = new CustomerDatabase();
        HashMap<String, String> customerRecord = new HashMap<>();
        dataBase.saveCustomer(new HashMap<String, String>());
        assertEquals("1",dataBase.getData().get(1).get("_id"), "Id is inserted");
    }

    @Test
    void saveCustomerRecordCorrectTest() {
        CustomerDatabase dataBase = new CustomerDatabase();
        HashMap<String, String> customerRecord = new HashMap<>();
        customerRecord.put("full_name", "Fred");
        dataBase.saveCustomer(customerRecord);
        assertEquals("Fred", dataBase.getData().get(1).get("full_name"), "Id is inserted");
    }
}
In order to do the testing, we need to be able to reach inside and see the raw Map data independent of any functional method calls. So there’s a getter for the Map in CustomerDatabase. We might be able to remove this later on, when we have some retrieve functions in our application, but for now we’ll use this. In the real world of corporate application development, this approach might not be possible as it exposes parts of the database class to outside classes that really shouldn’t be opened up.
The first two tests are to make sure that the ID is incremented by just one each time that saveCustomer() is called. The next test ensures that the internal _id field is added to our record when it is saved. The final test makes sure (to some degree) that the data that we wanted saved in the database is actually saved.
The Data Access Object (DAO)
The DAO class is the class that understands how to access the database. It knows about the various tables, the record structures, the relationships between the tables and how to query and retrieve data, as well as how to store it.
Here’s our DAO so far:
public class CustomerDAO {

    static CustomerDatabase database = new CustomerDatabase();

    public int saveCustomer(CustomerDTO customerRecord) {
        return database.saveCustomer(createCustomerRecord(customerRecord));
    }

    Map<String, String> createCustomerRecord(CustomerDTO customer) {
        Map<String, String> customerRecord = new HashMap<>();
        customerRecord.put("full_name", customer.getFullName());
        customerRecord.put("account_number", customer.getAccountNumber());
        return customerRecord;
    }
}
and here’s the Data Transfer Object:
public class CustomerDTO {

    private String accountNumber = "";
    private String fullName = "";

    public CustomerDTO(String accountNumber, String name) {
        this.accountNumber = accountNumber;
        this.fullName = name;
    }

    public String getAccountNumber() {
        return accountNumber;
    }

    public void setAccountNumber(String accountNumber) {
        this.accountNumber = accountNumber;
    }

    public String getFullName() {
        return fullName;
    }

    public void setFullName(String fullName) {
        this.fullName = fullName;
    }
}
There’s not much to it. The database is instantiated as a static field since we only ever want to have one database in our application, no matter how we instantiate the DAO, or how often we instantiate it.
There’s only two methods so far, and at this point saveCustomer() merely delegates to the database saveCustomer() method. There is nothing to test here - at least so far.
The other method converts CustomerDTO to the database structure, which is Map<String, String>. This is something we should test:
public class CustomerDAOTest {

    @Test
    void createCustomerRecord_AccountNumberTest() {
        CustomerDAO dao = new CustomerDAO();
        CustomerDTO customer = new CustomerDTO("1234", "Fred");
        assertEquals("1234", dao.createCustomerRecord(customer).get("account_number"), "Account number check");
    }

    @Test
    void createCustomerRecord_CustomerNameTest() {
        CustomerDAO dao = new CustomerDAO();
        CustomerDTO customer = new CustomerDTO("1234", "Fred");
        assertEquals("Fred", dao.createCustomerRecord(customer).get("full_name"), "Customer name check");
    }
}
The Broker and Domain Objects
Now we get to the application layer that introduces the idea of a “Domain Object”. Domain Objects are business objects. They hold the data required to perform business operations and business logic. In our application we have just one kind of Domain Object - the Customer:
public class Customer {

    private String accountNumber = "";
    private String name = "";


    public String getAccountNumber() {
        return accountNumber;
    }

    public void setAccountNumber(String accountNumber) {
        this.accountNumber = accountNumber;
    }

    public String getName() {
        return name;
    }

    public void setName(String name) {
        this.name = name;
    }
}
Yeah, this almost identical to our Model but without the Properties. It feels like a duplication of information. That’s mostly because our Model at this stage is so simple. We don’t have Properties to control data validation, or to handle other aspects of State that become important in a real application. So, for now, we just have to live with this feeling of duplication.
The Broker lives in a world in-between the business logic and the DAO. It knows about Domain Objects and database record structures. It knows how to communicate with the DAO, but it doesn’t know anything about tables, queries or database commands.
The Broker’s job is to turn Domain Objects into database-friendly data and pass them to the DAO for storage. Eventually it will do the opposite - ask the DAO for records and turn them into Domain Objects.
Here’s our Broker so far:
public class CustomerBroker {

    private final CustomerDAO dao = new CustomerDAO();

    public int saveCustomer(Customer customer) {
        return dao.saveCustomer(createCustomerDTO(customer));
    }

    CustomerDTO createCustomerDTO(Customer customer) {
        return new CustomerDTO(customer.getAccountNumber(), customer.getName());
    }
}
We have some independent, functional code here, so we’ll need create some tests. I’ve deliberately made createCustomerRecord() package private, so that we can call it directly in a test. If we didn’t do this, then we’d have to use a mocking library to mock the DAO so that we can see what’s being passed to it. That’s too much of a side trip.
Here’s the test class:
class CustomerBrokerTest {

    @Test
    void createCustomerRecord_AccountNumberTest() {
        CustomerBroker broker = new CustomerBroker();
        Customer customer = new Customer();
        customer.setAccountNumber("1234");
        customer.setName("Fred");
        assertEquals("1234", broker.createCustomerDTO(customer).getAccountNumber(), "Account number check");
    }

    @Test
    void createCustomerRecord_CustomerNameTest() {
        CustomerBroker broker = new CustomerBroker();
        Customer customer = new Customer();
        customer.setAccountNumber("1234");
        customer.setName("Fred");
        assertEquals("Fred", broker.createCustomerDTO(customer).getFullName(), "Customer name check");
    }
}
One note here: When I write these tests, I always fiddle with the “expected value” parameter of the Assert to something that is wrong, just to make sure that the test will fail if the CUT (Class/Code Under Test) is broken. Then I put it back to the correct value so the test passes.
Back to the Interactor
Now that we have our back-end built, we can go back to the Interactor and integrate it into our application:
public class CustomerInteractor {
    private final CustomerModel model;
    private final CustomerBroker broker = new CustomerBroker();

    public CustomerInteractor(CustomerModel model) {
        this.model = model;
    }

    public void saveCustomer() {
        int result = broker.saveCustomer(createCustomerFromModel());
        System.out.println("Saving account: " + model.getAccountNumber() + " Name: " + model.getCustomerName() + " Result: " + result);
    }

    Customer createCustomerFromModel() {
        Customer customer = new Customer();
        customer.setAccountNumber(model.getAccountNumber());
        customer.setName(model.getCustomerName());
        return customer;
    }
}
At this point it becomes clear that the Interactor is the place where the Domain Objects and the GUI Model co-exist. The Broker only deals in Domain Objects, and will never have any knowledge of our GUI Model.
You can see that we’ve added a field for the Broker, and then added a call to it into CustomerBroker.saveCustomer(). I’ve left the console output in there so that we can see how it works from the GUI. Aside from that, saveCustomer() itself simply delegates to the Broker, so there’s no need for a test here.
However, we do have a step that takes the data from the Model and turns it into a Domain Object. That’s something that we do need to test:
class CustomerInteractorTest {

    @Test
    void createCustomer_NameTest() {
        CustomerModel model = new CustomerModel();
        CustomerInteractor interactor = new CustomerInteractor(model);
        model.setCustomerName("Fred");
        model.setAccountNumber("ABCDE");
        assertEquals("Fred", interactor.createCustomerFromModel().getName(),"Check customer name");
    }

    @Test
    void createCustomer_AccountTest() {
        CustomerModel model = new CustomerModel();
        CustomerInteractor interactor = new CustomerInteractor(model);
        model.setCustomerName("Fred");
        model.setAccountNumber("ABCDE");
        assertEquals("ABCDE", interactor.createCustomerFromModel().getAccountNumber(),"Check customer name");
    }
}
Even though CustomerModel is composed of Properties that are JavaFX elements, it’s OK to access them from a JUnit test without any FXAT running at all. This means that we can test methods in Interactor without any issues.
The Data Classes
We now have four different data object types, each primarily used at a different level of the application. At this point in our application, all four of these object types are holding pretty much the same information just in different ways.
- The Model
- This holds the data inside
Observableclasses that can be integrated with the ViewNodes. - The Domain Object
- This is
Customerand it holds the data in regular Java data fields. Note that the customer’s name is stored inname. - The Data Transfer Object
- This is
CustomerDTOand it also holds the data in regular Java data fields. It differs from the Domain Object in that the data is organized in a fashion oriented towards the database storage. Note that the customer’s name is stored infullName, notname. - The Database Record
- This is a
Map<String, String>, but it still holds exactly the same data as the other three classes, just in a different format.
I don’t want to repeat myself too much, but the reason that we have 4 different data classes, all holding very similiar information, is to prevent coupling. With this structure, the database can completely change and that change will not ripple up past the DAO, and the DTO will remain the same. Changes at the DAO won’t ripple up past the Broker, and the Domain Objects will remain unchanged.
This is so important that it cannot be overstated. Coupling is the thing that will make your application difficult to extend and maintain, so you need to avoid it whenever possible.
Conclusion
That’s our back-end completed and our first, bare-bones, feature all wrapped up. We have an application that can create a Customer and store it in our database. We have tests for everything that can and should be tested.
Once again, this thing runs!
It’s also potentially deployable, even though it’s ugly and doesn’t have any error checking or validation controls.