What You’ll Learn
- How to use the Button class.
- Some principles of good programming
- The Single Responsibility Principle
- Avoiding excess coupling
- How to organize your layout code to make it easy to understand
- Events
- How to use Bindings
Adding User Interaction
Two of the most common tools for user interaction and input are TextFields and Buttons. We’re going to add both of these two our application to make it actually do something.
The Code So Far
public class Main extends Application {

    public static void main(String[] args) {
        launch(args);
    }

    @Override
    public void start(Stage primaryStage) {
        Scene scene = new Scene(createContent(), 400, 200);
        primaryStage.setScene(scene);
        primaryStage.show();
    }

    private Region createContent() {
        HBox results = new HBox(new Label("Name:"), new TextField(""));
        results.setSpacing(6);
        results.setPadding(new Insets(0,0,0,50));
        results.setAlignment(Pos.CENTER_LEFT);
        return results;
    }
}
Adding the Output and a Button
Now we are going to add some interaction to the application. We’ll add a Button and put the output Label back on the screen. We’ll set up the Button so that when it’s clicked, it loads “Hello “ plus the name into the output Label.
The code now looks like this:
public class Main extends Application {

    public static void main(String[] args) {
        launch(args);
    }

    @Override
    public void start(Stage primaryStage) {
        Scene scene = new Scene(createContent(), 400, 200);
        primaryStage.setScene(scene);
        primaryStage.show();
    }

    private Region createContent() {
        TextField inputTextField = new TextField("");
        HBox inputRow = new HBox(new Label("Name:"), inputTextField);
        inputRow.setSpacing(6);
        inputRow.setAlignment(Pos.CENTER);
        Label outputLabel = new Label("");
        Button actionButton = new Button("Hello");
        actionButton.setOnAction(evt -> outputLabel.setText("Hello " + inputTextField.getText()));
        VBox results = new VBox(20, inputRow, outputLabel, actionButton);
        results.setAlignment(Pos.CENTER);
        return results;
    }
}
I’ve wrapped the entire content in a VBox, which presents the contained Nodes vertically stacked on the screen. Then I’ve added the Label for the output (called outputLabel), and the Button to trigger the work (called actionButton).
An EventHandler was added to the actionButton to take an ActionEvent which will trigger an update on the contents of the outputLabel.
And the output looks almost like this:
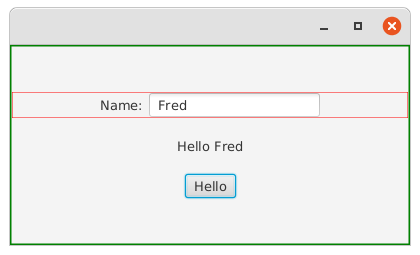
I’ve put a green border around the outer VBox and the red border remains around the HBox.
Button Actions
There’s something new in this code:
Button actionButton = new Button("Hello");
actionButton.setOnAction(evt -> outputLabel.setText("Hello " + inputTextField.getText()));
What’s this all about?
It’s best to think of a Button as a nothing more than a trigger for an action. You can do other things with them, but for now let’s just stick to this simplest use.
Most of the JavaFX classes can trigger “Events”. Events are a way for these classes to signal that something significant has happened to them. Maybe they’ve changed some kind of state, or received user input - these are things that cause Events to be fired. For every Event that can be triggered, you can define an EventHandler, which is a piece of code that will be executed when that Event is fired.
There are lots and lots of Events that are constantly fired in JavaFX and the vast majority of them have no associated EventHandler and won’t cause anything to happen.
When you think of a Button as a trigger, then there is one type of Event that is supremely important, the “OnAction” Event. OnAction is fired when the user clicks and releases the mouse over the Button, or when the user hits the “Enter” key when the Button is “default” or has focus. In other words, when the Button is activated.
The way to set up an EventHandler for the OnAction event is to call Button.setOnAction(). The single parameter for this method is an EventHandler.
EventHandler is a functional interface that has a single method called handle(Event event). Since it’s a functional interface, we can define it using a lambda function, which is what we’ve done in our code so far.
If you are treating a Button as nothing more than a trigger for an action, then you probably won’t ever reference the Event that was fired in your EventHandler. But we still need to pass it in, as handle() expects it.
In this case, we’re simply going to update the text in outputLabel, with a String that’s built up of some static text and the name from our TextField.
There’s a Lot Wrong with this code
It’s important that you learn how to write clean, clear layout code or your applications will become very difficult to understand and maintain. Even with the smallest of applications, it’s a good idea to get into the habit of making your layout code as clean as possible.
Let’s take a look at the problems with the code we’ve written so far:
It’s Getting Busy
This method no longer follows the “Single Responsibility Principle”. It does the following:
- Populates the input row and configures its layout
- Creates the output
Label - Creates the
Button - Defines the code which updates the output
Label
It’s often very easy to come up with a definition of your code that describes something that seems to be a “single responsibility”, yet isn’t really. In this case we have createContent(), which does one thing - creates the content. Except it actually does a lot of stuff, doesn’t it?
“Single Responsibility” really refers to a direct responsibility. A method can “do” a lot of things by delegating them to other methods. Then its single responsibility is to bring them all together.
The trick is to break your code down into pieces which do one thing that can’t be broken down any further, or where breaking down further would make the code less clear. Then you’re following the “Single Responsibility Principle”.
There’s Way Too Much Coupling
This is a big problem with our code, and something that we need to fix right away, before it gets out of hand.
What is Coupling, and Why is it Bad?
Coupling is when components of your application rely on the implementations of other components of your application. This results in a situation where two or more components are dependent on the structure of each other, making it difficult to modify one component without needing to modify another component. And, if that second, dependent, component has other components that are dependent on it… You see where this goes.
Coupling is the thing that you need to fight every step of the way when you’re building an application because it sneaks in almost every time you stop looking for it. So get into the habit of looking for coupling and avoiding it constantly.
Where’s the Coupling Here?
actionButtoncallsinputTextField.getText()- This is a big problem. These two elements are now totally coupled. Let’s say that
inputTextFieldis changed to some other type of Node that doesn’t have agetText()method. Maybe the application is intended to be used in a situation where there are a limited number of users, and the name is picked using aComboBox, which doesn’t have agetText()method. Then you’ll need to update theButtonas well. actionButtoncallsoutputLabel.setText()- This is the same type of coupling as above.
actionButtonneeds to access bothoutputLabelandinputTextField- These elements are coupled in the code. Any attempt to move the instantiation of either of these two
Nodesinto another method is going to cause trouble withactionButton. - The update of
outputLabelhappens inside theEventHandlerdefinition. - The logic about updating the contents of the
Labelare now encapsulated inside theEventHandler. It’s not the worst example of coupling, but it can be problematic. - All of the code is in the same scope
- This is a direct result of violating the Single Responsibility Principle. Everything is in the same scope and references between elements of the screen are inter-related.
Fixing the Coupling and Holding to the Single Responsibility Principle
Let’s look at some code that will do this:
public class Main extends Application {

    public static void main(String[] args) {
        launch(args);
    }

    private final StringProperty greeting = new SimpleStringProperty("");
    private final StringProperty name = new SimpleStringProperty("");

    @Override
    public void start(Stage primaryStage) {
        Scene scene = new Scene(createContent(), 400, 200);
        primaryStage.setScene(scene);
        primaryStage.show();
    }

    private Region createContent() {
        VBox results = new VBox(20, createInputRow(), createOutputLabel(), createGreetingButton());
        results.setAlignment(Pos.CENTER);
        return results;
    }

    private Node createGreetingButton() {
        Button results = new Button("Hello");
        results.setOnAction(evt -> setGreeting());
        return results;
    }

    private Node createInputRow() {
        TextField textField = new TextField("");
        textField.textProperty().bindBidirectional(name);
        HBox hBox = new HBox(6, new Label("Name:"), textField);
        hBox.setAlignment(Pos.CENTER);
        return hBox;
    }

    private Node createOutputLabel() {
        Label results = new Label("");
        results.textProperty().bind(greeting);
        return results;
    }

    private void setGreeting() {
        greeting.set("Hello " + name.get());
    }
}
StringProperty???
The first thing you’ll notice is that we’ve added two StringProperty's fields to the class. Together these two Properties are going to act as our “State” for the application. One of them, the name will hold whatever the user types into the TextField and the other will hold the greeting that will display in the output Label.
Putting these two Properties into the class allows all of the other coupling to be removed.
createContents() Now Just Sets Up the Main VBox
At a glance, you can now see that createContents() is going to create a VBox with 3 things centred in it: a place for input, a place for output and a Button.
This method still “creates the contents” for the screen, but it delegates the creation of the components to builder methods. You can see that the “Single Responsibility Principle” really refers to direct responsibility, and bringing together the results of several delegated responsibilities is, in fact, a single responsibility.
All of the various Nodes Now Have Generic Names
Since the layout of the screen has now been split into tiny, clearly named methods, there’s no value in having meaningful variable names for the individual Nodes. The scope of each of these variables is so small now that there’s no added clarity in having complicated names for them, and simple names like hBox should indicate to any reader that these have a limited scope.
All of the Builder Methods Have Meaningful Names
On the other hand, the builder methods now have names like createInputBox() and createOutputLabel(). It’s clear what they do, and makes it easy to find the method that you’re interested in if you’re reading, enhancing or modifying this code.
All of the Builder Methods Return Node or Region
This is a very important concept to understand. If your builder method needs to return a very specific type of Node, then you’re probably doing it wrong.
Let’s take createOutputLabel() as an example. As the code stands, you could return a Label instead of a Node and it would work. But if you do that, then it’s possible to something very Label specific, like set the font, inside of createContents(). That’s a potential issue, and certainly a “code smell”, because the configuration of the Label really belongs inside createOutputLabel().
Now let’s say that you wanted to do something to the return value of createOutputLabel(). Perhaps you want to have the “Hello” in a different font from the name. The best way to do that might be to split the text between two Labels, and put them into an HBox and return the HBox.
Now you have a problem since createContents() is expecting a Label so that it can mess with its font. But you want to return an HBox instead. This means you have to refactor createContents() in order to change things that should just be the responsibility of createOutputLabel().
The EventHandler in the Button is Just a Trigger to call setGreeting()
Even though the code in setGreeting() is just one line, now the action in the EventHandler has a name, “Set Greeting” which makes it easier to read the intent of the EventHandler at a glance.
Binding
The last thing to note about this code are these two lines:
results.textProperty().bind(greeting);
and:
textField.textProperty().bindBidirectional(name);
What are these two functions bind() and bindBidirectional()?
One of the key components of JavaFX is a library of classes that are called “Observable”. These are all wrapper classes that hold particular kinds of values and notify other objects when their contents change.
The main types of observable classes are called Properties. There are different types of Properties for different types of content. In this example we have used StringProperty, which is an Observable wrapper around a String value.
One of the key ways to use this observability is with something called Binding. Binding allows you to link two Properties together, so that when one changes, the other will change too. This can be in one direction, or bidirectional.
Both Label and TextField have an internal property called Text. This holds the contents of the Node, and whatever is in this property will be displayed on the screen. Label is output only, so we’ve bound its Text Property to our greeting Property, while TextField allows user input, so we’ve connected it to name bidirectionally.
Binding is the critical component that allows us to decouple all of the elements of our layout and create a data representation of the “State” of our GUI. It’s really the only way that you should be updating any non-static Nodes in your layout. Get comfortable with Binding, because you are going to be using it a lot.