What You’ll Learn
- The structure of cascading style sheet
- How to implement a cascading style sheet
- How to define a custom class selector
- How to define some attributes in a style sheet
- How to implement a style sheet in an application
- How to attach styling to a JavaFX Node
- The importance of DRY (Don’t Repeat Yourself)
What is a Stylesheet in JavaFX?
Style sheets in JavaFX fill much the same purpose that they do in web design. The allow you to specify the styling of various Nodes of a GUI in a self-contained element outside of your code.
The Code So Far
Let’s review how far we’ve come with our sample application. We have a screen with a TextField for user input and a Button to trigger an action which will update our output.
public class Main extends Application {

    public static void main(String[] args) {
        launch(args);
    }

    private final StringProperty greeting = new SimpleStringProperty("");
    private final StringProperty name = new SimpleStringProperty("");

    @Override
    public void start(Stage primaryStage) {
        Scene scene = new Scene(createContent(), 400, 200);
        primaryStage.setScene(scene);
        primaryStage.show();
    }

    private Region createContent() {
        VBox results = new VBox(20, createInputRow(), createOutputLabel(), createGreetingButton());
        results.setAlignment(Pos.CENTER);
        return results;
    }

    private Node createGreetingButton() {
        Button results = new Button("Hello");
        results.setOnAction(evt -> setGreeting());
        return results;
    }

    private Node createInputRow() {
        TextField textField = new TextField("");
        textField.textProperty().bindBidirectional(name);
        HBox hBox = new HBox(6, new Label("Name:"), textField);
        hBox.setAlignment(Pos.CENTER);
        return hBox;
    }

    private Node createOutputLabel() {
        Label results = new Label("");
        results.textProperty().bind(greeting);
        return results;
    }

    private void setGreeting() {
        greeting.set("Hello " + name.get());
    }
}
Now we are going add some styling to our screen using a cascading stylesheet.
The Structure of the Stylesheet
A stylesheet is just a text file with a particular structure:
.root {
  colour1 : value;
  colour2 : value;
}

.classSelector1 {
  -fx-attributeA: value;
  -fx-attributeB: value;
}

.classSelector1 {
  -fx-attributeA: value;
  -fx-attributeC: value;
}
The lines that start with a “.”, like “.root” and “.classSelector1” are called “selectors”. More specifically, they are called “Class Selectors”. There are other kinds of selectors, but for now we are going to stick to just Class Selectors as they do everything we need.
The “.root” class selector is special. It’s invoked whenever the stylesheet is applied, and is usually used to define colours that are used throughout the stylesheet, in much the same way that you’d assign static values to constants in a Java class.
For any given Selector, you can assign values to various JavaFX “attributes”. These are things like border colours, border widths, opacity, alignments and so on. Specific attributes might not apply to certain Node types. For instance there’s no point trying to assign a font to a Circle, since it doesn’t have any text.
Also, each attribute will have a different kind of data that it can be set to. Some attributes take colour values, some take pixel values, some take decimal values, some take something else. Some attributes can have fairly complicated values assigned to them. We’ll look at those much later.
If you are curious, there’s a web page with a reference guide to JavaFX CSS.
Loading a Stylesheet
As previously noted, a stylesheet is just a file, and it’s treated as a resource in Java. So you put it in the “resources” folder in the “main” section of your project and access it through Class.getResource().
Virtually all Nodes in JavaFX can have a stylesheet added to them. In order to work, though, the Node that you attach your stylesheet to has to be the “root” of the Scene. We’ll see how this work in our example.
Here’s our stylesheet:
.root {
   prompt-colour: #a04000;
   greeting-colour: #6000b0;
}

.greeting-label {
   -fx-text-fill: greeting-colour;
   -fx-font-size: 32px;
}

.prompt-label {
   -fx-text-fill: prompt-colour;
   -fx-font-size: 16px;
   -fx-font-weight: bold;
}
We’ve defined two custom colours in “.root”. One called “prompt-colour”, which is a dark orange, and another called “greeting-colour” which is purple. Then we’ve created two Class Selectors, one called “.greeting-label” and the other called “.prompt-label”. Each one assigns a colour to the text, and a size for the text. In addition, “.prompt-label” also sets the font weight.
It’s usually best to name your Class Selectors in a functional way. In this case, “.greeting-label” is very, very specific and probably not a great name. On the other hand, “.prompt-label” is likely to be used anytime you have a Label + TextField combination, and is a pretty good description of what it does.
Both of these Class Selector names end in “-label” to indicate that they are intended to be used with Labels in the layout. This seems to be a best practice.
Here’s the application, updated to use the stylesheet:
public class Main extends Application {

    public static void main(String[] args) {
        launch(args);
    }

    private final StringProperty greeting = new SimpleStringProperty("");
    private final StringProperty name = new SimpleStringProperty("");

    @Override
    public void start(Stage primaryStage) {
        Scene scene = new Scene(createContents(), 400, 200);
        primaryStage.setScene(scene);
        primaryStage.show();
    }

    private Region createContents() {
        VBox results = new VBox(20, createInputRow(), createOutputLabel(), createButton());
        results.setAlignment(Pos.CENTER);
        results.getStylesheets().add(this.getClass().getResource("/css/beginners.css").toExternalForm());
        return results;
    }

    private Button createButton() {
        Button results = new Button("Hello");
        results.setOnAction(evt -> setGreeting());
        return results;
    }

    private HBox createInputRow() {
        TextField textField = new TextField("");
        textField.textProperty().bindBidirectional(name);
        Label namePrompt = new Label("Name:");
        namePrompt.getStyleClass().add("prompt-label");
        HBox hBox = new HBox(6, namePrompt, textField);
        hBox.setAlignment(Pos.CENTER);
        return hBox;
    }

    private Node createOutputLabel() {
        Label results = new Label("");
        results.getStyleClass().add("greeting-label");
        results.textProperty().bind(greeting);
        return results;
    }

    private void setGreeting() {
        greeting.set("Hello " + name.get());
    }
}
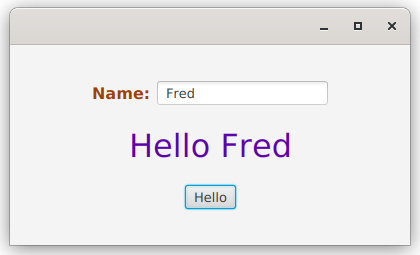
And here’s what it looks like when it’s running:
Only three things have been changed in the code.
First, in createContents() there’s a call to results.getStylesheets() which returns an ObservableList of stylesheets attached to the Node. Then we add our stylesheet to it after fetching it as a resource. Now we have an active stylesheet.
Next, in createInputRow() we’ve done two things. First, we’ve instantiated our prompt Label as a variable, instead of inside the constructor of the HBox. This lets us call its getStyleClass() method. This also returns an ObservableList, and we can add a Class Selector from our stylesheet to it. The Class Selector is added here without the “.” prefix - that’s just the way you do it. So here we assign it the “prompt-label” class selector.
Finally, we add the “greeting-label” class selector to the label returned from createOutputLabel() method.
One Last Thing
Did you notice that in order to add styling to namePrompt we had to instantiate it separately so that we could then call its getStyleClass() method?
This is an aspect of JavaFX which can get a bit frustrating. There’s a lot of boilerplate code you need to use to do some fairly simple and common things. None of it is very difficult, but it can clutter up your code pretty quickly. In this case, now we have 3 lines of code where we used to have one. It’s instantly just that little bit harder to read.
The other thing that you might notice is that exactly the same pattern happens in createOutputLabel(). It’s a different Class Selector, but the same basic operation is happening. This violates the principle of “Don’t Repeat Yourself” (DRY).
With JavaFX, one of the best tactics you can use to keep the boilerplate out of your layout code, and to keep it as simple as possible to read is to follow DRY religiously. This is one of the most important concepts to understand.
Let’s look at how you would do it here:
public class Main2 extends Application {

    public static void main(String[] args) {
        launch(args);
    }

    private final StringProperty greeting = new SimpleStringProperty("");
    private final StringProperty name = new SimpleStringProperty("");

    @Override
    public void start(Stage primaryStage) {
        Scene scene = new Scene(createContents(), 400, 200);
        primaryStage.setScene(scene);
        primaryStage.show();
    }

    private Region createContents() {
        VBox results = new VBox(20, createInputRow(), createOutputLabel(), createButton());
        results.setAlignment(Pos.CENTER);
        results.getStylesheets().add(this.getClass().getResource("/css/beginners.css").toExternalForm());
        return results;
    }

    private Button createButton() {
        Button results = new Button("Hello");
        results.setOnAction(evt -> setGreeting());
        return results;
    }

    private HBox createInputRow() {
        TextField textField = new TextField("");
        textField.textProperty().bindBidirectional(name);
        HBox hBox = new HBox(6, styledLabel("Name:", "prompt-label"), textField);
        hBox.setAlignment(Pos.CENTER);
        return hBox;
    }

    private Node createOutputLabel() {
        Label results = styledLabel("", "greeting-label");
        results.textProperty().bind(greeting);
        return results;
    }

    private Label styledLabel(String contents, String classSelector) {
        Label results = new Label(contents);
        results.getStyleClass().add(classSelector);
        return results;
    }

    private void setGreeting() {
        greeting.set("Hello " + name.get());
    }
}
What we’ve used here is the “Builder Pattern”. We’ve created a method called styledLabel() that is a “builder”. It’s a utility method that allows us to create a Label with a particular styling in a single call. It removes the repeated pattern, and allows us to avoid instantiating promptLabel as a variable altogether, so that now it can be called directly as a constructor parameter for the HBox.
This is a very small application with a simple layout, so the repeated pattern and the extra lines of code are not really a big issue here specifically. But this gets out of hand quickly as the size of the application grows, and the difference in code clarity between following DRY or not becomes enormous when an application is even moderately complicated.