What You’ll Learn
- How to pick a suitable scope
- Structure of a State object - the “Model”
- Using builder methods for clarity
- The Single Responsibility Principle
- Returning “generic” objects
- Avoid passing Events between classes
Implementing Create - Selecting Scope
The first feature that we’re going to implement is a minimal “Create” function. While I would really, really like to build a single field version, I can’t think of any way that it would be enough to actually test. So we’re going to use two fields: Account Number and Customer Name.
In this part, we’re going to concentrate on the GUI side of the feature then, in part 7, we’ll look at the business logic and persistence side of the application.
The next question is how “wide” do we make our feature scope? There’s no “right” answer here, but my preference is to make every feature as small as possible. In fact, there’s no such thing as “too small” when it comes to features. But just remember, every feature has to cut through the application from GUI Node right down to the database. So it’s really, really easy to end up with features that are too big.
I like to start with bare-bones functionality. Something that works, but isn’t polished. Then add the error checking, GUI flash and convenience, and things like that as additional features in the next steps. So that’s what we’ll do here.
Our scope is going to be a simple screen, and we’re not going to worry too much about formatting and appearance just yet. For a first cut, this is probably best. Then when we’re happy that the plumbing is good, we can go back and sort things out so that it looks nice, handles errors and checks to make sure that things are good before saving.
The best way to understand this is to look at how it’s done…
The Model
The first step is to build out our Model with the Properties for the data that we’re adding:
public class CustomerModel {

    private final StringProperty accountNumber = new SimpleStringProperty("");
    private final StringProperty customerName = new SimpleStringProperty("");

    public String getAccountNumber() {
        return accountNumber.get();
    }

    public StringProperty accountNumberProperty() {
        return accountNumber;
    }

    public void setAccountNumber(String accountNumber) {
        this.accountNumber.set(accountNumber);
    }

    public String getCustomerName() {
        return customerName.get();
    }

    public StringProperty customerNameProperty() {
        return customerName;
    }

    public void setCustomerName(String customerName) {
        this.customerName.set(customerName);
    }
}
This is just a POJO (Plain Old Java Object) with Properties as fields. Each field is configured as a JavaFX “Bean”, with a getter that delegates to Property.get(), a setter that delegates to Property.set(), and a “Property Getter” that retrieves the actual Property.
In this case, both the account number and customer name fields are StringProperty. Note that the fields are final, which means that their references can never be changed. The contents of the Properties can change - that’s the point of Properties - but once some other class has obtained a reference to one of these Properties it will always be valid.
The ViewBuider
Now, let’s take a look at the ViewBuider, which is, naturally, the most complicated part of this section since we’re concentrating on the GUI:
public class CustomerViewBuilder implements Builder<Region> {

    private final CustomerModel model;
    private final Runnable saveHandler;

    public CustomerViewBuilder(CustomerModel model, Runnable saveHandler) {
        this.model = model;
        this.saveHandler = saveHandler;
    }

    @Override
    public Region build() {
        BorderPane results = new BorderPane();
        results.getStylesheets().add(Objects.requireNonNull(this.getClass().getResource("/css/customer.css")).toExternalForm());
        results.setTop(headingLabel("Customer Information"));
        results.setCenter(createCentre());
        results.setBottom(createButtons());
        return results;
    }

    private Node createCentre() {
        VBox results = new VBox(6, accountBox(), nameBox());
        results.setPadding(new Insets(20));
        return results;
    }

    private Node accountBox() {
        return new HBox(6,promptLabel("Account #:"), boundTextField(model.accountNumberProperty()));
    }

    private Node nameBox() {
        return new HBox(6, promptLabel("Name:"), boundTextField(model.customerNameProperty()));
    }

    private Node createButtons() {
        Button saveButton = new Button("Save");
        saveButton.setOnAction(evt -> saveHandler.run());
        HBox results = new HBox(10, saveButton);
        results.setAlignment(Pos.CENTER_RIGHT);
        return results;
    }

    private Node boundTextField(StringProperty boundProperty) {
        TextField textField = new TextField();
        textField.textProperty().bindBidirectional(boundProperty);
        return textField;
    }

    private Node promptLabel(String contents) {
        return styledLabel(contents, "prompt-label");
    }

    private Node headingLabel(String contents) {
        return styledLabel(contents, "heading-label");
    }

    private Node styledLabel(String contents, String styleClass) {
        Label label = new Label(contents);
        label.getStyleClass().add(styleClass);
        return label;
    }
}
In the constructor, we’ve added a new parameter, a Runnable called saveHandler.
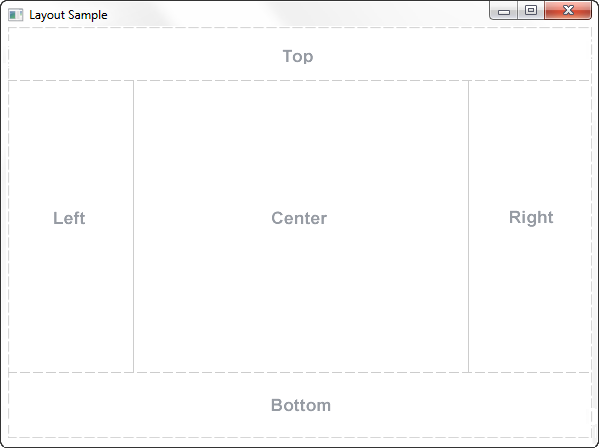
Next, we’ve changed our layout class from VBox to BorderPane. BorderPane is a great general-purpose layout class for screens like this. It’s divided up like so:

You can put a single Node into any of these areas. If you want to put more than one thing into an area, then you have to put it into a wrapper layout class, which can be anything you like, including another BorderPane. In our case, for Center and Bottom, we’ve used VBox and HBox respectively.
The build() method code is very simple. Instantiate a BorderPane then call some builder methods to populate Top, Bottom and Center.
Top
In Top we’ve put a heading, which is just a styled Label. Let’s take a look at how this is done:
There are two private methods that return Labels that are called from the layout code. These are named promptLabel() and headingLabel(). Both of these methods delegate to a single method called styledLabel().
What’s with this?
As we’ve seen before, we’re following DRY by putting the styling code for Label into a builder method so that we’re not repeating a pattern in our layout code. In my opinion, making a call to promptLabel() is a little bit easier to read in the layout code than calling styledLabel("some text", "prompt-label"). There also the argument that repeatedly calling styledLabel() with the same styleClass value is a violation of DRY. Think of how much refactoring you would need if you decided to change the css selector from “prompt-label” to something else.
Bottom
The Bottom is populated with an HBox containing a single Button, and the HBox is aligned CENTER_RIGHT. This tucks the Button over to the very right side of the screen, which is where people generally expect to find such buttons.
Let’s look at this Button. It’s treated as a simple trigger, and it just invokes the Runnable called saveHandler.
Why do it this way?
It’s best to think of EventHandlers as local values. As local as possible. In this case, we’ve made it extremely local, as a lambda defined in the Button.setOnAction() method call. The reason for this is that EventHandlers are all context defined. There are different classes of EventHandlers for Button actions, for mouse clicks and movement and for keyboard actions, just to name a few. As soon as you start passing EventHandlers around, you start to restrict the context in which those handlers can be used.
In this case, our Button needs to eventually trigger some code in our Interactor (without knowing about the Interactor), so the actual handler needs to be defined by the Controller. If we passed in, say, a Mouse Click EventHandler, then we’d have to monkey around in our ViewBuilder code to deal with mouse clicks, which is totally inappropriate for a Button. So the best way to pass the handler to the ViewBuilder is as some kind of functional interface, like a Runnable or a Consumer. This way, the Controller doesn’t need to know anything about how the handler is actually invoked, and the ViewBuilder doesn’t need to know anything about what the handler does.
Center
Here we just have a VBox containing two HBoxes. Each HBox contains a prompt Label, and a TextField. The TextFields are each bound bidirectionally to the appropriate Property in the Model. Bidirectional binding means that either value can be changed, and the the other value will automatically follow along with it. So if we programmatically change the value in model.customerNameProperty(), then we’ll see the value in the TextField change instantly. And if we type in the TextField, then the Property in the Model will instantly change to the same value.
Return Values of Builder Methods
Notice that all of the private builder methods in this class return Node. This is deliberate. The idea is that all of the code which needs to deal with the inner workings of the Node that it is building - in other words, the code that needs to know specifically what class is being built - belongs in the builder method itself. Once it’s done, then there’s no need for the calling program to know exactly what kind of Node was returned.
It’s possible that the calling method may need to understand that the returned Node has height and width that might need to be manipulated to fit into the layout property. In this case, return a Region instead of a Node.
The other benefit to this is that if the code needs to be refactored later on, and the class of the return Node changes, it won’t require any refactoring of the calling method. This is all about reducing coupling.
Single Responsibility Principle
One of the other key principles that’s been followed with this code is the “Single Responsibility Principle”. It states that any method should only be directly responsible for a single task.
The benefits of this are seen with createCentre(). It’s directly responsible for creating the VBox which holds the content of the centre. Then it delegates the details of the two rows inside it to builder methods. Because the builder methods have clear names, it’s now trivial to look at createCentre() and see exactly what it does, and where to look if you need more information about something.
And that concept flows through the entire structure of this class. You can look at build() and because it’s very small you can see immediately that it creates a BorderPane, and that the heading is in the top and the buttons are in the bottom. Maybe createCentre() could be better named to something like createDataEntry(), or createBody() but it’s usually fairly common that the meat of the screen goes into the centre of a BorderPane.
The Stylesheet
There’s not much to this stylesheet yet. Just some colours and some formatting for our two types of Labels:
.root {
   prompt-colour: #a04000;
   heading-colour: #2090c0;
}

.heading-label {
   -fx-text-fill: heading-colour;
   -fx-font-size: 32px;
}

.prompt-label {
   -fx-text-fill: prompt-colour;
   -fx-font-size: 16px;
   -fx-font-weight: bold;
}
The Controller
The Controller needs to be expanded to define the action handler for save. We’re not going to do much yet, just call a method in the Interactor to handle the actual “Save” function:
public class CustomerController {

    private final Builder<Region> viewBuilder;
    private final CustomerInteractor interactor;

    public CustomerController() {
        CustomerModel model = new CustomerModel();
        interactor = new CustomerInteractor(model);
        viewBuilder = new CustomerViewBuilder(model,interactor::saveCustomer);
    }

    public Region getView() {
        return viewBuilder.build();
    }
}
Notable here is the fact that we’ve added a dependency between the Controller and the Interactor, as the Interactor now has to have a public method called saveCustomer().
The Interactor
While we’re not doing much, and certainly not adding the persistence component just yet, we want to make sure that all of the plumbing that we’re building is working. So the Interactor has to do something. In this case, we’ll just have some console output.
public class CustomerInteractor {
    private CustomerModel model;

    public CustomerInteractor(CustomerModel model) {
        this.model = model;
    }

    public void saveCustomer() {
        System.out.println("Saving account: " + model.getAccountNumber() +
           " Name: " + model.getCustomerName());
    }
}
Now, one thing that you really should make note of is that exactly zero data is sent from the View through the Controller to the Interactor as part of the action. Everything that the Interactor needs is already in the Model from the bidirectional bindings on the two TextFields.
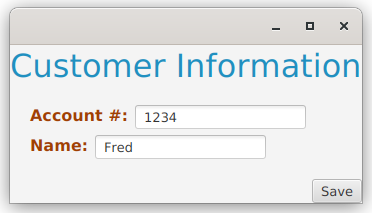
It Runs!
Here it is:

And here’s the console output:
> Task :run
Saving account: 1234 Name: Fred
As expected, it’s not pretty but it does work and contains all of the groundwork to connect the GUI to the business logic. Now we’re ready for the next step…